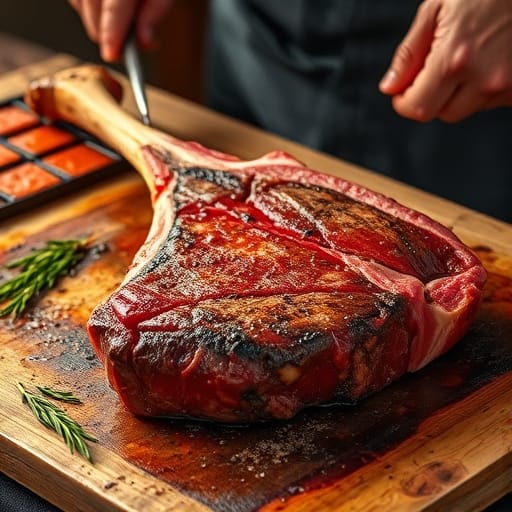
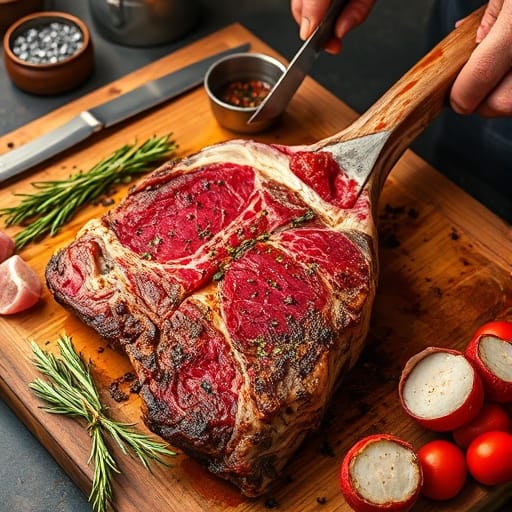
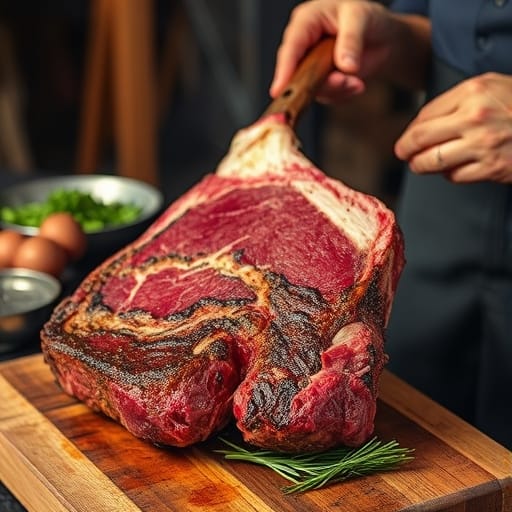
A Tomahawk steak is a culinary masterpiece that never fails to impress. With its dramatic bone-in presentation and rich, succulent flavor, it’s the crown jewel of any steak enthusiast’s repertoire. This recipe takes you through everything you need to know about preparing the perfect Tomahawk steak, from selecting the right cut to mastering the cooking process.
The Tomahawk steak derives its name from its resemblance to the Native American tomahawk axe, with a long bone attached to a ribeye cut. This steak is not only a feast for the taste buds but also a statement piece on the plate. Often associated with high-end steakhouses, it has become a favorite for backyard grilling and celebratory meals due to its dramatic appearance and robust flavor. Its origins can be traced back to traditional butchering techniques aimed at preserving the rib bone for aesthetic and flavor-enhancing purposes.
1 Tomahawk steak (2–3 inches thick, about 2–3 lbs)
Kosher salt (to taste)
Freshly ground black pepper (to taste)
Optional Seasonings
Garlic powder
Smoked paprika
Fresh rosemary sprigs
Unsalted butter (for basting)
4. Cultural History of Ingredients
Beef: Revered for centuries, beef is a symbol of luxury and sustenance in many cultures. The ribeye cut is prized for its marbling and flavor, making it a staple in American steakhouses.
Salt: A universal seasoning, salt enhances the natural flavors of the beef.
Black Pepper: Native to India, black pepper adds a subtle spice that complements the steak’s richness.
5. Equipment You’ll Need
Cast-iron skillet or grill
Meat thermometer
Tongs
Aluminum foil
Basting brush
Sharp knife for carving
6. Step-by-Step Instructions for Tomahawk Steak
Step 1: Preparing the Steak
Remove the Tomahawk steak from the refrigerator and let it come to room temperature for about 1 hour.
Generously season both sides with kosher salt and black pepper. For extra flavor, add garlic powder and smoked paprika.
Step 2: Searing the Steak
Heat a cast-iron skillet over high heat until it’s smoking hot.
Add a tablespoon of oil or butter to the skillet.
Sear the steak for 2–3 minutes on each side, including the edges, to create a golden-brown crust.
Step 3: Cooking to Perfection
Preheat your oven to 375°F (190°C) or prepare your grill for indirect heat.
Transfer the seared steak to the oven or place it on the cooler side of the grill.
Cook until the internal temperature reaches your desired doneness:
Rare: 120°F (49°C)
Medium-rare: 130°F (54°C)
Medium: 140°F (60°C)
Step 4: Resting the Steak
Remove the steak from the heat and tent it with aluminum foil.
Let it rest for 10–15 minutes to allow the juices to redistribute.
Step 5: Carving and Serving
Slice the steak against the grain for maximum tenderness.
Serve with your favorite sides, such as roasted vegetables or mashed potatoes.
7. Suggestions for Serving and Storing
Serving: Pair the steak with red wine, garlic herb butter, or chimichurri sauce.
Storing: Refrigerate leftovers in an airtight container for up to 3 days. Reheat gently to avoid drying out the meat.
8. Chef Simon’s Tips for Tomahawk Steak
Let the steak rest after cooking to retain its juices.
Use a meat thermometer for precise doneness.
Sear the edges to ensure an even crust all around.
9. Emotional and Psychological Impact of Food
Cooking and sharing a Tomahawk steak can evoke feelings of pride, gratitude, and connection. The steak’s grandeur elevates any occasion, turning a meal into a cherished memory.
10. Mindful Cooking Techniques
Focus on the process of seasoning and searing to engage your senses.
Use the time while the steak rests to prepare a simple side dish or reflect on the cooking experience.
11. Tips for Keeping the Recipe Fresh Longer
Wrap leftovers tightly in aluminum foil to prevent oxidation.
Store in the coldest part of the refrigerator and consume within 3 days.
12. Advanced Culinary Terms and Techniques
Maillard Reaction: The chemical process that creates the steak’s flavorful crust.
Reverse Searing: Cooking the steak slowly first, then searing for a perfect finish.
13. Healthy Ingredient Alternatives
Replace butter with olive oil for a lighter basting option.
Serve with a side of grilled vegetables for added nutrients.
14. More Serving Ideas
Top the steak with sautéed mushrooms and onions.
Serve with a fresh arugula salad drizzled with balsamic glaze.
15. Common Issues and Solutions
Dry Steak: Avoid overcooking by using a meat thermometer.
Uneven Cooking: Ensure the steak is at room temperature before cooking.
16. Variations to Try
Smoked Tomahawk: Add wood chips to your grill for a smoky flavor.
Spiced Rub: Use a blend of cumin, chili powder, and cayenne for a bold taste.
17. Nutritional Information and Health Benefits
Calories: ~1200 (per steak)
Protein: 85g
Fat: 90g
Rich in protein and iron, this steak supports muscle repair and energy production.
18. The Art of Pairing Tomahawk Steak
Pair with robust red wines like Cabernet Sauvignon or Malbec.
For non-alcoholic options, try sparkling water with a hint of citrus.
19. Weather and Recipe Outcome
Grill outdoors in warm weather for a perfect BBQ experience.
On colder days, cook indoors using a cast-iron skillet for consistent results.
20. Other Recipes to Explore
Grilled Ribeye
Prime Rib Roast
Garlic Butter Filet Mignon
21. Focus on Tools and Equipment
Invest in a high-quality meat thermometer for accurate cooking.
Use a heavy-duty cast-iron skillet for optimal heat retention.
22. Frequently Asked Questions (with answers)
Q1: Can I cook a Tomahawk steak without a grill? A1: Yes, a cast-iron skillet works perfectly for stovetop searing and oven finishing.
Q2: How do I know when the steak is done? A2: Use a meat thermometer to check the internal temperature.
Conclusion
The Tomahawk steak is more than just a meal; it’s a culinary experience. From its dramatic presentation to its tender, juicy flavor, it’s a dish that will elevate any occasion. By following this recipe, you can create a steakhouse-quality masterpiece in your own kitchen. Whether it’s for a special celebration or a weekend indulgence, this recipe ensures your Tomahawk steak is unforgettable. Enjoy the process, savor the flavors, and share the joy with loved ones!
If you’re craving something sweet, creamy, and absolutely irresistible, these Strawberry Cheesecake Cookies are your answer. The delightful mix of cheesecake-like richness combined with the freshness of strawberries makes these cookies an instant favorite for anyone who tries them. Perfect for any occasion, these cookies bring a unique twist to your typical dessert repertoire, offering the best of both worlds: the comfort of cookies and the indulgence of cheesecake.
Let’s dive into the story behind these cookies and explore the ingredients, technique, and tips to make them your new go-to treat.
Table of Contents
1. The Story Behind Strawberry Cheesecake Cookies
Strawberry cheesecake has long been a favorite dessert, loved for its creamy texture and fruity sweetness. The idea of turning this classic dessert into cookies came from a desire to combine the comfort of homemade cookies with the creamy goodness of cheesecake. By infusing the flavors of cheesecake and strawberries into a cookie dough, bakers discovered a way to offer a bite-sized version of this popular dessert without the need for an entire cheesecake. These cookies quickly gained popularity, becoming a hit at bake sales, family gatherings, and even holiday celebrations.
2. The Benefits of Making Your Own Strawberry Cheesecake Cookies
Making your own cookies means you can control the ingredients and adjust the flavor to your liking. Unlike store-bought cookies, homemade ones are fresh and free from preservatives or artificial ingredients. Additionally, these strawberry cheesecake cookies offer several benefits:
Customization: You can modify the amount of sweetness, use gluten-free flour, or adjust the level of strawberry flavor.
Freshness: Homemade cookies, made from scratch, taste fresher and more flavorful.
Creative Expression: Baking allows you to experiment with new ideas, whether it’s adding a different fruit or changing the texture of the cheesecake filling.
3. Essential Ingredients for the Perfect Strawberry Cheesecake Cookies
To make these strawberry cheesecake cookies, you’ll need a blend of familiar ingredients for a soft, chewy cookie and a creamy cheesecake filling. Here’s what you’ll need:
For the Cookie Dough:
1 ½ cups all-purpose flour
1 teaspoon baking powder
½ teaspoon salt
½ cup unsalted butter (room temperature)
1 cup granulated sugar
1 large egg
1 teaspoon vanilla extract
½ teaspoon strawberry extract (optional, for enhanced flavor)
For the Cheesecake Filling:
8 oz cream cheese (softened)
½ cup powdered sugar
1 teaspoon vanilla extract
¼ cup strawberry jam or fresh mashed strawberries
For Garnishing (optional):
Fresh strawberry slices
Crushed graham crackers (for a cheesecake-like texture)
A sprinkle of powdered sugar
4. Cultural History of Ingredients
Strawberries have been a beloved fruit for centuries, dating back to ancient Rome, where they were used in medicine and as food. Strawberries are a rich source of antioxidants and vitamins, making them a popular fruit in both savory and sweet dishes. The concept of “cheesecake” is believed to have originated in Ancient Greece, with the first written recipe recorded in the 4th century BC. Combining strawberries and cheesecake into a cookie is a modern innovation, combining a classic dessert with the convenience of a cookie.
5. Equipment You’ll Need
To make these cookies, you’ll need a few basic kitchen tools:
Mixing bowls: To prepare both the cookie dough and cheesecake filling.
Electric mixer or hand whisk: Helps to cream the butter and sugar, and mix the cheesecake filling.
Baking sheets: For placing the cookies on during baking.
Parchment paper: To line the baking sheet and prevent sticking.
Ice cream scooper or tablespoon: For evenly portioning out the cookie dough.
Cooling rack: For cooling the cookies once they’ve been baked.
Follow these easy steps to create your own batch of strawberry cheesecake cookies:
Preheat the Oven: Set your oven to 350°F (175°C) and line a baking sheet with parchment paper.
Prepare the Cookie Dough:
In a medium-sized bowl, whisk together the flour, baking powder, and salt.
In a separate large bowl, cream together the butter and sugar using an electric mixer until light and fluffy (about 2-3 minutes).
Add the egg and vanilla extract (and strawberry extract, if using), then beat until combined.
Gradually add the dry ingredients to the wet ingredients, mixing until just combined.
Prepare the Cheesecake Filling:
In a small bowl, combine the softened cream cheese, powdered sugar, and vanilla extract. Beat until smooth and creamy.
Gently fold in the strawberry jam or mashed strawberries to create a swirled effect.
Form the Cookies:
Using a tablespoon or ice cream scooper, scoop out a ball of cookie dough and place it on the prepared baking sheet. Make an indentation in the center of each cookie with your finger.
Spoon a small amount of the cheesecake filling into the center of each cookie.
Gently wrap the edges of the cookie dough around the cheesecake filling to encase it, forming a ball or rounded shape.
Bake the Cookies:
Place the baking sheet in the oven and bake for 12-15 minutes, or until the edges of the cookies are golden and set. The cheesecake filling will remain soft.
Let the cookies cool on the baking sheet for a few minutes before transferring them to a cooling rack.
7. Suggestions for Serving and Storing
Serving: Serve these cookies at room temperature for the best flavor. Pair with a cup of coffee or tea for an afternoon treat, or enjoy them as a special dessert after dinner.
Storing: These cookies can be stored in an airtight container at room temperature for up to 5 days. For longer storage, freeze the cookies for up to 3 months. Be sure to layer the cookies with parchment paper to prevent sticking when freezing.
Don’t overmix the dough: Overmixing can cause the cookies to become tough. Mix the ingredients just until combined for a tender, soft cookie.
Cream cheese temperature: Ensure the cream cheese is softened before using it in the filling. Cold cream cheese can create lumps in the filling.
Test the sweetness: Depending on the sweetness of your strawberries or strawberry jam, you may want to adjust the amount of sugar in the filling.
9. Emotional and Psychological Impact of Food
Baking cookies, especially something as delightful as strawberry cheesecake cookies, has the power to bring comfort and joy. The sweet, fruity flavor of strawberries combined with the creamy cheesecake filling evokes a sense of nostalgia and happiness. Sharing these cookies with loved ones or enjoying them during a quiet moment can have a soothing, uplifting effect, making them a perfect treat for emotional wellness.
10. Mindful Cooking Techniques
When making these strawberry cheesecake cookies, take your time to appreciate the process. Focus on the aroma of the vanilla extract, the smoothness of the cheesecake filling, and the satisfaction of forming each cookie. Cooking mindfully not only improves the quality of your baking but also makes the experience more enjoyable and fulfilling.
11. Tips for Keeping the Recipe Fresh Longer
Keep them sealed: Store cookies in an airtight container to prevent them from drying out.
Use fresh ingredients: Fresh strawberries or homemade strawberry jam will provide the best flavor for these cookies. Avoid using overly processed jams.
Avoid overbaking: Overbaking can cause the cookies to dry out. Bake until just golden around the edges for a chewy, soft texture.
12. Advanced Culinary Terms and Techniques
Creaming: The process of beating butter and sugar together until light and fluffy, which helps incorporate air into the dough and gives the cookies a soft texture.
Folding: A gentle mixing technique used to incorporate delicate ingredients, such as the strawberry jam into the cream cheese mixture, without deflating the batter.
13. Healthy Ingredient Alternatives
Gluten-Free Flour: Use a gluten-free flour blend for a gluten-free version of these cookies.
Low-Sugar: Use a sugar substitute like stevia or monk fruit in place of granulated sugar for a reduced-sugar version.
Vegan Version: Replace the butter with dairy-free margarine and the egg with a flax egg or chia egg for a plant-based alternative.
14. More Serving Ideas
Ice cream sandwich: Serve these cookies with a scoop of vanilla or strawberry ice cream in between for a decadent treat.
Mini Cheesecake Toppers: Top a slice of cheesecake with a strawberry cheesecake cookie for an extra indulgent dessert.
15. Common Issues and Solutions
Cookies are too flat: This can happen if the dough is overmixed or if the butter is too warm. Chill the dough before baking to help prevent spreading.
Cheesecake filling leaks out: Make sure the edges of the cookie dough are sealed properly around the filling to prevent leakage during baking.
16. Variations to Try
Chocolate Strawberry Cheesecake Cookies: Add some mini chocolate chips to the cookie dough for a chocolate-strawberry combination.
Strawberry Lemon Cheesecake Cookies: Add a teaspoon of lemon zest to the cookie dough for a tangy twist that complements the sweetness of the strawberries.
17. Nutritional Information and Health Benefits
These strawberry cheesecake cookies, like many desserts, are indulgent and should be enjoyed in moderation. Here’s a rough estimate of the nutritional information per cookie (based on a batch of 24 cookies):
Calories: 180-220
Fat: 12g
Carbohydrates: 24g
Sugar: 15g
Protein: 2g
While these cookies aren’t a health food, they offer a fun, comforting treat. The ingredients like strawberries provide a source of Vitamin C and antioxidants, and the cream cheese adds some calcium and protein. The key to enjoying these cookies while maintaining a balanced diet is portion control.
18. The Art of Pairing Strawberry Cheesecake Cookies
Pairing your strawberry cheesecake cookies with the right beverage can elevate your experience. Here are a few options:
Coffee: A cup of freshly brewed coffee, particularly a medium roast, balances the sweetness of the cookies with its bitterness.
Tea: A fragrant herbal tea such as chamomile or peppermint offers a light and calming contrast to the richness of the cookies.
Milk: You can never go wrong with a glass of cold milk, especially for those who enjoy the classic cookie and milk combination.
Sparkling Wine: For a more sophisticated pairing, a glass of sparkling wine (like a Prosecco or Champagne) enhances the fruity and creamy elements of the cookies.
19. Weather and Recipe Outcome
The weather can influence the texture and baking time of your cookies:
Hot and Humid Days: If you’re baking on a humid day, the dough may become slightly stickier than usual. Make sure to chill the dough before baking to maintain a manageable consistency.
Cold and Dry Days: On a dry day, the dough may firm up quicker, making it easier to handle. However, be mindful not to overbake the cookies, as they could become too dry. In general, room temperature is ideal for baking these cookies, ensuring that the dough holds its shape and the filling remains creamy.
20. Other Cookie Recipes to Explore
If you love strawberry cheesecake cookies, you might also enjoy these delicious cookie recipes:
Cinnamon Roll Cookies: Soft and warm with a cinnamon-sugar swirl, perfect for breakfast or a cozy treat.
Peanut Butter Cup Cookies: A rich cookie filled with a peanut butter cup for a sweet and salty indulgence.
Lemon Sugar Cookies: Light, citrusy, and tangy, these cookies offer a refreshing burst of flavor.
Snickerdoodle Cookies: Soft, chewy, and coated in cinnamon sugar, these cookies are a classic favorite.
21. Focus on Tools and Equipment
When making strawberry cheesecake cookies, using the right tools can make the process easier and more enjoyable:
Stand Mixer or Hand Mixer: Helps to easily cream the butter and sugar and mix the dough without any hassle.
Parchment Paper: Essential for non-stick baking. Lining your baking sheet with parchment paper makes clean-up easier and prevents the cookies from sticking.
Cookie Scooper: An ice cream scooper or a cookie scoop ensures that your cookies are uniformly sized for even baking.
Cooling Rack: Allows the cookies to cool evenly and prevents them from getting soggy on the bottom.
22. Frequently Asked Questions (with Answers)
Q1: Can I use frozen strawberries in this recipe? A1: Yes, you can use frozen strawberries, but be sure to thaw them and drain off any excess moisture to avoid soggy cookies.
Q2: How can I make the cookies less sweet? A2: Reduce the sugar in the cookie dough or use a sugar substitute like stevia to make them less sweet. You can also decrease the amount of strawberry jam or use fresh strawberries instead of jam.
Q3: Can I make these cookies in advance? A3: Yes, you can make the cookie dough ahead of time and refrigerate it for up to 24 hours before baking. This also helps the dough firm up, making it easier to handle.
Q4: How can I make these cookies gluten-free? A4: Substitute the all-purpose flour with a gluten-free flour blend. Make sure to check that your baking powder and other ingredients are gluten-free as well.
Q5: Can I freeze these cookies? A5: Yes, you can freeze these cookies. Allow them to cool completely, then place them in an airtight container or freezer bag. They will last up to 3 months in the freezer.
Conclusion
Strawberry cheesecake cookies are a fun and flavorful twist on a classic dessert, blending the creamy goodness of cheesecake with the sweet, fresh flavor of strawberries and the satisfying crunch of a cookie. Whether you’re baking for a special occasion or just want a comforting treat, these cookies will not disappoint. The combination of rich cream cheese, juicy strawberries, and soft cookie dough creates a bite-sized version of a cheesecake that’s easy to enjoy anytime.
With simple ingredients and straightforward steps, you can enjoy the deliciousness of these cookies fresh out of the oven, knowing that they’re made with love and care. Whether you’re sharing them with friends or enjoying them solo with a warm beverage, these strawberry cheesecake cookies will quickly become a new favorite in your baking repertoire. Enjoy the sweetness and creaminess in every bite, and savor the satisfaction of creating this indulgent treat in your own kitchen.
Lobster Thermidor is the epitome of indulgence, an iconic French seafood dish characterized by its luxurious creamy sauce, tender lobster meat, and delightful cheese crust. Whether you’re celebrating a special occasion or simply treating yourself, this recipe transforms lobster into a restaurant-worthy masterpiece in the comfort of your kitchen. With its origins steeped in French culinary tradition, Lobster Thermidor showcases the elegance of seafood paired with rich, creamy flavors.
Table of Contents
1. The Story Behind Lobster Thermidor
Lobster Thermidor has an intriguing history that dates back to the late 19th century. Named after a play titled Thermidor, performed at the Comédie-Française in Paris, the dish was created to impress theatergoers. Over time, it became a staple of French haute cuisine, representing sophistication and celebration. The original recipe was characterized by its classic béchamel sauce and a topping of Gruyère cheese, baked to perfection. Lobster Thermidor has since gained international acclaim, gracing the menus of fine dining restaurants across the globe.
2. The Benefits of Making Your Own Lobster Thermidor
Making Lobster Thermidor at home offers several advantages:
Cost-Effective: Lobster Thermidor in a restaurant can be pricey. By preparing it yourself, you enjoy the same luxurious experience at a fraction of the cost.
Customizable: Tailor the dish to your liking, adjusting the seasoning, cheese, or sauce consistency to suit your preferences.
Fresh Ingredients: Homemade ensures you use the freshest lobster and ingredients for an authentic, flavorful experience.
Impressive Presentation: Serving a homemade Lobster Thermidor is sure to wow your guests and elevate your culinary reputation.
3. Essential Ingredients for the Perfect Lobster Thermidor
For this recipe, you will need:
Lobsters: 2 large lobsters (1.5–2 lbs each), cooked and halved.
Butter: 4 tbsp, unsalted.
Shallots: 2, finely chopped.
Garlic: 2 cloves, minced.
Dry White Wine: ½ cup (or chicken broth as a substitute).
Heavy Cream: 1 cup.
Dijon Mustard: 1 tbsp.
Gruyère Cheese: 1 cup, grated.
Parsley: 2 tbsp, freshly chopped.
Paprika: 1 tsp.
Salt and Pepper: To taste.
4. Cultural History of Ingredients
Lobster: Historically, lobster was considered a food for the poor until the 19th century, when it became a symbol of luxury and fine dining.
Gruyère Cheese: Originating from Switzerland, Gruyère adds a nutty, creamy flavor, perfect for Lobster Thermidor.
Dijon Mustard: A French classic, it provides a slight tang and depth to the dish’s rich sauce.
Dry White Wine: Integral to many French recipes, wine enhances the sauce with acidity and balance.
Fresh Lobster: Opt for live lobsters for the best flavor and texture.
Cheese Variation: Swap Gruyère for Parmesan or Comté for a unique twist.
Wine Substitute: Use chicken broth or a splash of lemon juice if wine is unavailable.
9. Emotional and Psychological Impact of Food
Lobster Thermidor exudes luxury, making it a dish often associated with special moments. Preparing and enjoying it can evoke feelings of indulgence and accomplishment, creating memorable dining experiences.
10. Mindful Cooking Techniques
Focus on each step, from boiling the lobsters to crafting the sauce, as an opportunity to connect with the culinary process.
Engage your senses—observe the vibrant colors, inhale the aromatic flavors, and savor the creamy richness of the final dish.
11. Tips for Keeping the Recipe Fresh Longer
Store unused lobster meat in a vacuum-sealed bag or airtight container.
Freeze lobster shells for future seafood stock, enhancing other recipes.
12. Advanced Culinary Terms and Techniques
Reduction: Simmering the white wine to intensify its flavor.
Gratin: A French technique of topping a dish with cheese or breadcrumbs, then broiling for a golden crust.
13. Healthy Ingredient Alternatives
Use low-fat cream to reduce calories.
Replace butter with olive oil for a heart-healthy option.
14. More Serving Ideas
Serve alongside risotto for a more filling meal.
Pair with a glass of chilled Chardonnay or sparkling water with lemon.
15. Common Issues and Solutions
Sauce Splitting: Whisk continuously to prevent cream from curdling.
Overcooked Lobster: Cook lobsters just until the shell turns bright red to maintain tender meat.
16. Variations to Try
Spicy Lobster Thermidor: Add cayenne pepper or chili flakes for heat.
Herbaceous Twist: Mix in fresh tarragon or dill for an aromatic flavor.
17. Nutritional Information and Health Benefits
Calories: ~450 per serving.
Protein: Lobster is an excellent lean protein source.
Omega-3 Fatty Acids: Promotes heart and brain health.
18. The Art of Pairing Lobster Thermidor
Pair with buttery mashed potatoes, crusty French bread, or crisp asparagus. A chilled white wine, such as Sauvignon Blanc or Chablis, complements the dish beautifully.
19. Weather and Recipe Outcome
Lobster Thermidor is ideal for colder months, providing a warm and comforting meal. However, its light yet indulgent nature makes it suitable for summer celebrations as well.
20. Other Seafood Recipes to Explore
Garlic Butter Shrimp Scampi
Crab-Stuffed Mushrooms
Baked Salmon with Dill Sauce
21. Focus on Tools and Equipment
Invest in a quality seafood cracker for effortless shell cracking.
Use ramekins for individual servings, adding a touch of elegance.
22. Frequently Asked Questions (with answers)
Q: Can I make Lobster Thermidor ahead of time? A: Yes, prepare the sauce and lobster meat in advance. Assemble just before baking for the freshest results.
Q: Can I use frozen lobster? A: Absolutely. Thaw frozen lobster thoroughly before cooking.
Conclusion
Creamy Lobster Thermidor is a timeless recipe that captures the essence of French sophistication. Perfect for special occasions or as a personal indulgence, this dish showcases the natural sweetness of lobster paired with a rich, velvety sauce and a golden cheese crust. With this detailed guide, you’ll master the art of Lobster Thermidor and impress your loved ones with a culinary masterpiece.
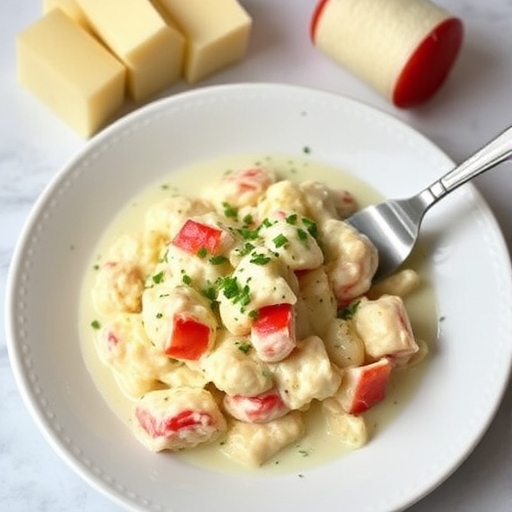
This meatloaf recipe is designed to be a delicious, comforting dish for those avoiding pork and wine in their meals. Packed with flavor, tender, and moist, this recipe offers the perfect balance of taste and texture. Whether you’re preparing a weeknight dinner or a hearty dish for family gatherings
Table of Contents
The Story Behind Meatloaf
Meatloaf has its roots in European cuisine, dating back to ancient Rome, where ground meat was combined with bread and spices. Over centuries, it evolved, and in America, it became a symbol of comfort food during the Great Depression when families stretched their budgets with creative cooking. This modern version continues the tradition, adapting to dietary preferences while keeping its classic essence intact.
Ground Meat: 2 lbs ground beef, turkey, or chicken.
Breadcrumbs: 1 cup, to bind and add structure.
Eggs: 2 large, for binding.
Milk: ½ cup (or non-dairy alternative for lactose intolerance).
Onion: 1 small, finely chopped.
Garlic: 2 cloves, minced.
Ketchup: 2 tbsp for the mixture and additional for the glaze.
Worcestershire Sauce: 1 tbsp (ensure it is alcohol-free).
Seasonings: 1 tsp salt, ½ tsp black pepper, ½ tsp paprika, 1 tsp dried parsley, ½ tsp dried thyme.
For the Glaze
¼ cup ketchup
1 tbsp mustard
1 tbsp brown sugar
Cultural History of Ingredients
Ground Meat: A staple in many cuisines, symbolizing versatility and resourcefulness.
Breadcrumbs: Used for centuries as a binder in recipes worldwide.
Ketchup: Originated in Asia as a fish sauce and evolved into the sweet tomato-based condiment we know today.
Worcestershire Sauce: Created in England, it adds depth to recipes with its complex umami flavor.
Equipment You’ll Need
Large mixing bowl
Measuring cups and spoons
Loaf pan or baking sheet
Spatula
Meat thermometer
Knife and cutting board
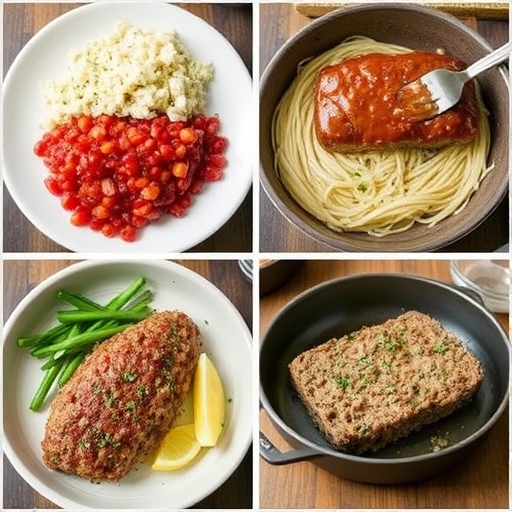
Step-by-Step Instructions for Meatloaf
Preheat Oven: Preheat your oven to 375°F (190°C). Grease a loaf pan or line a baking sheet with parchment paper.
Prepare the Mixture: In a large bowl, combine ground meat, breadcrumbs, eggs, milk, onion, garlic, ketchup, Worcestershire sauce, and seasonings. Mix gently until just combined.
Shape the Meatloaf: Transfer the mixture to your prepared pan or baking sheet, shaping it into a loaf.
Make the Glaze: Mix ketchup, mustard, and brown sugar in a small bowl. Spread this evenly over the top of the meatloaf.
Bake: Bake for 50-60 minutes, or until the internal temperature reaches 160°F (71°C).
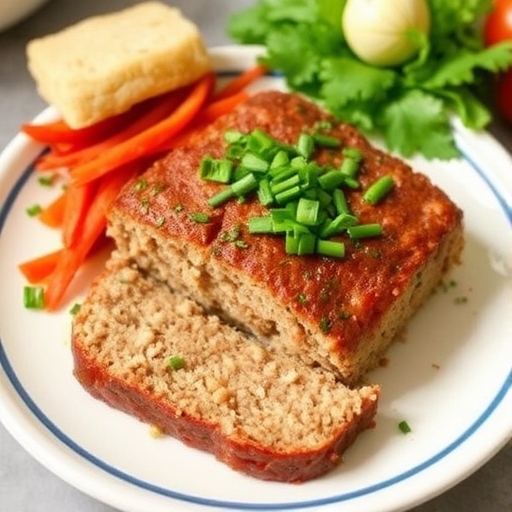
Rest: Let the meatloaf rest for 10 minutes before slicing to retain its juices.
Suggestions for Serving and Storing
Serve With: Mashed potatoes, roasted vegetables, or a fresh side salad.
Store: Wrap slices tightly in foil or store in an airtight container for up to 3 days in the refrigerator.
Chef Simon’s Tips for Meatloaf
Avoid overmixing the ingredients to keep the meatloaf tender.
Use a meat thermometer to ensure perfect doneness.
Add finely chopped vegetables like zucchini or carrots for extra moisture and nutrition.
Emotional and Psychological Impact of Food
Meatloaf evokes feelings of nostalgia and comfort, making it a perfect dish to share with loved ones. The act of preparing and serving this dish creates a sense of community and warmth, especially when enjoyed together at the dinner table.
Mindful Cooking Techniques
Focus on the process: Chop ingredients mindfully and enjoy the tactile experience of mixing.
Appreciate the aromas and textures as the meatloaf bakes, bringing mindfulness to the cooking process.
Tips for Keeping the Recipe Fresh Longer
Freeze It: Wrap the uncooked loaf tightly and freeze for up to 3 months.
Reheat Properly: Cover slices with foil and bake at 350°F (175°C) until warmed through.
Advanced Culinary Terms and Techniques
Mirepoix: Use a finely chopped mix of onions, carrots, and celery for added depth.
Deglaze: (Optional) Use a splash of broth to scrape up browned bits for a sauce.
Healthy Ingredient Alternatives
Replace breadcrumbs with oat flour or almond meal for a gluten-free version.
Use ground turkey or chicken for a leaner option.
Substitute milk with unsweetened almond or oat milk.
More Serving Ideas
Serve with gravy or mushroom sauce for a rich, hearty touch.
Slice leftovers for sandwiches or sliders the next day.
Common Issues and Solutions
Dry Meatloaf: Add more liquid ingredients like milk or grated vegetables.
Falls Apart: Ensure proper binding with enough eggs and breadcrumbs.
Undercooked Center: Use a meat thermometer to guarantee even cooking.
Variations to Try
Italian Meatloaf: Add Parmesan cheese and Italian herbs, and top with marinara sauce.
Cheesy Center: Stuff the loaf with mozzarella for a gooey surprise.
BBQ Twist: Use barbecue sauce instead of ketchup for the glaze.
Nutritional Information and Health Benefits
(Per Serving, 6 Servings)
Calories: ~320
Protein: ~25g
Carbs: ~15g
Fat: ~18g
The Art of Pairing Meatloaf
Sides: Mashed sweet potatoes, sautéed green beans, or a tangy coleslaw.
Beverages: Lemonade, iced tea, or sparkling water.
Weather and Recipe Outcome
On cooler days, meatloaf provides warmth and comfort. It’s a perfect choice for cozy evenings, as the oven heat also warms your kitchen.
Other Meat-Based Recipes to Explore
Beef Stroganoff: A creamy, savory delight.
Chicken Meatballs: A versatile addition to pasta or soups.
Turkey Shepherd’s Pie: A healthy spin on a classic dish.
Focus on Tools and Equipment
A high-quality loaf pan ensures even cooking.
A digital meat thermometer prevents over- or under-cooking.
Frequently Asked Questions (FAQs)
1. Can I freeze cooked meatloaf? Yes, slice it and wrap each piece individually before freezing for up to 3 months.
2. Can I make it dairy-free? Substitute milk with a non-dairy option like almond or oat milk.
3. Can I use gluten-free breadcrumbs? Absolutely, they work perfectly without affecting the texture.
4. Can I add vegetables? Yes, grated carrots, zucchini, or bell peppers can be mixed in for added nutrients.
5. How can I make it spicier? Add a pinch of cayenne pepper or diced jalapeños to the mixture.
Conclusion
This pork- and wine-free meatloaf is a versatile, flavorful dish that’s easy to make and perfect for any occasion. With customizable options, mindful cooking techniques, and heartwarming results, it’s a recipe you’ll return to time and time again. Enjoy the simplicity of creating a meal that brings comfort and joy to your table!
Fruit gelatine is a colorful and refreshing dessert that’s perfect for a variety of occasions. This easy-to-make treat combines the natural flavors of fresh fruit with the smooth, wobbly texture of gelatine. It’s an excellent choice for warm weather, light dessert options, or a fun, customizable dish for kids and adults alike. You can make this dessert as simple or as intricate as you wish, adding your favorite fruits or even layering flavors for a visually stunning result.
Gelatine-based desserts, known for their gelatinous, bouncy texture, have been a popular dish for centuries. Originally derived from animal collagen, gelatine has been used in various forms in sweet and savory recipes. Fruit gelatine, in particular, gained popularity in the 20th century, becoming a household favorite thanks to its bright, appealing colors and versatility. Whether served in molded shapes, cups, or layered with other fruits and creams, fruit gelatine is loved for its simplicity and ability to highlight the natural sweetness of fresh fruit.
Making your own fruit gelatine allows you to control the ingredients, ensuring it’s made with fresh, natural flavors and without the artificial additives or excess sugar found in store-bought versions. By using real fruit juices and fresh fruit, you create a healthier alternative that’s rich in vitamins and nutrients, without compromising on taste. Plus, homemade fruit gelatine is easy to customize to suit dietary preferences, from vegan and sugar-free options to adding your favorite fruits and flavors.
Essential Ingredients for the Perfect Fruit Gelatine
Gelatine Powder: The key ingredient to give your gelatine its smooth, wobbly texture. Ensure you use unflavored gelatine.
Fruit Juice: Freshly squeezed juice or store-bought, but opt for 100% fruit juice for a natural flavor.
Sugar: To sweeten the gelatine. You can substitute with honey or another sweetener if preferred.
Fresh Fruit: Sliced or diced fruits like strawberries, mangoes, or kiwi add both flavor and a beautiful visual element to the dish.
Water: To dissolve the gelatine and mix the juices.
Lemon Juice (Optional): A squeeze of fresh lemon juice can brighten up the flavor and balance the sweetness.
Cultural History of Ingredients
Gelatine has roots in ancient civilizations, where it was derived from boiling animal bones and skin. In the modern world, gelatine is usually made from pork or beef collagen. Fruit juices, on the other hand, have been consumed by people for centuries as a natural source of nutrients, vitamins, and hydration. Using gelatine with fruit juice blends two timeless ingredients into a delightful dessert enjoyed worldwide. The use of fruits like berries, citrus, and tropical varieties reflects regional preferences and the availability of fruits throughout the year.
Equipment You’ll Need
Mixing Bowls: For dissolving gelatine and combining fruit juices.
Saucepan: To heat the fruit juice and water mixture.
Molds or Containers: To shape the gelatine once it’s set. You can use silicone molds, individual cups, or a large dish if you prefer a more rustic presentation.
Measuring Cups: For precise measurements of ingredients.
Whisk: To help dissolve the gelatine smoothly.
Knife: To chop fresh fruit into small, bite-sized pieces.
Step-by-Step Instructions for Fruit Gelatine
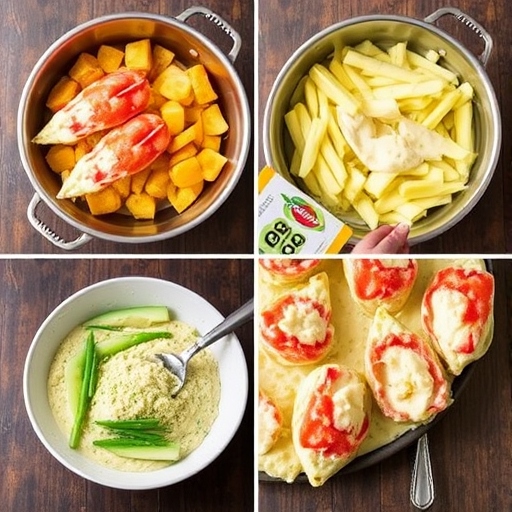
Prepare the Fruit: Begin by slicing your fresh fruit into small pieces. Berries, citrus segments, or tropical fruits like pineapple and mango work wonderfully. Set the fruit aside.
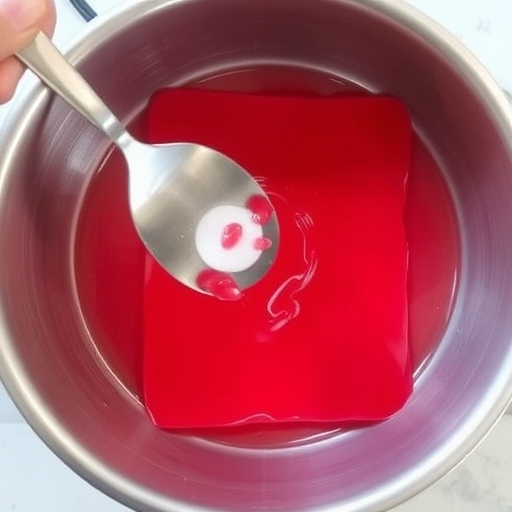
Dissolve the Gelatine: In a small bowl, add 1 tablespoon of gelatine to 1/4 cup of cold water. Let it sit for 5 minutes to bloom (the gelatine will absorb the water and become spongy).
Heat the Juice: In a saucepan, heat 2 cups of fruit juice (like orange, apple, or berry juice) over medium heat. Add sugar to taste, and stir until dissolved.
Combine the Gelatine and Juice: Once the juice is heated, add the bloomed gelatine and stir constantly until it’s completely dissolved. This usually takes 2-3 minutes. Ensure there are no lumps and that the mixture is smooth.
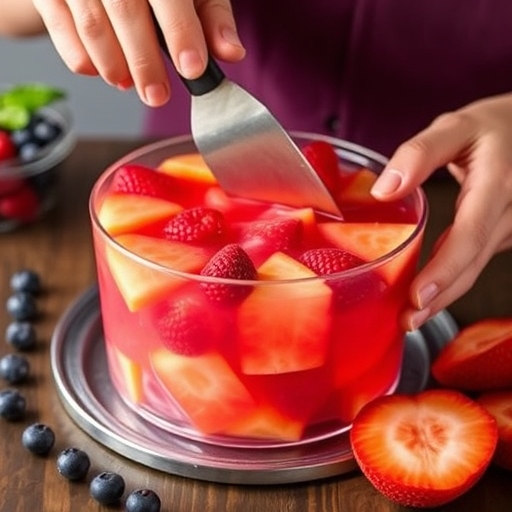
Add Fresh Fruit: Pour the gelatine mixture into molds or a dish of your choice. Add your fresh fruit pieces into the liquid. If you’re using individual molds, drop in the fruit evenly. For a layered effect, pour the gelatine halfway through, add fruit, then pour the remaining gelatine on top.
Chill and Set: Place the molds or dish in the refrigerator. Allow the gelatine to set for at least 4 hours or overnight for the best results.
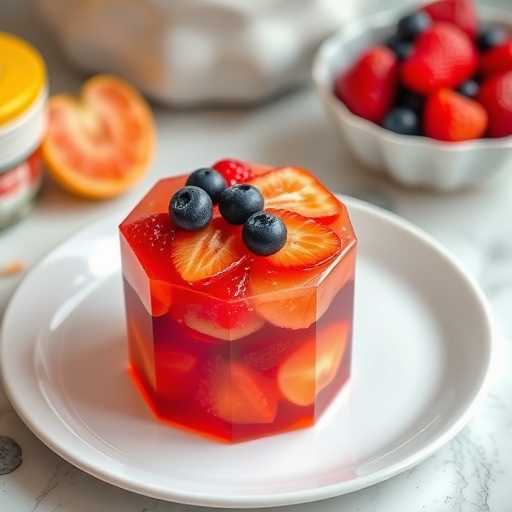
Unmold and Serve: Once the gelatine has set, carefully remove it from the mold. Serve in slices or as individual portions, topped with additional fruit if desired.
Suggestions for Serving and Storing
Serve with Whipped Cream or Yogurt: A dollop of whipped cream or a side of Greek yogurt can add a creamy contrast to the fruity, refreshing gelatine.
Layer with Different Flavors: Experiment with different fruit juices, such as mango, passion fruit, or cranberry, to create colorful and flavorful layers.
Storage: Store leftover fruit gelatine in an airtight container in the fridge for up to 3-4 days. It’s best served cold, making it perfect for summer parties or picnics.
Chef Simon’s Tips for Fruit Gelatine
Don’t Overheat the Juice: When heating the juice, be careful not to boil it as this can affect the flavor and texture of the gelatine.
Use Natural Sweeteners: If you’re aiming for a more health-conscious dessert, try using agave syrup or stevia instead of sugar.
Incorporate Different Fruits: For a more dynamic flavor profile, mix fruits with varying textures. Soft fruits like berries blend well with firmer fruits like apples or pears.
Emotional and Psychological Impact of Food
Fruit gelatine, with its bright colors and refreshing flavors, often evokes feelings of joy and nostalgia. The fun, wobbly texture brings a sense of lightheartedness, often associated with childhood memories of birthday parties or family gatherings. For many, it’s a dessert that can lift spirits and provide a sense of satisfaction without being overly indulgent.
Mindful Cooking Techniques
When making fruit gelatine, approach the process with mindfulness. Take your time to carefully select the fruits that appeal to you, pay attention to the natural sweetness of the juices, and enjoy the sensory experience of making something fresh and delightful. Cooking with intention can elevate the entire experience, making the end result even more rewarding.
Tips for Keeping the Gelatine Fresh Longer
Proper Storage: Keep the gelatine in the fridge in a covered container to maintain its texture.
Avoid Excess Moisture: Don’t allow any liquid to pool on top of the gelatine as it may affect the texture.
Advanced Culinary Terms and Techniques
Blooming Gelatine: The process of letting powdered gelatine absorb liquid before it’s dissolved in hot liquids. This prevents clumping and ensures smooth incorporation.
Molecular Gastronomy: A more advanced technique that involves manipulating gelatine’s properties to create intricate textures, such as foams or spheres, for a more gourmet presentation.
Healthy Ingredient Alternatives
Vegan Gelatine: Use agar-agar, a plant-based alternative, for a vegan version of fruit gelatine.
Sugar-Free Option: Replace sugar with a natural sweetener like stevia or monk fruit for a sugar-free alternative that still tastes delicious.
More Serving Ideas
Fruit Parfaits: Layer fruit gelatine with whipped cream or yogurt for a beautiful and delicious parfait.
Gelatine Popsicles: Pour the gelatine into popsicle molds for a refreshing frozen treat.
Common Issues and Solutions
Gelatine Won’t Set: This could be because the gelatine wasn’t dissolved properly or the mixture wasn’t chilled enough. Be sure to follow the blooming and heating instructions carefully.
Too Sweet or Too Tart: Adjust the sugar or lemon juice to suit your preference. Taste the mixture before setting it to ensure it’s to your liking.
Variations to Try
Tropical Fruit Gelatine: Use pineapple, mango, and coconut juice for a tropical twist.
Layered Gelatine: Create beautiful layers of different fruit flavors to make a visually appealing dessert.
Ginger or Mint: Add grated ginger or fresh mint leaves to infuse a unique flavor into your gelatine.
Nutritional Information and Health Benefits
Fruit gelatine can be a healthier dessert option compared to heavy, calorie-laden sweets. When made with fresh fruit and minimal sugar, it provides a good source of vitamins, hydration, and fiber. Here’s an approximate breakdown per serving (based on 10 servings):
Calories: 80–100 kcal
Fat: 0g
Carbohydrates: 20g
Protein: 2g
Sugar: 15g
Fiber: 2g
Health Benefits:
Gelatine: Contains collagen, which supports skin, joint, and bone health.
Fruit: Fresh fruits are rich in antioxidants, vitamins (such as vitamin C), and fiber, all of which contribute to overall health by supporting the immune system and improving digestion.
The Art of Pairing Fruit Gelatine
Pairing fruit gelatine with complementary flavors and textures can elevate your dessert experience. Here are some suggestions:
Whipped Cream or Greek Yogurt: Creamy textures balance the lightness of the gelatine and add a rich flavor contrast.
Crispy Biscuits or Shortbread: For added crunch, serve fruit gelatine with a side of crispy cookies or shortbread.
Nutty Toppings: Roasted nuts, such as almonds or pistachios, can provide a crunchy, savory element to balance the sweetness of the gelatine.
Fresh Mint or Basil: Fresh herbs can bring a fragrant, refreshing twist to the dish and enhance the fruity flavors.
Weather and Recipe Outcome
Fruit gelatine works wonderfully in warmer weather as it is a cool, refreshing treat. The smooth, wobbly texture combined with the fruity flavors makes it perfect for summer parties, barbecues, and picnics. However, it can also be enjoyed year-round as a light dessert after heavier meals, especially during holidays when fruits like berries and citrus are in season.
Other Gelatine-Based Recipes to Explore
Panna Cotta: A creamy Italian dessert that also uses gelatine for its velvety texture.
Fruit Jellies: A firmer, chewy version of fruit gelatine, which can be served as bite-sized snacks.
Jelly Mousse: A light and airy dessert made with gelatine and whipped cream, offering a delicate texture and fruity flavor.
Focus on Tools and Equipment
Silicone Molds: For easy removal and creative shapes.
Whisk: Essential for dissolving the gelatine without lumps.
Measuring Cups: Precision is key when making gelatine to ensure the right texture and balance of flavors.
Refrigerator: A good, reliable fridge is crucial to properly setting the gelatine.
Frequently Asked Questions
1. Can I use a different type of fruit juice for this recipe? Yes, you can experiment with different fruit juices such as pineapple, cranberry, or apple. Just make sure to use natural juice without added sugars for the best flavor.
2. Can I make this recipe without sugar? Yes, you can use natural sweeteners like stevia, monk fruit, or honey instead of regular sugar.
3. How do I make a vegan version of fruit gelatine? Replace the traditional gelatine with agar-agar, a plant-based alternative, to make this dessert vegan.
4. How long can I store fruit gelatine? Fruit gelatine can be stored in an airtight container in the refrigerator for up to 3-4 days.
5. Can I add other flavors to the gelatine? Absolutely! You can add extracts like vanilla, almond, or coconut to enhance the flavor profile.
Conclusion
Fruit gelatine is a versatile, easy-to-make dessert that can be tailored to your tastes and dietary preferences. Whether you prefer it simple with just fresh fruit and juice, or more elaborate with layers and flavors, it is a crowd-pleaser for every occasion. By following the tips and techniques shared here, you’ll be able to create a delightful dessert that’s as beautiful as it is delicious. The perfect balance of sweet, tart, and refreshing flavors, combined with its fun texture, makes fruit gelatine a timeless favorite. Enjoy experimenting and creating your own signature version of this classic treat!
Introduction Empanadas, beloved worldwide, are hand-held pastries filled with flavorful ingredients ranging from savory meats and cheeses to sweet fruits and custards. Originating from Spain and Latin America, empanadas have become a global favorite for their portability, versatility, and satisfying taste. This recipe focuses on the classic beef empanada, with flaky, golden pastry encasing a rich, spiced filling.
The word “empanada” comes from the Spanish verb empanar, meaning “to wrap in bread.” These delightful pockets were historically created to provide travelers and workers with portable, nourishing meals. While the concept is centuries old, empanadas have evolved to reflect the diverse culinary traditions of the countries where they’re made. From Argentinian empanadas stuffed with olives and eggs to Filipino sweet versions, every bite tells a story.
The Benefits of Making Your Own Empanadas
Customizable Fillings: You can mix and match flavors, from vegetarian options to meaty favorites.
Freshness: Homemade pastry ensures a superior texture and taste.
Budget-Friendly: Making empanadas at home is often cheaper than buying pre-made or restaurant versions.
Freezer-Friendly: Prepare a batch and freeze for quick meals or snacks.
Dough: Similar to pie crusts, empanada dough is designed to be sturdy yet tender, reflecting European pastry traditions.
Beef: A staple protein in many cultures, it brings a rich, hearty flavor to empanadas.
Olives: A nod to Spanish culinary influence, olives add a salty, tangy element.
Spices: Cumin and paprika, commonly used in Latin American cooking, provide warmth and depth.
Equipment You’ll Need
Rolling pin
Pastry cutter or knife
Skillet
Baking sheet
Parchment paper
Fork for crimping
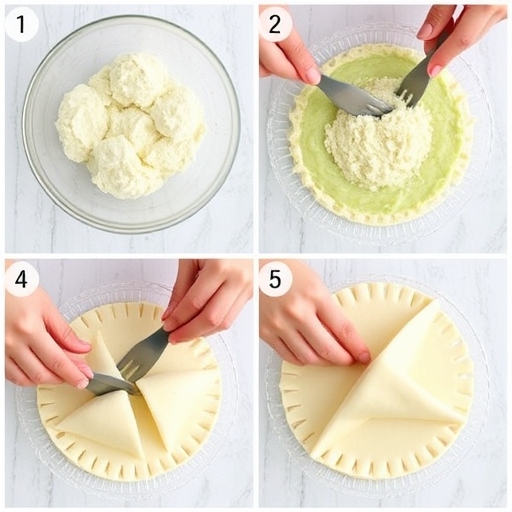
Step-by-Step Instructions for Empanadas
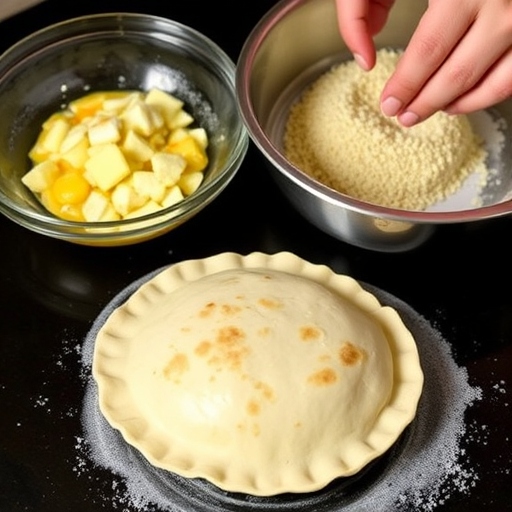
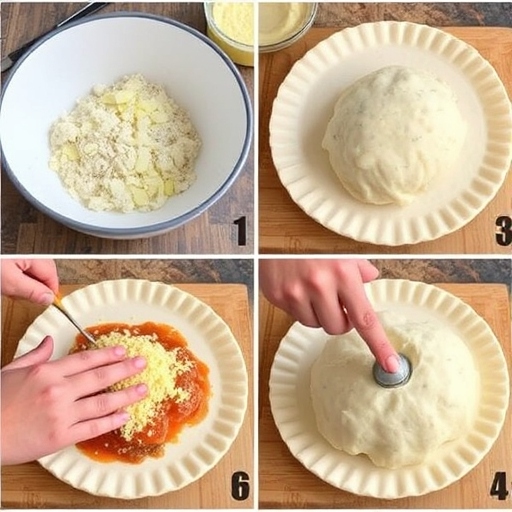
Step 1: Prepare the Dough
Combine flour and salt in a bowl.
Add cold butter and use your fingers or a pastry cutter to blend until the mixture resembles coarse crumbs.
Mix in one beaten egg and cold water, kneading gently until a dough forms. Wrap in plastic wrap and refrigerate for at least 30 minutes.
Step 2: Make the Filling
Heat olive oil in a skillet over medium heat.
Sauté onions and garlic until softened.
Add ground beef, breaking it apart as it cooks. Stir in paprika, cumin, chili powder, and tomato paste.
Once the beef is fully cooked, mix in olives and hard-boiled egg (if using). Season with salt and pepper. Let the filling cool.
Step 3: Assemble the Empanadas
Preheat oven to 375°F (190°C).
Roll out the dough on a floured surface to about ⅛-inch thickness.
Cut out circles using a round cutter (4–5 inches in diameter).
Place a tablespoon of filling in the center of each circle. Fold the dough over to form a half-moon shape.
Crimp the edges with a fork to seal.
Step 4: Bake the Empanadas
Place empanadas on a parchment-lined baking sheet.
Brush with a beaten egg for a golden finish.
Bake for 20–25 minutes, or until golden brown.
Suggestions for Serving and Storing
Serving: Pair with chimichurri sauce, salsa, or a dollop of sour cream.
Storing: Store in an airtight container in the fridge for up to 3 days.
Freezing: Freeze uncooked empanadas and bake them straight from the freezer, adding 5–7 minutes to the baking time.
Chef Simon’s Tips for Empanadas
Use chilled butter and water for a flakier dough.
Avoid overfilling the empanadas to prevent leaks during baking.
Experiment with fillings like shredded chicken, black beans, or cheese for variety.
Emotional and Psychological Impact of Food
Empanadas evoke feelings of comfort and nostalgia, often tied to family gatherings or festive occasions. Preparing and sharing them can strengthen bonds and create lasting memories.
Mindful Cooking Techniques
Focus on the tactile elements of making empanadas, like shaping the dough and crimping the edges. These activities can help you stay present and enjoy the process.
Tips for Keeping the Recipe Fresh Longer
Reheat empanadas in the oven rather than the microwave to maintain their crispness.
Advanced Culinary Terms and Techniques
Blind Baking: Partially baking the dough before filling (optional for extra-crispy empanadas).
Docking: Pricking the dough with a fork to prevent puffing.
Healthy Ingredient Alternatives
Use whole wheat flour for the dough.
Swap beef for turkey or plant-based protein.
Add diced vegetables like zucchini or bell peppers for extra nutrition.
More Serving Ideas
Pair with a light salad for a balanced meal.
Serve as an appetizer alongside other Latin-inspired dishes like guacamole and ceviche.
Common Issues and Solutions
Dry Dough: Add a splash of water if the dough is too dry.
Soggy Bottoms: Ensure the filling is cool and not too moist before assembling.
Variations to Try
Sweet Empanadas: Fill with dulce de leche, apples, or bananas.
Vegetarian Empanadas: Use spinach, feta, and mushrooms.
Seafood Empanadas: Try shrimp or crab with a creamy sauce.
Nutritional Information and Health Benefits
Calories: ~200 per empanada (depending on filling).
Protein: High in protein from beef and eggs.
Iron: Beef and olives contribute to iron intake.
The Art of Pairing Empanadas
Serve with a bold Malbec wine or a refreshing agua fresca to complement the flavors.
Weather and Recipe Outcome
Empanadas are versatile and can be enjoyed year-round. They’re particularly comforting on cold days when served warm with a hearty soup.
Other Empanada Recipes to Explore
Argentinian Beef Empanadas
Chicken and Cheese Empanadas
Filipino Sweet Empanadas
Focus on Tools and Equipment
Invest in a quality pastry cutter and rolling pin for a smooth dough-making process.
Frequently Asked Questions (with answers)
Q: Can I fry the empanadas instead of baking? A: Yes, frying gives them a crispy texture, but it increases the calorie count.
Q: Can I make the dough ahead of time? A: Absolutely! Store it in the fridge for up to 2 days or freeze it for later use.
Q: How do I prevent the empanadas from bursting? A: Avoid overfilling and ensure the edges are sealed tightly.
Conclusion
Empanadas are a testament to the beauty of simple, flavorful cooking. This recipe gives you the tools to create a classic yet adaptable dish that’s perfect for any occasion. Whether you’re serving them at a party, enjoying a cozy night in, or preparing a snack for the week, empanadas are sure to impress. Try this recipe today and enjoy the joy of homemade empanadas!