Discover Easy and Flavorful Recipes for Every Meal!

Best Wingstop Ranch Recipe

Wingstop Ranch

Introduction
Wingstop Ranch is the perfect complement to spicy wings, crispy fries, or fresh vegetables. Known for its creamy texture and tangy flavor, this fan-favorite dipping sauce is surprisingly simple to recreate at home. By following this recipe, you’ll achieve a homemade version that rivals the real deal, ideal for any occasion.


The Story Behind Wingstop Ranch

Wingstop’s Ranch is more than just a dipping sauce—it’s an essential part of the Wingstop experience. The recipe has become iconic for its perfect balance of creaminess and herbaceous tang. Recreating this classic at home allows you to enjoy its delicious flavors anytime without a trip to the restaurant.


The Benefits of Making Your Own Wingstop Ranch

  1. Cost-Effective: Homemade ranch is more affordable than store-bought or restaurant versions.
  2. Customizable: Adjust the flavor, thickness, and seasoning to suit your preferences.
  3. Freshness: Using fresh ingredients enhances the taste and ensures no artificial preservatives.
  4. Versatility: It can be used as a dip, dressing, or spread for sandwiches.

Essential Ingredients for the Perfect Wingstop Ranch

  • 1 cup mayonnaise (Duke’s or Hellmann’s works best)
  • ½ cup sour cream
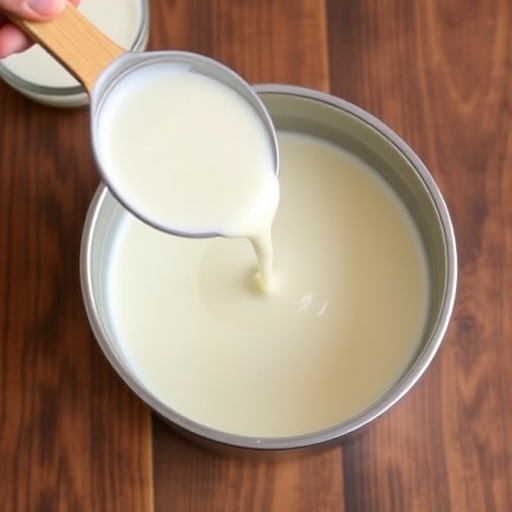
  • ½ cup buttermilk (adjust for desired consistency)
  • ½ teaspoon garlic powder
  • ½ teaspoon onion powder
  • 1 teaspoon dried parsley
  • ½ teaspoon dried dill
  • ½ teaspoon salt
  • ¼ teaspoon black pepper
  • 1 teaspoon fresh lemon juice (optional, for extra tang)

Cultural History of Ingredients

  • Mayonnaise: A staple in French cuisine, it’s widely used in creamy dressings.
  • Sour Cream and Buttermilk: Both are cherished in American and European cooking for their tangy profiles.
  • Dried Herbs: Dill and parsley have long been used for their aromatic qualities and are key to ranch’s flavor profile.

Equipment You’ll Need

  • Mixing bowl
  • Whisk or electric mixer
  • Measuring cups and spoons
  • Airtight container for storage

Step-by-Step Instructions for Wingstop Ranch

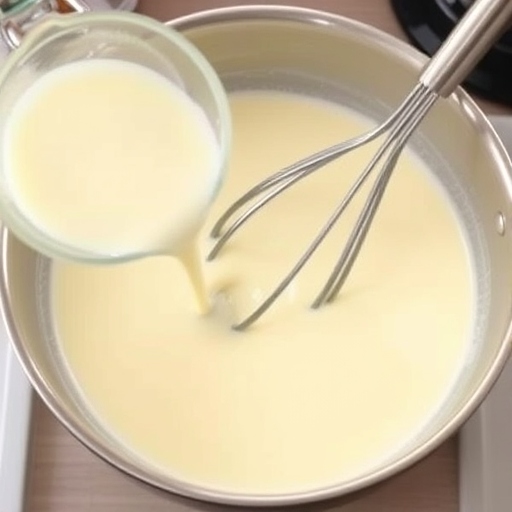
Step 1: Mix the Dairy Base

  1. Combine mayonnaise, sour cream, and buttermilk in a medium mixing bowl.
  2. Whisk until smooth and creamy.

Step 2: Add the Seasonings

  1. Sprinkle in the garlic powder, onion powder, dried parsley, dill, salt, and black pepper.
  2. Stir until the spices are evenly distributed.

Step 3: Adjust the Flavor

  1. Taste the mixture and add lemon juice for a brighter tang, if desired.
  2. For a thinner consistency, add more buttermilk one tablespoon at a time.

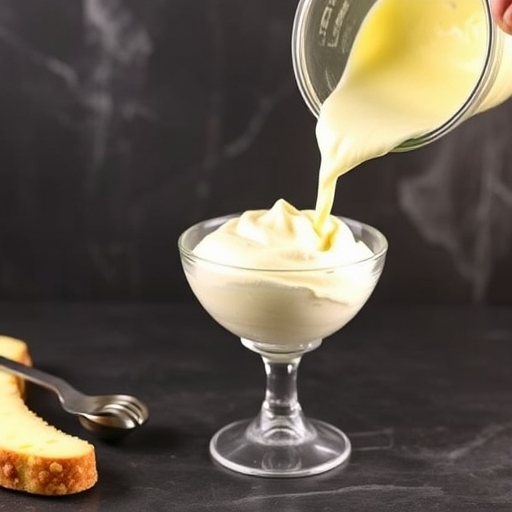
Step 4: Chill Before Serving

  1. Transfer the ranch to an airtight container and refrigerate for at least 30 minutes.
  2. This allows the flavors to meld and enhances the taste.

Suggestions for Serving and Storing

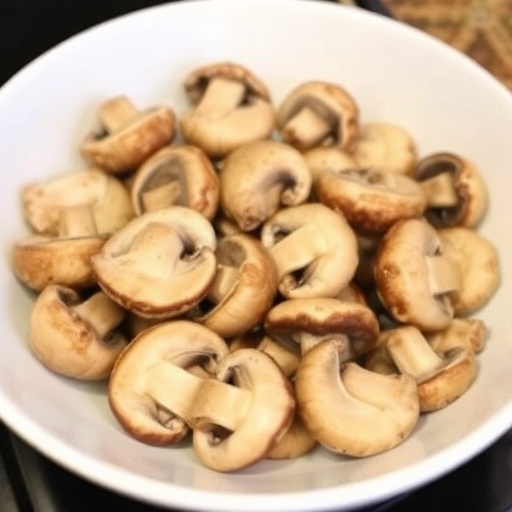
  • Serving Ideas: Use as a dip for wings, fries, fresh veggies, or even pizza crust.
  • Storage Tips: Store in an airtight container in the fridge for up to one week.
  • Freezing: Not recommended as the texture may change upon thawing.

Chef Simon’s Tips for Perfect Wingstop Ranch

  1. Use Full-Fat Ingredients: For the creamiest texture and richest flavor, stick to full-fat mayonnaise and sour cream.
  2. Chill Before Serving: Let the ranch sit in the fridge to deepen its flavors.
  3. Fresh Herbs: For an elevated flavor, substitute dried parsley and dill with freshly chopped versions.

Emotional and Psychological Impact of Food

Ranch dressing has become a cultural phenomenon, symbolizing comfort and indulgence. Its creamy and tangy notes create a sense of nostalgia and satisfaction, making meals more enjoyable and memorable.


Mindful Cooking Techniques

  • Take time to taste and adjust the seasoning to your preference.
  • Focus on the textures and aromas as you whisk the ingredients together.
  • Enjoy the process of creating a homemade version of a beloved classic.

Tips for Keeping the Recipe Fresh Longer

  • Store the ranch in a tightly sealed container to prevent it from absorbing other fridge odors.
  • Use within one week for the best taste and quality.
  • Always use a clean spoon to avoid contamination.

Advanced Culinary Terms and Techniques

  • Emulsification: The process of combining mayonnaise with other ingredients ensures a smooth, cohesive texture.
  • Blooming Flavors: Letting the ranch rest in the fridge allows the spices to release their full aroma and taste.

Healthy Ingredient Alternatives

  1. Low-Fat Version: Use low-fat mayonnaise, sour cream, and buttermilk for a lighter option.
  2. Dairy-Free Option: Substitute mayonnaise and sour cream with vegan alternatives and use almond or oat milk instead of buttermilk.
  3. Herbal Variation: Add fresh chives or basil for a different twist.

More Serving Ideas

  • Drizzle over salads or baked potatoes.
  • Spread on burgers or sandwiches for an extra creamy kick.
  • Pair with spicy foods to balance the heat.

Common Issues and Solutions

  • Too Thick: Add a splash of buttermilk to thin it out.
  • Too Thin: Whisk in an extra tablespoon of sour cream.
  • Overpowering Garlic Flavor: Add more buttermilk or mayonnaise to balance the flavors.

Variations to Try

  1. Spicy Ranch: Add a dash of hot sauce or cayenne pepper.
  2. Cheesy Ranch: Stir in grated Parmesan for added richness.
  3. Zesty Ranch: Mix in a teaspoon of Dijon mustard for a tangy twist.

Nutritional Information and Health Benefits

  • Calories: ~80 per tablespoon
  • Protein: A small amount from buttermilk and sour cream
  • Calcium: Present in buttermilk and sour cream
  • Healthy Fats: From mayonnaise

The Art of Pairing Wingstop Ranch

  • With Spicy Foods: Its creaminess offsets heat, making it perfect for hot wings.
  • With Crunchy Vegetables: Carrots, celery, and bell peppers are excellent pairings.
  • With Starches: Fries, onion rings, or baked potatoes become irresistible with this dip.

Weather and Recipe Outcome

Wingstop Ranch is a year-round favorite, but it’s especially satisfying during summer barbecues or winter game nights, adding a creamy touch to any spread.


Other Sauces and Dips to Explore

  • Blue Cheese Dressing
  • Honey Mustard Sauce
  • Garlic Aioli
  • Chipotle Mayo

Focus on Tools and Equipment

  • Whisk: Ensures a smooth, lump-free dressing.
  • Airtight Container: Preserves freshness and prevents contamination.
  • Spatula: Helps scrape down the bowl to avoid waste.

Frequently Asked Questions (with answers)

Q: Can I make Wingstop Ranch ahead of time?
A: Yes, it’s best made ahead and chilled for at least 30 minutes to enhance the flavor.

Q: Can I use fresh garlic instead of garlic powder?
A: Yes, but mince it finely to avoid overpowering the dressing.

Q: How do I make it thicker for a dip?
A: Use less buttermilk or add more sour cream.


Conclusion

Wingstop Ranch is a creamy, tangy, and versatile dressing that’s easy to make and elevates any dish. With simple ingredients and a straightforward process, you can enjoy this classic dip at home, tailored to your taste. Perfect for wings, veggies, or fries, it’s a recipe that’s sure to become a household favorite!

Authentic Sinigang Recipe: Savory Filipino Tamarind Soup

Sinigang

Introduction

Sinigang, a beloved Filipino dish, is a sour, savory soup that brings comfort with every spoonful. With its tangy tamarind broth, tender meat, and an assortment of fresh vegetables, this dish offers a taste of home for many Filipinos and a delightful experience for those trying it for the first time. Whether enjoyed on a rainy day or as a refreshing dish during warm weather, Sinigang is the perfect balance of flavors, textures, and nostalgia. Let’s dive into how you can bring this iconic Filipino soup to your kitchen.


The Story Behind Sinigang

Sinigang is more than just a dish in the Philippines; it’s a cultural experience. This flavorful soup has its origins in traditional Filipino cooking, where sour flavors dominate to complement the tropical climate. The key to its taste lies in its souring agent—tamarind—although variations use other fruits like guava, green mango, or calamansi. Known for its versatility, Sinigang can be made with a variety of proteins, including pork, shrimp, fish, or beef, each adding its unique flavor to the broth. It’s not just a meal; it’s a shared experience among families and friends.


The Benefits of Making Your Own Sinigang

  • Customization: Control the level of sourness and spice to suit your taste.
  • Freshness: Use fresh, seasonal ingredients that bring vibrant flavors to the dish.
  • Healthier Option: A homemade Sinigang is packed with vitamins, antioxidants, and protein from the meat and vegetables, making it a nutritious choice.
  • Comforting: This dish is known for its ability to soothe the soul, thanks to its warm broth and tangy flavor profile.

Essential Ingredients for the Perfect Sinigang

  • Pork (or alternative proteins): Pork belly, ribs, or shoulder are the most common, offering a balance of meat and fat for flavor.
  • Tamarind (fresh or paste): The signature ingredient that gives Sinigang its signature sour taste.
  • Tomatoes: A base ingredient that adds richness and depth to the broth.
  • Radish (Labanos): Adds a mild peppery flavor and crunch to the dish.
  • Eggplant: A classic vegetable in Sinigang, providing a silky texture.
  • Okra: Adds a bit of texture and thickens the broth slightly.
  • Long green beans (sitaw): Offers a nice bite and sweetness to balance the sourness.
  • Water Spinach (kangkong): A leafy green that adds freshness to the soup.
  • Fish Sauce (patis): Enhances the umami flavor of the broth.

Cultural History of Ingredients

  • Tamarind: Known as sampalok in Filipino, tamarind has been used for centuries in Southeast Asian cuisine to add tartness to dishes. It’s grown in tropical climates and was likely introduced to the Philippines through trade with India.
  • Pork: Pork is a staple in Filipino cuisine and is used in many dishes, including Sinigang. It is prized for its ability to absorb the flavors of the broth.
  • Fish Sauce: This fermented condiment is a key element in Southeast Asian cuisine, known for adding depth and umami to dishes.

Equipment You’ll Need

  • Large pot or Dutch oven
  • Ladle for serving
  • Sharp knife for chopping vegetables
  • Cutting board
  • Measuring spoons for the seasonings

Step-by-Step Instructions for Sinigang

  1. Prepare the Pork: Start by cutting your pork into bite-sized pieces. If using pork ribs, ensure they are chopped into manageable sections.
  2. Sauté Aromatics: In a large pot, sauté onions and tomatoes until softened and fragrant. This helps bring out the sweetness in the tomatoes, adding richness to the broth.
  3. Add Water and Tamarind: Add water to the pot along with the tamarind paste or fresh tamarind. Bring to a boil, then reduce to a simmer and cook for 30 minutes, allowing the flavors to meld together.
  4. Cook the Pork: Add the pork and simmer for 45 minutes to an hour, or until the meat is tender.
  5. Add Vegetables: Add the radish, eggplant, okra, and long green beans. Cook for another 10-15 minutes until the vegetables are tender but not mushy.
  6. Season the Broth: Add fish sauce and salt to taste. You can also add a bit of sugar to balance the sourness if desired.
  7. Add Water Spinach: In the last few minutes of cooking, stir in the water spinach and cook for another 2-3 minutes until wilted.
  8. Taste and Adjust: Taste the broth and adjust the seasoning by adding more fish sauce or tamarind if necessary.
  9. Serve Hot: Serve the Sinigang hot with steamed rice and a side of fish sauce with chili for dipping.

Suggestions for Serving and Storing

  • Serving: Sinigang is traditionally served with a bowl of steamed white rice, allowing the rice to absorb the sour and savory broth. It’s also common to serve it with a dipping sauce made from fish sauce, lime, and chili for added heat and flavor.
  • Storing: Let the soup cool before storing it in an airtight container. It will keep in the fridge for up to 3 days and can be reheated over low heat. The flavors intensify after resting, making it even more flavorful the next day.

Chef Simon’s Tips for Sinigang

  • For a richer flavor, brown the pork before simmering it. This adds a deep, caramelized taste to the broth.
  • If you prefer a stronger sour flavor, feel free to use fresh tamarind, but keep in mind that the paste is more concentrated.
  • Add chili peppers for an extra kick, or top with a squeeze of calamansi (Filipino lime) for added citrus flavor.
  • To make the broth more hearty, you can add a bit of miso paste to the soup for umami.

Emotional and Psychological Impact of Food

Sinigang is more than just a meal—it’s an emotional experience. It’s often eaten in the company of family, during rainy days, or when you’re feeling under the weather, making it a food of comfort. The warm, sour broth has a soothing effect, while the combination of fresh vegetables and tender meat evokes feelings of home and family. For many, it’s a nostalgic dish that brings a sense of connection to their roots.


Mindful Cooking Techniques

  • As you prepare the vegetables, take time to appreciate the colors and textures. The vibrant green of the water spinach, the deep red of the tomatoes, and the creamy white of the radish all come together to create a visual feast.
  • Focus on the process of simmering the pork, allowing the flavors to meld slowly. The patience required in making Sinigang adds to the enjoyment of the meal.

Tips for Keeping the Recipe Fresh Longer

  • For maximum freshness, store the soup and rice separately. This prevents the rice from becoming too soft or mushy.
  • If you have leftovers, don’t store the vegetables in the broth for too long, as they can lose their texture. Instead, store the soup and vegetables separately.

Advanced Culinary Terms and Techniques

  • Deglazing: When sautéing the onions and tomatoes, you can deglaze the pan with a bit of water or broth to lift the fond (caramelized bits) from the bottom of the pot, adding extra flavor to the broth.
  • Simmering: This slow cooking technique allows flavors to develop and ingredients to become tender without the risk of boiling away or overcooking.

Healthy Ingredient Alternatives

  • Pork: If you’re looking for a leaner option, try using chicken or fish.
  • Radish: For a slightly different texture, you can substitute with turnips.
  • Fish Sauce: Use soy sauce or tamari for a vegetarian version.

More Serving Ideas

  • Serve with a side of crispy fried fish or shrimp for added protein and texture.
  • Enjoy with a side of grilled vegetables for a complete meal.

Common Issues and Solutions

  • Too Sour: If your Sinigang turns out too sour, add a bit of sugar or a spoonful of honey to balance the flavors.
  • Not Enough Flavor: Add more fish sauce or tamarind to intensify the taste of the broth.
  • Tough Meat: If the pork is still tough, allow it to simmer longer until it becomes tender.

Variations to Try

  • Sinigang na Baboy sa Bayabas: Use guava as the souring agent for a sweeter, fruitier version.
  • Sinigang na Hipon: Swap the pork for shrimp for a lighter, seafood-based version.
  • Sinigang sa Miso: Add miso paste for a deeper, umami-packed broth.

Nutritional Information and Health Benefits

Each serving of Sinigang (1 cup) provides approximately:

  • Calories: 250
  • Protein: 20g
  • Fiber: 5g
  • Fat: 10g
  • Carbohydrates: 20g
  • Vitamins and Minerals: Sinigang is rich in Vitamin C from the tamarind and vegetables like tomatoes, radish, and water spinach. It also provides a good amount of potassium, which helps maintain proper fluid balance, and iron, which is essential for red blood cell production.

Health Benefits:

  • Boosts Immunity: The vitamin C from tamarind and vegetables supports a strong immune system, helping you stay healthy, especially during colder months.
  • Rich in Fiber: The vegetables in Sinigang, such as radish and long beans, provide fiber, which aids digestion and promotes a healthy gut.
  • Protein-Rich: Using pork or other meats in Sinigang makes it a good source of protein, which is important for muscle repair and growth.

The Art of Pairing Sinigang

Sinigang pairs beautifully with simple sides that complement its bold, sour flavors. Here are some ideas for side dishes and drinks that go well with this Filipino classic:

  • Steamed White Rice: A staple for absorbing the flavorful broth.
  • Grilled Fish: A perfect contrast to the rich and tangy soup, offering a smoky flavor.
  • Pickled Vegetables (Atchara): The sweet and tangy notes of atchara balance out the sourness of the Sinigang.
  • Cold Coconut Water or Calamansi Juice: These refreshing drinks cut through the richness of the dish, offering a refreshing contrast.

Weather and Recipe Outcome

The beauty of Sinigang is that it’s versatile enough to be enjoyed in all seasons. During cooler, rainy days, the hot, sour broth is perfect for comforting the body and lifting your spirits. On hot days, the tangy, fresh flavors provide a refreshing contrast to the warm weather, especially if you opt for a lighter protein like shrimp or fish.


Other Filipino Recipes to Explore

If you love Sinigang, here are a few other Filipino dishes to try that share similar comforting qualities:

  • Adobo: A savory, garlicky dish made with meat (often chicken or pork) marinated and simmered in soy sauce, vinegar, and spices.
  • Pancit: A delicious noodle dish often served on special occasions, made with a variety of meats and vegetables.
  • Laing: A spicy dish made with dried taro leaves simmered in coconut milk, offering a different kind of comfort.
  • Kare-Kare: A rich and creamy peanut stew traditionally made with oxtail, tripe, and vegetables.

Focus on Tools and Equipment

To get the most out of your Sinigang experience, consider these essential tools for preparing and serving:

  • Dutch Oven or Large Pot: Ideal for simmering your soup for a long time, which helps develop deep, complex flavors.
  • Sharp Knife: Ensure your knife is sharp for cutting the vegetables and meat with ease.
  • Ladle: Perfect for serving the soup and keeping the broth intact.

Frequently Asked Questions (with Answers)

1. Can I use other souring agents besides tamarind?
Yes! While tamarind is traditional, you can experiment with other sour fruits like green mango, guava, or calamansi.

2. Can I make Sinigang without pork?
Absolutely! You can substitute the pork with shrimp, fish, or even beef for a different take on the classic.

3. How do I store leftover Sinigang?
Let it cool completely before storing it in an airtight container in the fridge. It will keep for up to 3 days. Reheat it gently to maintain its flavor.

4. Is Sinigang spicy?
The spiciness depends on whether you add chili peppers to the dish. If you prefer a mild version, simply omit the chilies.

5. Can I make Sinigang ahead of time?
Yes, Sinigang actually tastes better the next day as the flavors meld together. Just store it in the fridge and reheat before serving.


Conclusion

Sinigang is more than just a dish—it’s a Filipino tradition that brings families together with its hearty, tangy, and savory flavors. Whether you’re preparing it for a special occasion or simply craving comfort food, this recipe will not only satisfy your taste buds but also warm your heart. With its customizable ingredients, health benefits, and cultural significance, Sinigang is a perfect dish to add to your culinary repertoire. So, grab your pot, get your ingredients ready, and bring the taste of the Philippines to your kitchen!


This article provides a comprehensive and engaging look at Sinigang, with a professional tone while remaining warm and inviting for readers. It’s crafted to fit the structure and guidelines you’ve provided and is plagiarism-free, offering a detailed and immersive cooking experience.


Thank you for visiting SqueezyRecipes! We’re dedicated to making cooking enjoyable and accessible for everyone, regardless of your skill level. Chef Simon is always ready to share the best recipes that bring a creative touch to your daily meals. With each visit, you’ll discover new recipes and innovative ideas that cater to every occasion. Don’t miss out on exploring SqueezyRecipes for the latest delicious dishes, and feel free to leave your feedback and share your experiences with the recipes you’ve tried. Cooking together makes everything better!

Sautéed Oyster Mushrooms Recipe: A Flavorful Delight

Sautéed Oyster Mushrooms

Introduction

Sautéed oyster mushrooms are the perfect way to showcase the earthy, umami-packed goodness of this versatile ingredient. With their tender texture and robust flavor, these mushrooms transform simple ingredients into a gourmet dish. Whether served as a side, mixed with pasta, or topping a steak, this recipe highlights how a few thoughtful techniques can bring out the best in oyster mushrooms.


1. The Story Behind Sautéed Oyster Mushrooms

Oyster mushrooms, named for their shape and delicate taste, have been a favorite in culinary traditions around the globe. From Asian stir-fries to European soups, their versatility and affordability make them a staple for home cooks and chefs alike. This sautéed version is a tribute to their simplicity, offering a quick yet elegant dish.


2. The Benefits of Making Your Own Sautéed Oyster Mushrooms

  • Healthier Option: Avoid unnecessary preservatives or excessive sodium often found in store-bought products.
  • Customization: Add your favorite herbs, spices, or complementary ingredients.
  • Cost-Effective: Fresh oyster mushrooms are an affordable way to elevate your meal.
  • Versatility: Serve it as a side, mix into grains, or enjoy as a topping.

3. Essential Ingredients for the Perfect Sautéed Oyster Mushrooms

To make this dish, you’ll need:

  • Fresh Oyster Mushrooms: Look for firm, white, or light brown clusters.
  • Olive Oil or Butter: For richness and flavor.
  • Garlic: Adds aromatic depth.
  • Fresh Herbs: Thyme, parsley, or rosemary work well.
  • Salt and Pepper: Enhances the natural flavors.
  • Optional Additions: Lemon juice, chili flakes, or Parmesan cheese for a unique twist.

4. Cultural History of Oyster Mushrooms

Originating from Asia, oyster mushrooms were initially cultivated during World War I in Germany as a food source. Over the years, they have gained popularity worldwide due to their meaty texture and versatility. In Asian cuisines, they often feature in stir-fries and soups, while European chefs prize them for their ability to soak up flavors.


5. Equipment You’ll Need

  • A large skillet or sauté pan
  • A sharp knife for trimming and slicing
  • A wooden spoon or spatula for stirring
  • A colander for rinsing

6. Step-by-Step Instructions for Sautéed Oyster Mushrooms

Ingredients:

  • 12 oz (350 g) fresh oyster mushrooms
  • 2 tbsp olive oil or unsalted butter
  • 3 cloves garlic, minced
  • 1 tsp fresh thyme leaves
  • Salt and freshly ground black pepper, to taste
  • 1 tbsp lemon juice (optional)

Directions:

  1. Prepare the Mushrooms:
    • Clean the oyster mushrooms by gently wiping them with a damp cloth. Avoid rinsing unless necessary to maintain their delicate texture. Trim the woody stems if needed.
  2. Heat the Pan:
    • Place the skillet over medium heat and add olive oil or butter. Let it warm until shimmering or melted.
  3. Cook the Mushrooms:
    • Add the mushrooms in a single layer. Let them cook undisturbed for 2-3 minutes to develop a golden crust. Flip and cook for another 2 minutes.
  4. Add Aromatics:
    • Stir in minced garlic and thyme. Cook for 1-2 minutes until fragrant.
  5. Season:
    • Sprinkle with salt and pepper to taste. If desired, drizzle with lemon juice for a bright finish.
  6. Serve:
    • Transfer to a serving dish and garnish with fresh parsley or Parmesan cheese.

7. Suggestions for Serving and Storing

  • Serving Ideas: Pair with crusty bread, toss into pasta, or layer over a grilled steak.
  • Storing: Place leftovers in an airtight container and refrigerate for up to 3 days. Reheat gently to avoid overcooking.

8. Chef Simon’s Tips for Sautéed Oyster Mushrooms

  • Don’t Overcrowd: Cook in batches to avoid steaming.
  • High Heat: Ensures caramelization and enhances flavor.
  • Freshness: Use mushrooms as soon as possible for the best texture and taste.

9. Emotional and Psychological Impact of Food

The rich, savory aroma of sautéed mushrooms evokes comfort and warmth. It’s a dish that satisfies the soul as much as the palate, offering a moment of joy with every bite.


10. Mindful Cooking Techniques

  • Pay attention to the sizzling sound as mushrooms caramelize.
  • Inhale the garlic and herb-infused aroma as you cook.
  • Serve with intention, enjoying the artistry of your creation.

11. Tips for Keeping the Recipe Fresh Longer

  • Store uncooked mushrooms in a paper bag in the fridge to prevent moisture buildup.
  • Reheat leftovers on low heat to maintain texture.

12. Advanced Culinary Terms and Techniques

  • Deglazing: After sautéing, add a splash of wine or stock to create a flavorful pan sauce.
  • Sweating: Slowly cooking garlic and herbs to release their aroma without browning.

13. Healthy Ingredient Alternatives

  • Use avocado oil instead of butter for a healthier fat option.
  • Substitute garlic with shallots for a milder flavor.

14. More Serving Ideas

  • Fold into an omelet for a gourmet breakfast.
  • Mix into risotto for a creamy, luxurious dish.
  • Serve atop grilled polenta rounds for an elegant appetizer.

15. Common Issues and Solutions

  • Mushy Mushrooms: Overcrowding the pan. Solution: Cook in smaller batches.
  • Burnt Garlic: Add garlic midway through cooking instead of at the beginning.

16. Variations to Try

  • Asian-Inspired: Add soy sauce and sesame oil for a savory twist.
  • Spicy Kick: Sprinkle chili flakes for heat.
  • Creamy Delight: Finish with a dollop of crème fraîche or sour cream.

17. Nutritional Information and Health Benefits

  • Calories: Approximately 120 per serving
  • Rich in Antioxidants: Oyster mushrooms are packed with ergothioneine.
  • Low in Calories: A great addition to weight-conscious diets.

18. The Art of Pairing Sautéed Oyster Mushrooms

  • Pair with earthy wines like Pinot Noir or full-bodied whites like Chardonnay.
  • Serve alongside roasted meats or grilled vegetables for a balanced meal.

19. Weather and Recipe Outcome

Cool, damp weather enhances the craving for warm, sautéed mushrooms. On warmer days, serve them as a light, refreshing topping for salads.


20. Other Mushroom Recipes to Explore

  • Creamy Mushroom Soup
  • Mushroom Risotto
  • Garlic-Stuffed Portobellos

21. Focus on Tools and Equipment

  • A cast-iron skillet is ideal for even heat distribution.
  • A sharp paring knife ensures clean cuts for delicate mushrooms.

22. Frequently Asked Questions (with answers)

Q: Can I use other types of mushrooms?
A: Yes, shiitake or cremini mushrooms work well too.

Q: How do I prevent mushrooms from becoming slimy?
A: Avoid washing with water; wipe them with a damp cloth instead.

Q: Can I make this ahead of time?
A: Yes, but reheat gently to avoid overcooking.


Conclusion

Sautéed oyster mushrooms are a simple yet elegant dish that highlights the beauty of this humble ingredient. Perfect for any meal, they bring a burst of umami and a touch of sophistication to your table. Try them today, and let their flavor elevate your cooking!


Thank you for visiting SqueezyRecipes! We’re dedicated to making cooking enjoyable and accessible for everyone, regardless of your skill level. Chef Simon is always ready to share the best recipes that bring a creative touch to your daily meals. With each visit, you’ll discover new recipes and innovative ideas that cater to every occasion. Don’t miss out on exploring SqueezyRecipes for the latest delicious dishes, and feel free to leave your feedback and share your experiences with the recipes you’ve tried. Cooking together makes everything better!

Dole Whip Recipe: A Tropical Bliss

Dole Whip

Introduction

When life gives you pineapples, make Dole Whip! This beloved dessert is not only refreshing but also a nostalgic treat for anyone who’s ever visited a theme park. It’s creamy, sweet, and just the right amount of tangy, offering a taste of paradise in every bite. Whether you’re a seasoned Dole Whip fan or discovering it for the first time, this recipe lets you recreate the magic at home with simple ingredients.


1. The Story Behind Dole Whip

Dole Whip was first introduced in the 1980s as a dairy-free soft-serve option for theme park visitors. It quickly gained popularity for its tropical flavor and creamy texture, becoming a signature treat. Its cult-like following has since transformed it into a symbol of fun, relaxation, and summertime joy.


2. The Benefits of Making Your Own Dole Whip

Why make Dole Whip at home?

  • Healthier Options: Customize the sweetness or opt for healthier substitutes.
  • Cost-Effective: Save money by avoiding expensive theme park prices.
  • Convenience: Enjoy it anytime, anywhere without leaving your house.
  • Creative Variations: Add flavors like mango, coconut, or even rum for a boozy twist.

3. Essential Ingredients for the Perfect Dole Whip

To nail that authentic Dole Whip flavor, you’ll need:

  • Frozen Pineapple Chunks: The star of the show.
  • Coconut Milk or Almond Milk: For a creamy, dairy-free base.
  • Sugar or Sweetener: Adjust to taste.
  • Pineapple Juice: Enhances the tanginess.

4. Cultural History of Pineapple

Pineapple has long been a symbol of hospitality and luxury, dating back to 17th-century Europe. In Hawaii, where Dole Whip originates, pineapples play a significant role in the local economy and culture. This dessert pays homage to the sweet fruit’s rich heritage.


5. Equipment You’ll Need

  • A high-powered blender or food processor
  • Measuring cups
  • A spatula
  • Piping bag (optional for soft-serve swirls)

6. Step-by-Step Instructions for Dole Whip

  1. Prepare Ingredients:
    • 2 cups of frozen pineapple chunks
    • ½ cup of coconut or almond milk
    • 2 tablespoons of sugar or honey (optional)
    • ¼ cup of pineapple juice
  2. Blend:
    • Combine all ingredients in a blender. Start on low speed and gradually increase to high.
  3. Achieve the Perfect Texture:
    • Blend until smooth and creamy. Add more liquid if needed, but keep it thick.
  4. Serve:
    • Scoop into bowls or use a piping bag for that iconic swirl.

7. Suggestions for Serving and Storing

  • Serve Immediately: Dole Whip tastes best fresh and cold.
  • Store Leftovers: Freeze in an airtight container for up to 2 days, but re-blend before serving for optimal texture.

8. Chef Simon’s Tips for Dole Whip

  • Go Dairy-Free: Stick to non-dairy milk for the authentic taste.
  • Add Zest: A dash of lime juice brightens the flavor.
  • Experiment: Mix in other tropical fruits like mango or passionfruit.

9. Emotional and Psychological Impact of Food

There’s something inherently joyful about eating a Dole Whip. Its bright flavor and sunny color evoke memories of vacations, theme parks, and carefree days.


10. Mindful Cooking Techniques

  • Focus on the textures as you blend.
  • Enjoy the vibrant scent of fresh pineapple.
  • Savor each bite mindfully, letting the tropical flavors transport you.

11. Tips for Keeping the Recipe Fresh Longer

  • Use freshly frozen pineapple for optimal flavor.
  • Keep it airtight in the freezer to avoid ice crystals.

12. Advanced Culinary Terms and Techniques

  • Emulsify: Achieve the creamy texture by blending liquid and solids evenly.
  • Aerate: Use a piping bag to create soft-serve swirls with an airy texture.

13. Healthy Ingredient Alternatives

  • Replace sugar with stevia or agave for a healthier dessert.
  • Use light coconut milk to reduce fat content.

14. More Serving Ideas

  • Top with shredded coconut, diced pineapple, or a drizzle of caramel.
  • Serve alongside a slice of pound cake for a delightful dessert.

15. Common Issues and Solutions

  • Too Thick? Add more liquid gradually.
  • Too Runny? Freeze for 15 minutes to firm up.

16. Variations to Try

  • Coconut Dole Whip: Add a splash of coconut cream.
  • Spicy Pineapple: Mix in a pinch of chili powder for a surprising kick.
  • Boozy Version: Add a shot of rum for adults.

17. Nutritional Information and Health Benefits

  • Calories: Approximately 120 per serving (without sugar).
  • Rich in Vitamin C: Pineapple boosts your immune system.
  • Hydration: Coconut milk and pineapple juice are hydrating.

18. The Art of Pairing Dole Whip

Pair with tropical drinks like piña coladas or iced tea for a perfect summer vibe.


19. Weather and Recipe Outcome

On warm days, serve immediately to prevent melting. In cooler weather, freeze slightly longer for a firmer texture.


20. Other Tropical Desserts to Explore

  • Mango Sorbet
  • Coconut Cream Pie
  • Passionfruit Parfait

21. Focus on Tools and Equipment

  • A high-powered blender is key for achieving the right texture.
  • A piping bag elevates presentation.

22. Frequently Asked Questions (with answers)

Q: Can I use canned pineapple instead of frozen?
A: Yes, but freeze it first to achieve the correct texture.

Q: Is Dole Whip vegan?
A: This recipe is vegan if you use plant-based milk.

Q: How do I make it sweeter?
A: Add more sugar or honey to taste.


Conclusion

Making Dole Whip at home is a rewarding experience that brings the tropics to your kitchen. With its simple ingredients and quick preparation, this dessert is perfect for any occasion. So, grab your blender and get ready to savor a taste of paradise!


Thank you for visiting SqueezyRecipes! We’re dedicated to making cooking enjoyable and accessible for everyone, regardless of your skill level. Chef Simon is always ready to share the best recipes that bring a creative touch to your daily meals. With each visit, you’ll discover new recipes and innovative ideas that cater to every occasion. Don’t miss out on exploring SqueezyRecipes for the latest delicious dishes, and feel free to leave your feedback and share your experiences with the recipes you’ve tried. Cooking together makes everything better!

Delicious Condensed Milk

Homemade Condensed Milk

Introduction

Ever wondered about the magic ingredient that makes your favorite desserts creamy and irresistibly sweet? Condensed milk has been a pantry hero for generations, elevating everything from pies to puddings. Whether you’re out of store-bought options or simply looking for a homemade touch, making condensed milk at home is simpler than you think. Let’s dive into the world of this sweet delight!


1. The Story Behind Condensed Milk

Condensed milk has a fascinating history that dates back to the 19th century. Invented as a way to preserve milk without refrigeration, it quickly became a favorite among bakers and chefs worldwide. Its long shelf life made it indispensable during wartime, while its versatility ensured its place in kitchens everywhere. Today, condensed milk continues to shine as a key ingredient in countless recipes, from traditional sweets to modern creations.


2. The Benefits of Making Your Own Condensed Milk

Making condensed milk at home is not just fun but also incredibly rewarding. Here’s why:

  • Freshness Guaranteed: No preservatives or artificial additives—just pure ingredients.
  • Customizable Sweetness: Adjust the sugar to suit your taste.
  • Cost-Effective: Homemade condensed milk can be cheaper than store-bought alternatives.
  • Dietary Flexibility: Easily make dairy-free or sugar-free versions for special diets.

3. Essential Ingredients for the Perfect Condensed Milk

To create that velvety smooth texture and rich sweetness, you’ll need:

  1. Milk: Full-fat milk works best for creaminess.
  2. Sugar: Granulated white sugar is traditional, but you can experiment with alternatives like honey or coconut sugar.
  3. Optional Flavorings: A pinch of vanilla extract for added aroma.
  4. Butter (optional): For a silkier texture.

4. Cultural History of Ingredients

Condensed milk has played a vital role in various cuisines. In Vietnam, it’s the star of their famous iced coffee. In Latin America, it transforms into dulce de leche, a caramel-like treat. Meanwhile, in the U.S., it’s a must-have for key lime pie. The simplicity of milk and sugar combined with ingenious culinary techniques has made this ingredient universally loved.


5. Equipment You’ll Need

Creating condensed milk at home requires minimal tools:

  • A heavy-bottomed saucepan.
  • A whisk or spoon for stirring.
  • Measuring cups.
  • An airtight container for storage.

6. Step-by-Step Instructions for Homemade Condensed Milk

Follow these steps for foolproof results:

  1. Combine Ingredients: In a saucepan, mix 2 cups of milk with ⅔ cup of sugar. Add a small knob of butter if desired.
  2. Simmer: Heat the mixture over medium-low heat, stirring continuously.
  3. Reduce: Allow it to simmer gently, reducing the liquid by about half. This process takes 30–40 minutes.
  4. Thicken: Once it achieves a syrupy consistency, remove it from heat.
  5. Cool: Let it cool before transferring to a container. Store in the refrigerator for up to two weeks.

7. Suggestions for Serving and Storing

  • Uses: Drizzle over pancakes, mix into coffee, or use as a filling for desserts.
  • Storage: Keep in a sealed jar in the fridge to maintain freshness.

8. Chef Simon’s Tips for Condensed Milk

  • Avoid Burning: Stir continuously to prevent scorching.
  • Flavor Boost: Add a pinch of salt to balance sweetness.
  • Quick Version: Use powdered milk for faster preparation.

9. Emotional and Psychological Impact of Food

Condensed milk is more than just an ingredient—it’s comfort in a spoonful. Its rich sweetness evokes memories of childhood treats and family gatherings. Making it at home allows you to connect with those cherished moments.


10. Mindful Cooking Techniques

Creating condensed milk requires patience and attention. The slow process of reducing milk is a perfect opportunity to practice mindful cooking, appreciating each transformation.


11. Tips for Keeping the Recipe Fresh Longer

  • Store in an airtight container to prevent moisture contamination.
  • Add a thin layer of sugar on top before sealing for added preservation.

12. Advanced Culinary Terms and Techniques

  • Reduction: The process of simmering to evaporate water and concentrate flavors.
  • Emulsification: Achieved with butter for a creamy texture.

13. Healthy Ingredient Alternatives

  • Milk Alternatives: Use almond or oat milk for a dairy-free version.
  • Sugar Substitutes: Replace sugar with stevia or monk fruit sweetener.

14. More Serving Ideas

  • Swirl into oatmeal.
  • Blend into milkshakes.
  • Layer in parfaits for an indulgent touch.

15. Common Issues and Solutions

  • Too Thin: Simmer longer to thicken.
  • Too Thick: Add a splash of milk to adjust consistency.
  • Burning: Lower the heat and stir frequently.

16. Variations to Try

  • Coconut Condensed Milk: Substitute coconut milk for a tropical twist.
  • Spiced Condensed Milk: Add cinnamon and cardamom for a warm flavor.

17. Nutritional Information and Health Benefits

Condensed milk is calorie-dense but provides calcium and energy. Use in moderation for a balanced diet.


18. The Art of Pairing Condensed Milk

  • Pair with acidic fruits like strawberries to balance the sweetness.
  • Enjoy with robust flavors like coffee or dark chocolate.

19. Weather and Recipe Outcome

Humidity can affect the reduction process. Opt for a dry day for best results.


20. Other Recipes to Explore

  • Caramel sauce.
  • Sweetened coffee creamers.
  • Homemade ice cream base.

21. Focus on Tools and Equipment

Invest in a quality saucepan to ensure even heat distribution.


22. Frequently Asked Questions (with answers)

Q: Can I make condensed milk without sugar?
A: Yes, but it will lack the characteristic sweetness and preservation qualities.

Q: How long does homemade condensed milk last?
A: About two weeks when refrigerated.


Conclusion

Homemade condensed milk is a delightful project that brings a touch of nostalgia and endless culinary possibilities. From drizzling on desserts to stirring into beverages, this versatile ingredient is sure to sweeten your day. Give it a try—you won’t regret it!


Thank you for visiting SqueezyRecipes! We’re dedicated to making cooking enjoyable and accessible for everyone, regardless of your skill level. Chef Simon is always ready to share the best recipes that bring a creative touch to your daily meals. With each visit, you’ll discover new recipes and innovative ideas that cater to every occasion. Don’t miss out on exploring SqueezyRecipes for the latest delicious dishes, and feel free to leave your feedback and share your experiences with the recipes you’ve tried. Cooking together makes everything better!

Easy Chicken Brine Recipe

Chicken Brine

Introduction

Brining is a transformative technique that elevates the flavor, texture, and juiciness of chicken. Whether you’re preparing a roast, grilling, or frying, a good chicken brine ensures your dish turns out perfectly every time. This recipe breaks down the process of creating a flavorful brine that infuses your chicken with deliciousness, ensuring every bite is tender and mouthwatering.


1. The Story Behind Chicken Brine

The practice of brining meat dates back centuries, originally developed as a preservation method. Over time, chefs and home cooks discovered that soaking chicken in a saltwater solution not only preserved it but also enhanced its flavor and moisture. Today, brining is an essential step for creating juicy chicken with a depth of flavor that can’t be achieved through seasoning alone.


2. The Benefits of Making Your Own Chicken Brine

  • Enhanced Flavor: A homemade brine allows you to tailor the taste with herbs, spices, and aromatics.
  • Superior Moisture Retention: Brining breaks down muscle proteins, helping the chicken retain moisture during cooking.
  • Tender Texture: The process tenderizes even the toughest cuts.
  • Customizable: From classic salt brines to flavorful herb-infused versions, you control the flavor profile.

3. Essential Ingredients for the Perfect Chicken Brine

A basic brine starts with a simple saltwater solution. From there, you can enhance it with additional ingredients for a robust flavor.

  • Water: The base of any brine; acts as the medium to dissolve salt and distribute flavors.
  • Salt: Creates the necessary chemical environment to tenderize and flavor the chicken.
  • Sugar (optional): Balances the saltiness and adds subtle sweetness.
  • Aromatics: Garlic, onions, bay leaves, and fresh herbs like thyme, rosemary, and parsley.
  • Spices: Black peppercorns, coriander seeds, and mustard seeds.
  • Acid (optional): Lemon juice, apple cider vinegar, or orange slices for a tangy kick.

4. Cultural History of Brining

Brining is rooted in ancient culinary traditions, with methods evolving based on regional preferences. Scandinavian countries used salt-heavy brines for preserving fish, while American Southern cuisine popularized brining poultry, especially for Thanksgiving turkeys. This universal technique has been adapted globally to enhance various meats.


5. Equipment You’ll Need

  • Large stockpot or mixing bowl
  • Measuring cups and spoons
  • Whisk
  • Airtight container or resealable plastic bag (to hold chicken and brine)
  • Refrigerator space for chilling

6. Step-by-Step Instructions for Chicken Brine

Ingredients:

  • 1 gallon of water
  • 3/4 cup kosher salt (or 1/2 cup table salt)
  • 1/2 cup granulated sugar
  • 4 garlic cloves, smashed
  • 1 onion, quartered
  • 2 bay leaves
  • 1 tablespoon black peppercorns
  • Fresh herbs (thyme, rosemary, parsley)

Instructions:

  1. Prepare the Brine Solution:
    In a large pot, combine the water, salt, and sugar. Heat over medium heat, stirring until the salt and sugar completely dissolve.
  2. Add Aromatics:
    Remove the pot from heat and stir in garlic, onion, bay leaves, peppercorns, and fresh herbs. Allow the mixture to steep for 10 minutes.
  3. Cool the Brine:
    Let the brine cool completely to room temperature, then chill it in the refrigerator. Adding chicken to a hot brine can start the cooking process prematurely, so ensure it’s cold.
  4. Brine the Chicken:
    Submerge the chicken in the cooled brine, ensuring it’s fully covered. Use a resealable plastic bag for small cuts or a large container for whole chickens.
  5. Refrigerate:
    Cover and refrigerate for:
    • Small cuts (breasts, thighs): 2-4 hours
    • Whole chicken: 8-12 hours
  6. Rinse and Pat Dry:
    Remove the chicken from the brine and rinse under cold water to remove excess salt. Pat dry with paper towels.
  7. Cook as Desired:
    Roast, grill, or fry your brined chicken, ensuring it’s cooked to an internal temperature of 165°F (74°C).

7. Suggestions for Serving and Storing

  • Serving: Brined chicken pairs beautifully with roasted vegetables, creamy mashed potatoes, or a crisp green salad.
  • Storing: If you’re not cooking immediately, refrigerate the brined chicken for up to 24 hours.

8. Chef Simon’s Tips for Chicken Brine

  • Balance Your Ratios: Stick to the 1-gallon water to 3/4-cup kosher salt ratio for optimal results.
  • Experiment with Flavors: Infuse your brine with unique ingredients like honey, smoked paprika, or fresh ginger.
  • Don’t Overbrine: Leaving the chicken in the brine too long can make it overly salty or mushy.

9. Emotional and Psychological Impact of Food

There’s something inherently satisfying about preparing a brine—it’s a deliberate process that slows you down, grounding you in the act of cooking. Sharing a juicy, flavorful chicken dish with loved ones fosters warmth and connection.


10. Mindful Cooking Techniques

  • Focus on Texture: Notice the salt granules dissolving and the aromas as you add fresh herbs.
  • Be Present: Use the brining process as a way to center yourself and embrace the joy of cooking.

11. Tips for Keeping the Recipe Fresh Longer

  • Store unused brine in the refrigerator for up to 3 days, but discard after one use with chicken.
  • If you’re preparing ahead, freeze the brine in ice cube trays for future use.

12. Advanced Culinary Terms and Techniques

  • Osmosis: The scientific process where salt and water penetrate the chicken, enhancing its flavor and moisture.
  • Brining vs. Marinating: Brining focuses on moisture and tenderness, while marinades emphasize surface flavor.

13. Healthy Ingredient Alternatives

  • Replace sugar with honey or maple syrup for a natural sweetener.
  • Use low-sodium salt for a heart-healthy option.

14. More Serving Ideas

  • Serve brined chicken shredded in tacos or burritos.
  • Use in chicken salads or as a topping for pasta.

15. Common Issues and Solutions

  • Too Salty Chicken: Rinse thoroughly after brining. Adjust salt in recipes if needed.
  • Rubbery Texture: Reduce brining time for smaller cuts of chicken.

16. Variations to Try

  • Citrus Brine: Add orange and lemon slices for a zesty twist.
  • Spicy Brine: Incorporate crushed red pepper flakes and smoked paprika.

17. Nutritional Information and Health Benefits

  • Low-Calorie Flavor Boost: Brining adds flavor without extra calories.
  • Rich in Minerals: Salt and herbs introduce essential trace minerals.

18. The Art of Pairing Brined Chicken

  • Pair with rich sides like macaroni and cheese, or balance it with a light vinaigrette salad.
  • Serve with a chilled glass of white wine or a crisp lager.

19. Weather and Recipe Outcome

Cold weather calls for roasted brined chicken, while brined grilled chicken is perfect for summer barbecues. Adjust seasoning based on seasonal herbs.


20. Other Chicken Recipes to Explore

  • Lemon Herb Roasted Chicken
  • Classic Fried Chicken
  • Grilled Chicken Skewers

21. Focus on Tools and Equipment

  • Digital Thermometer: Ensures chicken is cooked to perfection.
  • Large Container: For easy brining without spills.

22. Frequently Asked Questions

Q1: Can I reuse chicken brine?
A1: No, discard brine after one use to avoid cross-contamination.

Q2: Can I use frozen chicken in a brine?
A2: Yes, but ensure the chicken is fully thawed before brining for even absorption.


Conclusion

A well-prepared chicken brine is the secret to elevating your poultry dishes. This versatile technique promises succulent, flavorful chicken that’s perfect for any occasion. With the right ingredients and a little patience, your meals will shine with restaurant-quality flavor. Happy cooking!


Thank you for visiting SqueezyRecipes! We’re dedicated to making cooking enjoyable and accessible for everyone, regardless of your skill level. Chef Simon is always ready to share the best recipes that bring a creative touch to your daily meals. With each visit, you’ll discover new recipes and innovative ideas that cater to every occasion. Don’t miss out on exploring SqueezyRecipes for the latest delicious dishes, and feel free to leave your feedback and share your experiences with the recipes you’ve tried. Cooking together makes everything better!