Discover Easy and Flavorful Recipes for Every Meal!

Delicious Salmon with Cajun Butter Sauce Recipe

Salmon with Cajun Butter Sauce

Introduction

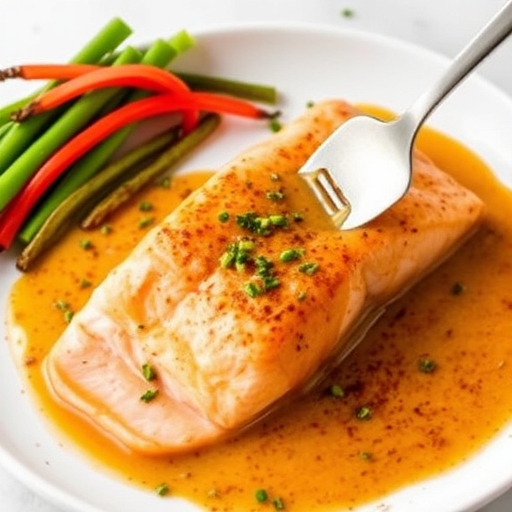
Salmon with Cajun Butter Sauce is the epitome of bold flavors meeting healthy eating. The tender, flaky salmon is seasoned to perfection and paired with a rich, spicy Cajun butter sauce that enhances every bite. This dish is perfect for weeknight dinners or special occasions, offering a restaurant-quality meal right from your kitchen.


1. The Story Behind the Recipe

This recipe was inspired by the vibrant flavors of Louisiana cuisine, known for its hearty and spicy dishes. Cajun spices bring warmth and depth, while the butter sauce adds a luxurious touch. Combining these flavors with nutrient-packed salmon creates a balance of indulgence and wholesomeness.


2. The Benefits of Making Your Own Salmon with Cajun Butter Sauce

  • Customization: Adjust the spice levels to suit your palate.
  • Freshness: You control the ingredients, ensuring premium quality.
  • Healthier Option: Homemade allows you to use less sodium and healthier fats.
  • Cost-Effective: Enjoy a gourmet meal without the hefty restaurant price.

3. Essential Ingredients for the Perfect Salmon with Cajun Butter Sauce

  • Salmon: Opt for fresh, wild-caught fillets for the best flavor and nutrition.
  • Cajun Seasoning: A blend of paprika, garlic powder, onion powder, cayenne, and herbs.
  • Butter: Unsalted butter provides a creamy base for the sauce.
  • Garlic: Adds a robust flavor to the butter sauce.
  • Lemon: Brings a zesty brightness to balance the richness.
  • Parsley: A fresh garnish for added color and taste.

4. Cultural History of Ingredients

  • Salmon: A staple in many cultures, salmon is revered for its versatility and health benefits.
  • Cajun Spices: Originating from Louisiana, Cajun seasoning reflects the cultural melting pot of French, African, and Native American influences.
  • Butter: An essential in French-inspired cuisine, butter is often used to elevate sauces.

5. Equipment You’ll Need

  • Non-stick or cast iron skillet: Ensures even cooking and a beautiful sear on the salmon.
  • Tongs: For flipping the fillets without breaking them.
  • Small saucepan: To prepare the Cajun butter sauce.
  • Whisk: Helps achieve a smooth, creamy sauce.

6. Step-by-Step Instructions for Salmon with Cajun Butter Sauce

Ingredients

  • 4 salmon fillets (skin on or off, as preferred)
  • 2 tbsp Cajun seasoning
  • 2 tbsp olive oil
  • 4 tbsp unsalted butter
  • 3 cloves garlic, minced
  • 1 tsp smoked paprika
  • 1 tsp cayenne pepper (adjust for heat preference)
  • Juice of 1 lemon
  • 2 tbsp chopped parsley

Instructions

  1. Season the Salmon: Pat the fillets dry and rub them generously with Cajun seasoning.
  2. Sear the Salmon: Heat olive oil in a skillet over medium-high heat. Sear the salmon for 4-5 minutes per side until golden brown and cooked through. Remove and set aside.
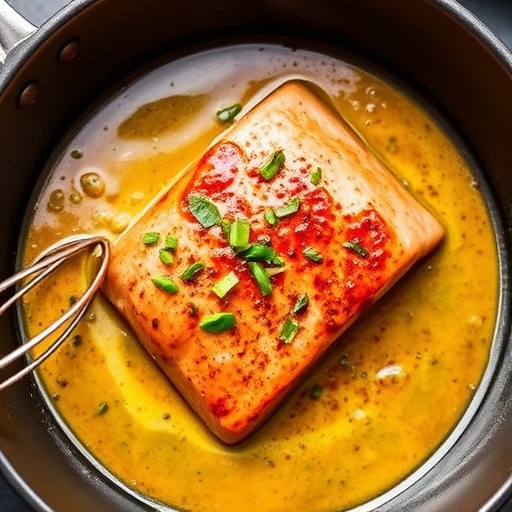
  3. Prepare the Cajun Butter Sauce: In the same skillet, melt the butter over low heat. Add minced garlic and sauté for 1-2 minutes until fragrant. Stir in smoked paprika, cayenne pepper, and lemon juice.
  4. Combine: Return the salmon to the skillet, spoon the sauce over the fillets, and let them absorb the flavors for 1-2 minutes.
  5. Garnish and Serve: Sprinkle with parsley and serve immediately.

7. Suggestions for Serving and Storing

  • Serving: Pair with steamed vegetables, mashed potatoes, or a side of fluffy rice.
  • Storing: Store leftovers in an airtight container in the refrigerator for up to 3 days. Reheat gently to maintain the salmon’s texture.

8. Chef Simon’s Tips for Salmon with Cajun Butter Sauce

  • Choose salmon fillets of even thickness for uniform cooking.
  • For extra crispy skin, press the salmon gently onto the skillet when searing.
  • Use freshly squeezed lemon juice for a bright, tangy flavor.

9. Emotional and Psychological Impact of Food

This dish is comfort food with a twist. The richness of the butter sauce paired with the heartiness of salmon evokes a sense of indulgence, while the vibrant Cajun spices add excitement and warmth, making it perfect for unwinding after a long day.


10. Mindful Cooking Techniques

  • Take your time to let the salmon sear properly; avoid rushing.
  • Be present when preparing the sauce, allowing the aromas of garlic and spices to envelop your senses.

11. Tips for Keeping the Recipe Fresh Longer

  • Store cooked salmon with the sauce separately to avoid sogginess.
  • Always refrigerate leftovers promptly to maintain freshness.

12. Advanced Culinary Terms and Techniques

  • Searing: A high-heat cooking method to create a crust on the salmon.
  • Deglazing: Using lemon juice to scrape up browned bits from the skillet, enhancing the sauce.
  • Emulsification: Whisking butter with spices and lemon juice for a creamy, cohesive sauce.

13. Healthy Ingredient Alternatives

  • Replace butter with olive oil for a lighter sauce.
  • Use Greek yogurt for a creamy, low-fat topping instead of the butter sauce.
  • Opt for salt-free Cajun seasoning to reduce sodium.

14. More Serving Ideas

  • Serve atop a bed of quinoa for a high-protein meal.
  • Pair with a fresh green salad and a vinaigrette dressing for a light option.
  • Add a dollop of avocado crema for a creamy contrast.

15. Common Issues and Solutions

  • Dry Salmon: Avoid overcooking; remove from heat as soon as it flakes easily.
  • Overly Spicy Sauce: Reduce the cayenne pepper or balance with a touch of honey.
  • Sauce Separation: Stir constantly when melting butter to prevent breaking.

16. Variations to Try

  • Swap salmon for shrimp or cod for a different protein.
  • Add a splash of cream to the Cajun butter sauce for a richer flavor.
  • Incorporate diced tomatoes or bell peppers into the sauce for added texture.

17. Nutritional Information and Health Benefits

  • Calories: 350 per serving
  • Protein: 25g (from salmon)
  • Omega-3s: Promotes heart health and reduces inflammation.
  • Vitamin D: Supports bone health and immunity.

18. The Art of Pairing Salmon with Cajun Butter Sauce

Complement the bold flavors with a glass of chilled Chardonnay or a light, hoppy beer. Non-alcoholic pairings like sparkling water with a slice of lime or iced tea with lemon work wonderfully too.


19. Weather and Recipe Outcome

This dish is versatile, perfect for summer grilling or a cozy winter dinner. Adjust the accompaniments seasonally for the best results.


20. Other Recipes to Explore

  • Cajun Shrimp Alfredo
  • Blackened Chicken Tacos
  • Lemon Garlic Tilapia

21. Focus on Tools and Equipment

  • A good-quality non-stick skillet is essential for achieving a flawless sear.
  • A fish spatula ensures you can flip the salmon without breaking it.

22. Frequently Asked Questions (with answers)

  • Q: Can I use frozen salmon?
    A: Yes, but ensure it’s thawed completely and patted dry before cooking.
  • Q: Can I make the sauce in advance?
    A: Yes, but reheat gently to prevent it from separating.

Conclusion

Salmon with Cajun Butter Sauce is a flavorful dish that’s as delightful to eat as it is to prepare. With its bold spices, creamy sauce, and tender salmon, this recipe will become a family favorite. Whether you’re hosting a dinner party or treating yourself, this dish is guaranteed to impress.

Delicious Lemon Caper Chicken Pasta Recipe

Lemon Caper Chicken Pasta

Introduction

When life gives you lemons, why not make a delightful Lemon Caper Chicken Pasta? This recipe combines zesty lemons, savory capers, and tender chicken over a bed of al dente pasta. Perfect for weeknight dinners or special occasions, it’s a dish that tastes as good as it looks.


1. The Story Behind the Recipe

The inspiration for Lemon Caper Chicken Pasta comes from the sunny Mediterranean, where simple ingredients like lemons, olive oil, and capers reign supreme. This dish brings together bright citrus flavors, briny capers, and juicy chicken, creating a meal that feels light, elegant, and deeply satisfying.


2. The Benefits of Making Your Own Lemon Caper Chicken Pasta

  • Fresh and Healthy: Home-cooked ensures the freshest ingredients and eliminates unnecessary preservatives.
  • Cost-Effective: Skip expensive restaurant meals without compromising flavor.
  • Customizable: Adjust the tanginess, spice, or protein to suit your preferences.
  • Quick and Easy: Ready in under 30 minutes, it’s ideal for busy weeknights.

3. Essential Ingredients for the Perfect Lemon Caper Chicken Pasta

  • Chicken Breasts: Boneless and skinless for lean protein.
  • Capers: Add a tangy, salty flavor that balances the richness of the sauce.
  • Lemons: Freshly squeezed juice and zest are non-negotiable.
  • Pasta: Choose long strands like spaghetti or linguine for a classic pairing.
  • Garlic: Infuses the sauce with a warm, aromatic base.
  • Olive Oil: The foundation of many Mediterranean dishes.
  • Parmesan Cheese: For a creamy, savory finish.

4. Cultural History of Ingredients

  • Lemons: Native to Asia, lemons became a Mediterranean staple, celebrated for their vibrant flavor and health benefits.
  • Capers: These briny flower buds are a hallmark of Mediterranean cuisine, often used to elevate simple dishes.
  • Pasta: A culinary gift from Italy, pasta provides a versatile base for countless recipes.

5. Equipment You’ll Need

  • Large pot for boiling pasta
  • Skillet for cooking chicken and sauce
  • Zester for fresh lemon zest
  • Tongs for tossing pasta
  • Cutting board and sharp knife

6. Step-by-Step Instructions for Lemon Caper Chicken Pasta

Ingredients

  • 12 oz (340g) spaghetti or linguine
  • 2 chicken breasts, thinly sliced
  • 2 tbsp olive oil
  • 3 cloves garlic, minced
  • 2 tbsp capers, drained
  • Juice and zest of 2 lemons
  • 1 cup chicken broth
  • 2 tbsp unsalted butter
  • ½ cup grated Parmesan cheese
  • Salt and black pepper to taste
  • Fresh parsley for garnish

Instructions

  1. Cook the Pasta: Bring a large pot of salted water to a boil. Cook pasta according to package instructions until al dente. Reserve ½ cup of pasta water and drain the rest.
  2. Prepare the Chicken: Season chicken slices with salt and pepper. Heat olive oil in a skillet over medium heat and cook chicken until golden and fully cooked, about 3-4 minutes per side. Remove and set aside.
  3. Make the Sauce: In the same skillet, add minced garlic and sauté for 1 minute until fragrant. Stir in capers, lemon juice, zest, and chicken broth. Let it simmer for 2-3 minutes.
  4. Combine: Return the chicken to the skillet and add the cooked pasta. Toss to coat evenly in the sauce. If needed, add reserved pasta water for a silkier texture.
  5. Finish with Butter and Cheese: Stir in butter and Parmesan cheese until melted. Adjust seasoning with salt and pepper.
  6. Serve: Garnish with fresh parsley and an extra sprinkle of Parmesan.

7. Suggestions for Serving and Storing

  • Serving: Pair with a crisp green salad and crusty bread for a complete meal.
  • Storing: Store leftovers in an airtight container in the refrigerator for up to 3 days. Reheat gently with a splash of water or broth.

8. Chef Simon’s Tips for Lemon Caper Chicken Pasta

  • Always use freshly squeezed lemon juice for the best flavor.
  • Don’t overcook the pasta—al dente is key for perfect texture.
  • Add a pinch of red pepper flakes for a spicy kick.

9. Emotional and Psychological Impact of Food

The citrusy brightness of this dish evokes feelings of joy and renewal, making it perfect for lifting spirits. Its comforting yet light nature makes it equally ideal for celebrations or casual gatherings.


10. Mindful Cooking Techniques

  • Pay attention to the chicken as it cooks to achieve a golden crust without drying out.
  • Taste the sauce as you go, adjusting lemon and caper levels to your preference.

11. Tips for Keeping the Recipe Fresh Longer

  • Store sauce and pasta separately to maintain the best texture.
  • Use airtight containers to prevent the dish from absorbing other refrigerator odors.

12. Advanced Culinary Terms and Techniques

  • Deglazing: Adding broth to the skillet to release flavorful browned bits from the bottom.
  • Emulsification: The process of creating a creamy sauce by combining butter with broth and lemon juice.

13. Healthy Ingredient Alternatives

  • Replace butter with olive oil for a dairy-free version.
  • Use whole-grain pasta for added fiber.
  • Substitute chicken with shrimp or tofu for variety.

14. More Serving Ideas

  • Add roasted cherry tomatoes for a burst of sweetness.
  • Top with toasted breadcrumbs for added texture.
  • Serve alongside a chilled glass of Sauvignon Blanc.

15. Common Issues and Solutions

  • Too Tart: Balance excessive lemon flavor with a pinch of sugar or more Parmesan.
  • Dry Chicken: Slice chicken thinly for even cooking and avoid overcooking.
  • Clumpy Sauce: Ensure the skillet is not too hot when adding butter and Parmesan.

16. Variations to Try

  • Add spinach or arugula for a pop of green.
  • Include olives for an additional Mediterranean flair.
  • Replace chicken with salmon for a seafood twist.

17. Nutritional Information and Health Benefits

  • Calories: 420 per serving
  • Protein: 35g (from chicken and Parmesan)
  • Vitamin C: Boosts immunity and skin health from lemons.
  • Antioxidants: Found in capers and parsley.

18. The Art of Pairing Lemon Caper Chicken Pasta

Pair with a crisp white wine like Pinot Grigio or a sparkling lemonade for non-alcoholic options. A light dessert, like lemon sorbet, complements the meal beautifully.


19. Weather and Recipe Outcome

This dish is versatile, brightening up rainy days with its citrusy zing or perfectly complementing sunny picnics and alfresco dining.


20. Other Recipes to Explore

  • Lemon Garlic Shrimp Pasta
  • Mediterranean Chicken with Olives and Capers
  • Creamy Lemon Risotto

21. Focus on Tools and Equipment

  • A sharp zester ensures fine lemon zest without bitterness.
  • Use a heavy-bottomed skillet to evenly cook chicken and sauce.

22. Frequently Asked Questions (with answers)

  • Q: Can I use bottled lemon juice?
    A: Fresh lemon juice is highly recommended for the best flavor.
  • Q: Can this dish be made gluten-free?
    A: Absolutely—use gluten-free pasta.

Conclusion

Lemon Caper Chicken Pasta is a delightful fusion of zesty, savory, and creamy flavors. Its simplicity, elegance, and bold taste make it a family favorite and an entertainer’s delight. Dive into the Mediterranean spirit with this unforgettable dish!

Heavenly Banana Walnut Cream Cake Recipe

Banana Walnut cream cake

Introduction

There’s something almost magical about a cake that seems like a warm hug. Well, the Heavenly Banana Walnut Cream Cake isn’t just a dessert; it is a celebration of flavors and textures. Imagine the sweetness of bananas at their ripe best mixed with the earthy, crunchy walnuts, covered by a light, velvety cream frosting. Such a cake can make ordinary days special and turn celebrations into cherished memories.

This is a perfect cake for birthdays, gatherings, or even a quiet afternoon treat. It’s a real showstopper, with moist layers and creamy topping that create an irresistible harmony. It’s also simple enough for beginners, while at the same time providing ample opportunities for more advanced bakers to make it their own.


1. The Story Behind the Recipe

Every recipe has a story, and this one is steeped in family traditions. Growing up, there was always a bowl of overripe bananas on the kitchen counter, ready to be turned into something delicious. My grandmother was an avid baker who didn’t believe in wasting anything. What’s her solution to soft bananas? To turn them into moist cakes that brought the family together.

The walnuts were her touch, adding crunch to what was otherwise a soft cake. The recipe evolved over the years to include cream frosting, which would be the finishing touches needed to balance the sweetness of the bananas and the nutty flavor of the walnuts. Today, this recipe stands as a tribute to those cherished moments in the kitchen filled with laughter, love, and the irresistible aroma of fresh-baked cake.


2. The Benefits of Making Your Own Banana Walnut Cream Cake

Why should you try this recipe at home instead of buying a pre-made dessert? Here’s why:

1. Unmatched Freshness

Store-bought cakes often lack the freshness that comes from homemade desserts. When you bake this cake, you control every ingredient, ensuring a flavor that’s pure and vibrant.

2. Creative Control

Making your own cake allows you to adjust it according to your preference. Love nuts? Throw in an extra handful. Like it a little less sweet? Have at it.

3. A Healthier Option

Homemade recipes allow you to use fresh, natural ingredients without artificial preservatives. Substitute refined sugar with honey or whole-wheat flour for a healthier twist.

4. Bonding Activity

This is the best thing to do while spending time with family or friends. Whether teaching children how to bake or just having fun with loved ones, it is a memory-maker.

5. Cost-Effective

Ingredients for this cake are common and budget-friendly, hence making it an affordable indulgence.


3. Essential Ingredients for the Perfect Cake

Each ingredient used in this cake plays an important part in the magic of making it. Active ingredients are as follows:

For the Cake Layers:

  • All-Purpose Flour: The base of the cake, providing structure.
  • Ripe Bananas: The star ingredient, offering natural sweetness and moisture.
  • Chopped Walnuts: Adds a crunchy texture and nutty flavor.
  • Buttermilk: Enhances moisture and adds a slight tang.
    Ingredients intended for this cake include:
  • Brown and White Sugar: A mix for depth and sweetness.
  • Vanilla Extract: For added warm, aromatic touch.

For the Cream Frosting:

  • Heavy Cream: Whips into a light, fluffy texture.
  • Cream Cheese (Optional): Adds a tangy richness.
  • Powdered Sugar: Sweetens the frosting without the grittiness.

Optional Additions:

  • Cinnamon or Nutmeg: Spiced flavor.
  • Dark Chocolate Chips: To add a hint of indulgence.

4. Cultural History of Ingredients

The following recipe is steeped in cultural history in each and every ingredient that goes into it:

  • Bananas: Originating from Southeast Asia, bananas form part of the staple ingredients for desserts all over the world. Their natural sweetness attracts their usage in cakes, pies, and breads.
  • Walnuts: Revered in ancient Persia and Rome, walnuts symbolize intelligence and fertility. They’ve been used in baked goods for centuries.
  • Cream: Often associated with European desserts, cream represents indulgence and celebration.

5. Equipment You’ll Need

To create this masterpiece, you’ll need the following tools:

  • Mixing Bowls: For combining ingredients.
  • Whisk or Electric Mixer: For combining the batter and whipping the frosting.
  • Measuring Cups and Spoons: In baking, accuracy is critical.
  • Cake Pans: The recipe works perfectly for two 9-inch pans.
  • Cooling Rack: Allows the cake to cool down even after baking.

6. Instructions Step-by-Step

Making the Batter:

  1. Preheat the Oven: Preheat to 350°F (175°C). Prepare the cake pans by applying grease and dusting them with flour.  
  2. Combine Dry Ingredients: Mix flour, baking soda, baking powder, and salt in a bowl.  
  3. Cream the Butter and Sugars: Beat until fluffy and light in color.  
  4. Add Wet Ingredients: Add eggs one at a time, then mashed bananas, and lastly vanilla.
  5. Alternate Mixing: Progressively add the dry ingredients and buttermilk, starting and ending with the dry mix. 6. Fold in Walnuts: Gently fold them into the batter.

Baking the Cake:

  1. Divide the batter evenly between the prepared pans.
  2. Bake for 25–30 minutes or until a toothpick inserted in the center comes out clean.
  3. Cool completely before frosting.

To Make the Cream Frosting:

  1. Whip the Cream: Chill a bowl and whisk and then beat heavy cream to achieve soft peaks.
  2. Add Sugar and Vanilla: Add in (grated) powdered sugar, extract of vanilla, and cont whipp to get the stiff peaks.
  3. **Cream Cheese : Add in softened cream cheese for added richness and tang in the frosting. –

To Assemble This Cake:  

  1. Level Cakes: Trim the top of each cake if it is necessary for them to lie flat.
  2. **First Cake Frost: Place the first cake on a serving plate and thickly frost.
  3. Add the Second Layer: Place it on top and frost the top and sides. 4. Decorate: Use additional walnuts and banana slices for garnish.

7. Suggestions for Serving and Storing

Serving Suggestions:

  • Serve slices slightly chilled for a firmer texture or at room temperature for ultimate softness.
  • Pair with hot beverages like coffee, tea, or hot chocolate for a cozy treat.

Storing Tips:

  • Refrigerator: Store in an airtight container for up to 3 days.
  • Freezer: Wrap the unfrosted cake layers in plastic wrap and freeze for up to 2 months. Defrost overnight before frosting.

8. Chef Simon’s Tips for the Cake

  • Use Overripe Bananas: The browner the bananas, the better the flavor.
  • Toast the Walnuts: Lightly toasting them enhances their nutty aroma and taste.
  • Chill Your Whipping Cream: For the fluffiest frosting, ensure the cream is cold before whipping.

9. Emotional and Psychological Impact of Food

This cake is far beyond a dessert; it’s even comforting and nostalgic in every single bite. The bananas and walnuts bring a sense of warmth and security, while the creaminess of the frosting adds an element of indulgence. Shared among family and friends, it tightens bonds, making moments ordinary yet memorable.


10. Mindful Cooking Techniques

Baking this cake should be approached like a sensory experience.

  • Focus on the tactile process of mashing bananas.
  • Savor the aromas of the batter and toasted walnuts.
  • Take pride in each step, knowing you’re creating something special.

11. Tips for Keeping the Cake Fresh Longer

  • Wrap individual slices tightly in cling film to retain moisture.
  • Do not store the cake near foods with strong odors to retain its subtle flavors.

12. Advanced Culinary Terms and Techniques

  • Creaming Method: Beating together butter and sugar to incorporate air into it, thus making it light and fluffy.
  • Folding: Gentle mixing of ingredients so as not to eliminate the airiness in the batter.

13. Healthy Ingredient Alternatives

  • Sugar Substitutes: Use coconut sugar or maple syrup for a natural sweetener.
  • Dairy-Free Options: Replace butter with vegan margarine and buttermilk with almond milk mixed with vinegar.
  • Gluten-Free Flour: Swap all-purpose flour with a gluten-free blend for dietary restrictions.

14. More Serving Ideas

  • Top with a drizzle of caramel sauce for extra sweetness.
    Serve with a dollop of Greek yogurt for a nice tanginess.

15. Common Issues and Solutions

Problem: Cake too dense

  • Solution: Make sure bananas are very well mashed, do not overmix the batter.

Problem: Frosting too runny

  • Solution: Use cold cream and powdered sugar and whip on until stiff peaks are reached.

16. Some Variations to Try

*- Banana Chocolate Chip Cake: Fold in 1 cup of chocolate chips in the batter.

  • Tropical Twist : Mix in shredded coconut with the crushed pineapple for added tropical flavor.
  • Cinnamon Swirl : Add a swirl of cinnamon-sugar to give a spice-infused makeover.

17. Nutritional Information and Health Benefits

Considering how decadent this is, here are some hidden benefits:

  • Bananas: Rich in potassium and vitamin B6, which help in maintaining heart health.
  • Walnuts: Rich in omega-3 fatty acids and antioxidants.

18. The Art of Pairing

This cake pairs well with:

  • Beverages: A cup of chai tea, latte, or even a sweet dessert wine.
  • Other food items: A light fruit salad or a dollop of vanilla ice cream.

19. Weather and Recipe Outcome

Humidity can affect the frosting’s consistency. If you’re baking in a warm climate, work quickly to keep the cream stable. Conversely, colder weather can cause the butter in the batter to firm up, so bring it to room temperature before mixing.


20. Other Cake Recipes to Explore

  • Classic Red Velvet Cake
  • Moist Lemon Pound Cake
  • Triple Chocolate Fudge Cake

21. Focus on Tools and Equipment

Investing in quality tools can make all the difference:

  • Heavy-Duty Mixer: Speeds up creaming and whipping processes.
  • Silicone Spatulas: Perfect for scraping every bit of batter and frosting.

22. Frequently Asked Questions

Q: Can I make this cake without nuts?
Yes, simply omit the walnuts for a nut-free version.

Q: Can I use frozen bananas?
Of course! Let them thaw and then mash for best results.

Q: How can I make the frosting stiffer?
Add a tablespoon of cornstarch or cream cheese for added stability.


Conclusion

The Heavenly Banana Walnut Cream Cake is comfort and indulgence at its finest. This is much more than a dessert; this is a labor of love, the fruit of which is always joyous when it meets one’s taste buds. Be it for a family get-together or simply indulging oneself, this cake will promise smiles all around.

So grab those ripe bananas, preheat the oven, and let the magic begin. Your kitchen is going to smell like heaven!

Delicious Strawberry Chocolate Ice Cream Cake Recipe

Strawberry Chocolate Ice Cream Cake

Introduction
A Strawberry Chocolate Ice Cream Cake is the ultimate dessert, combining the rich indulgence of chocolate with the fresh sweetness of strawberries. This layered cake is perfect for celebrations, summer parties, or just as a special treat for your loved ones. With its decadent layers of chocolate cake, creamy strawberry ice cream, and a luscious chocolate fudge topping, it’s a dessert that will steal the show at any occasion. Whether you’re celebrating a birthday or just craving a refreshing, yet indulgent dessert, this cake hits all the right notes.


The Story Behind Strawberry Chocolate Ice Cream Cake

Ice cream cakes have been a popular dessert for decades, especially for birthdays and festive occasions. The combination of cake and ice cream makes for a delightful contrast in textures and temperatures. The pairing of strawberry and chocolate has been a classic one in the culinary world—both flavors are beloved by many for their perfect balance of sweetness and richness. This strawberry chocolate version elevates the traditional ice cream cake, combining the best of both worlds into one decadent, refreshing treat.


The Benefits of Making Your Own Strawberry Chocolate Ice Cream Cake

  1. Full Control Over Ingredients:
    When you make your own ice cream cake, you can use fresh, high-quality ingredients. This means you can choose a premium brand of chocolate and select the ripest strawberries, resulting in a more flavorful and satisfying dessert.
  2. Customization:
    You can tailor the cake’s layers, fillings, and toppings to suit your tastes. Want to add an extra layer of fruit or top it with more chocolate? The choice is yours!
  3. No Artificial Additives:
    Homemade cakes are free from preservatives and artificial flavors, giving you a healthier, fresher alternative to store-bought versions.

Essential Ingredients for the Perfect Strawberry Chocolate Ice Cream Cake

  • For the Cake:
    • 1 box chocolate cake mix (or homemade chocolate cake batter)
    • 2 large eggs
    • 1 cup water
    • 1/2 cup vegetable oil
  • For the Ice Cream Layer:
    • 4 cups strawberry ice cream (softened)
    • 1/2 cup crushed strawberries (fresh or frozen)
  • For the Fudge Layer:
    • 1 cup heavy cream
    • 1 cup semi-sweet chocolate chips
    • 1 tablespoon butter
  • For Garnish:
    • Fresh strawberries, halved
    • Whipped cream (optional)

Cultural History of Ingredients

  • Chocolate:
    Chocolate is one of the most beloved treats in the world. It originates from ancient Mesoamerican civilizations, where cocoa beans were used to make a bitter drink. Over time, the sweetness of chocolate evolved, and it became a staple in desserts globally. Chocolate cake and ice cream are now classic dessert choices in many cultures.
  • Strawberries:
    Strawberries have been enjoyed since ancient times. They are one of the first fruits to ripen in spring, symbolizing the start of a new season. Known for their vibrant color and sweet, slightly tangy taste, strawberries are commonly used in desserts, jams, and beverages.
  • Ice Cream:
    Ice cream’s history dates back to ancient Rome and China, where it was made from snow and flavored with fruits. Today, it’s a beloved dessert, especially during warmer months, and the perfect ingredient for layering in cakes and pies.

Equipment You’ll Need

  • 9-inch round cake pan (for baking the cake)
  • Electric mixer (optional, for smooth cake batter)
  • Spatula
  • Double boiler or microwave-safe bowl (for making the chocolate fudge)
  • Cake plate or serving dish
  • Parchment paper (optional, for lining the cake pan)
  • Knife (for slicing the cake and serving)

Step-by-Step Instructions for Strawberry Chocolate Ice Cream Cake

Step 1: Bake the Chocolate Cake

  1. Preheat your oven to 350°F (175°C).
  2. Grease a 9-inch round cake pan and line the bottom with parchment paper to prevent sticking.
  3. Prepare the chocolate cake mix according to the instructions on the box, or use your favorite homemade chocolate cake recipe.
  4. Pour the batter into the prepared pan and bake according to the package directions or until a toothpick inserted into the center comes out clean.
  5. Allow the cake to cool completely in the pan, then remove from the pan and set aside.

Step 2: Prepare the Strawberry Ice Cream Layer

  1. While the cake is cooling, soften the strawberry ice cream by leaving it at room temperature for about 10–15 minutes.
  2. Once softened, gently fold in the crushed strawberries to add extra flavor and texture.
  3. Spread the ice cream mixture evenly over the top of the cooled cake.
  4. Place the cake in the freezer for at least 2 hours to allow the ice cream to set.

Step 3: Make the Chocolate Fudge Layer

  1. In a double boiler or microwave-safe bowl, combine the heavy cream and chocolate chips.
  2. Heat over medium heat or microwave in 30-second intervals, stirring frequently, until the chocolate is melted and the mixture is smooth.
  3. Stir in the butter until fully incorporated, then allow the fudge to cool slightly before using.

Step 4: Assemble the Cake

  1. Once the ice cream layer has set, pour the cooled chocolate fudge sauce over the top of the cake.
  2. Use a spatula to spread the fudge evenly across the surface of the cake, ensuring it covers the ice cream layer.
  3. Return the cake to the freezer and freeze for at least 2 more hours to allow the fudge to harden.

Step 5: Garnish and Serve

  1. Once fully frozen, remove the cake from the freezer.
  2. Garnish with fresh strawberries and optional whipped cream on top.
  3. Slice and serve, making sure to let the cake sit for a few minutes at room temperature to make slicing easier.

Suggestions for Serving and Storing

  • Serving Tips:
    Serve the cake with a scoop of extra strawberry ice cream or a drizzle of hot fudge sauce for added indulgence.
  • Storage:
    Store any leftover cake in the freezer, covered tightly with plastic wrap or foil, for up to 1 week. If you plan to store the cake for longer, consider individually wrapping slices to prevent freezer burn.

Chef Simon’s Tips for Strawberry Chocolate Ice Cream Cake

  1. Cake Texture:
    If you’re making your own chocolate cake from scratch, make sure not to overmix the batter. Overmixing can result in a dense cake that won’t absorb the ice cream properly.
  2. Layering:
    For a cleaner look when slicing, allow the cake to freeze for a few hours after each layer is added. This will help maintain the distinct layers of cake, ice cream, and fudge.
  3. Ice Cream Variations:
    Try mixing up the flavors! If strawberry isn’t your favorite, substitute with any fruit-flavored ice cream or even chocolate or vanilla.

Emotional and Psychological Impact of Food

Food, especially something as indulgent as a Strawberry Chocolate Ice Cream Cake, often brings comfort and joy. It can remind us of celebrations, happy memories, and shared moments with loved ones. The combination of chocolate and strawberries, two flavors that are universally adored, invokes a sense of nostalgia and contentment.


Mindful Cooking Techniques

  • Enjoy the Process:
    Making this cake from scratch is not just about the end product; it’s about enjoying the process. Take your time to appreciate each step, from mixing the cake batter to creating the perfect chocolate fudge topping.
  • Visual Appeal:
    As you layer the ice cream and fudge, take a moment to admire the colors and textures. This is a dessert that’s not just delicious but also a feast for the eyes.

Tips for Keeping the Recipe Fresh Longer

  • Avoid Freezer Burn:
    Be sure to wrap the cake tightly in plastic wrap or foil when storing in the freezer. If you have any leftover fudge or ice cream, store them separately to preserve their texture and flavor.
  • Serving Freshness:
    If the cake has been stored for a while, let it sit at room temperature for 5–10 minutes before serving for a smoother texture and easier slicing.

Advanced Culinary Terms and Techniques

  • Ganache:
    A rich chocolate mixture made from melting chocolate and heavy cream. It’s often used as a topping or filling in cakes and pastries.
  • Churned Ice Cream:
    Ice cream that has been churned during the freezing process, which helps to incorporate air and create a smoother, creamier texture.

Healthy Ingredient Alternatives

  1. Low-Fat Ice Cream:
    For a lighter version, opt for low-fat or non-dairy ice cream options. Coconut milk-based ice creams can provide a similar creamy texture without the added calories.
  2. Sugar Substitutes:
    Use sugar substitutes like stevia or monk fruit for a healthier version of the cake and ice cream without sacrificing taste.

More Serving Ideas

  • Toppings:
    Serve with additional toppings like chopped nuts, caramel sauce, or a drizzle of strawberry syrup.
  • Beverages:
    Pair this cake with a chilled glass of sparkling water or a fruity iced tea to balance the richness of the dessert.

Common Issues and Solutions

  • Cake is Too Dense:
  • Solution: Ensure you don’t overmix the cake batter. Overmixing can lead to a denser texture. Mix just until the ingredients are combined for a light and fluffy cake. Additionally, check that your baking powder or soda is fresh for proper leavening.
  • Ice Cream Layer Melting Too Fast:
    Solution: If your ice cream layer starts melting too quickly, ensure the cake is fully chilled before spreading the ice cream. It’s also important to work in small batches when spreading the ice cream layer to avoid it melting prematurely.
  • Chocolate Fudge Not Setting Properly:
    Solution: Make sure the fudge mixture has cooled before pouring it onto the cake. If it’s too hot, it might melt the ice cream layer underneath. Also, ensure you give the cake enough time in the freezer after adding the fudge to allow it to set.

Variations to Try

  1. Caramel Ice Cream Layer:
    Instead of strawberry ice cream, try a caramel or butterscotch ice cream for a new twist. This variation will bring a rich, buttery flavor that pairs beautifully with chocolate cake.
  2. Fruit Toppings:
    Add a variety of fruits like raspberries, blueberries, or kiwi on top of the cake for a more refreshing, fruity dessert. The tartness of these fruits will balance out the sweetness of the cake.
  3. Nutty Add-ins:
    For a bit of crunch, try adding crushed nuts like almonds, hazelnuts, or walnuts into the ice cream layer. This adds texture and a nutty flavor that pairs wonderfully with the chocolate.

Nutritional Information and Health Benefits

While this dessert is indulgent and rich, it can be enjoyed in moderation as part of a balanced diet. Here’s an approximate breakdown of the nutritional content per serving (based on 12 servings):

  • Calories: 380–400 kcal per slice
  • Fat: 23g
  • Carbohydrates: 43g
  • Protein: 4g
  • Sugar: 30g
  • Fiber: 1g

Health Benefits:

  • Strawberries: Rich in antioxidants like vitamin C, strawberries help boost the immune system, fight free radicals, and promote skin health.
  • Dark Chocolate (in the fudge): Contains antioxidants that can benefit heart health and provide a small dose of iron and magnesium.

While this dessert isn’t low in calories or sugar, it offers a few benefits from the nutrient-rich ingredients like strawberries and dark chocolate. It’s a great way to treat yourself while enjoying a burst of antioxidants and natural goodness.


The Art of Pairing Strawberry Chocolate Ice Cream Cake

To elevate your dessert experience, pair this ice cream cake with a few complementary items:

  • Beverages:
    • Coffee: A cup of freshly brewed coffee (especially dark roast) enhances the chocolate flavors in the cake and provides a slight contrast to the sweetness.
    • Wine: A light white wine such as a Moscato or a sweet Riesling pairs beautifully with the strawberry layer, while a richer red wine like Merlot complements the chocolate.
  • Side Dishes:
    • Fresh Fruit Salad: A refreshing side of fresh berries or citrus fruits can balance out the richness of the ice cream cake.
    • Light Sorbet: Serve a scoop of lemon or raspberry sorbet to cleanse the palate between bites of the rich cake.

Weather and Recipe Outcome

The outcome of this Strawberry Chocolate Ice Cream Cake is ideal for warm weather months, especially during spring and summer. The cold, creamy layers of ice cream provide a refreshing contrast to the heat, making it a perfect treat for hot days or summer gatherings. On colder days, while still delicious, it may be more comforting to enjoy this dessert after a warm meal, as the chilled layers contrast with the coziness of the meal.


Other Ice Cream Cakes to Explore

If you’re a fan of ice cream cakes, here are a few more variations to try:

  1. Mint Chocolate Chip Ice Cream Cake: Layer chocolate cake with mint chocolate chip ice cream and top with a chocolate ganache drizzle for a refreshing twist.
  2. Cookies and Cream Ice Cream Cake: Chocolate or vanilla cake layers paired with cookies and cream ice cream and crushed Oreos make for a fun and delicious treat.
  3. Peanut Butter Cup Ice Cream Cake: A rich chocolate cake layered with peanut butter ice cream and chunks of peanut butter cups for an indulgent, satisfying dessert.

Focus on Tools and Equipment

To make the preparation of your Strawberry Chocolate Ice Cream Cake easier and more efficient, consider the following tools:

  1. Electric Mixer:
    For a smoother cake batter, using an electric mixer can speed up the process and ensure everything is thoroughly incorporated.
  2. Double Boiler or Microwave:
    A double boiler is ideal for melting chocolate without scorching it. If you don’t have one, you can also use the microwave in short bursts, stirring in between.
  3. Cake Slicing Knife:
    When it’s time to serve the cake, a serrated cake slicer or a sharp chef’s knife ensures you get clean slices without melting the ice cream.

Frequently Asked Questions (with answers)

  1. Can I use store-bought cake for this recipe?
    Yes! If you want to save time, you can use a store-bought chocolate cake or even brownies as the base for your ice cream cake. Just ensure it’s fully cooled before layering with ice cream.
  2. Can I add more than one flavor of ice cream?
    Absolutely! You can create layers with different flavors of ice cream, like vanilla, chocolate, and strawberry, for a more complex and indulgent dessert.
  3. How can I make this cake gluten-free?
    To make this cake gluten-free, simply substitute the regular chocolate cake mix with a gluten-free version. Ensure that the ice cream and chocolate fudge sauce are also gluten-free.
  4. Can I make this cake without ice cream?
    If you prefer not to use ice cream, you can replace it with a layer of whipped cream or mousse. However, this will alter the texture and flavor of the cake.

Conclusion

The Strawberry Chocolate Ice Cream Cake is a delightful, indulgent treat that combines the best of both worlds—creamy, cold ice cream and rich, moist chocolate cake. This dessert is a crowd-pleaser that will satisfy even the most discerning sweet tooth. It’s perfect for birthdays, holiday gatherings, or any special occasion. By following the steps, experimenting with flavors, and adding your personal touches, you’ll create a show-stopping dessert that everyone will love. So, gather your ingredients, enjoy the process, and treat your family and friends to this delicious and refreshing ice cream cake!

Delicious Pumpkin Cheesecake Truffles Recipe

Pumpkin Cheesecake Truffles Recipe

Introduction

Pumpkin Cheesecake Truffles are the perfect bite-sized treats that combine the cozy flavors of pumpkin spice with the creamy decadence of cheesecake. These no-bake delights are an excellent dessert for holidays, gatherings, or simply indulging in fall flavors all year round. Their rich, velvety texture paired with a hint of spice makes them irresistible, whether served as an after-dinner treat or gifted to loved ones.


1. The Story Behind Pumpkin Cheesecake Truffles

The idea for Pumpkin Cheesecake Truffles stems from the love for cheesecake desserts and the growing popularity of pumpkin-flavored treats during autumn. Inspired by traditional pumpkin pie and the elegance of truffles, this recipe delivers a balance of creaminess, spice, and sweetness in a portable form. These truffles have become a staple for modern dessert enthusiasts looking for convenience without sacrificing flavor.


2. The Benefits of Making Your Own Pumpkin Cheesecake Truffles

  • Control Over Ingredients: Avoid additives and customize sweetness and spice levels.
  • Creative Presentation: Decorate or coat them uniquely for special occasions.
  • Cost-Effective: Homemade truffles are a budget-friendly alternative to store-bought ones.
  • Perfect Portioning: Enjoy a dessert that satisfies cravings without overindulgence.

3. Essential Ingredients for the Perfect Pumpkin Cheesecake Truffles

  • Cream Cheese: 8 ounces, softened.
  • Pumpkin Puree: ½ cup, not pumpkin pie filling.
  • Powdered Sugar: 1 ½ cups, sifted.
  • Pumpkin Pie Spice: 1 teaspoon.
  • Vanilla Extract: 1 teaspoon.
  • Graham Cracker Crumbs: 1 cup, finely crushed.
  • White Chocolate Chips: 1 ½ cups, for coating.
  • Coconut Oil: 1 tablespoon, for smooth melting.
  • Optional Toppings: Crushed pecans, sprinkles, or extra graham cracker crumbs.

4. Cultural History of Ingredients

  • Pumpkin: A North American staple, pumpkins have been used in desserts since the early colonial days.
  • Cream Cheese: Popularized in 19th-century America, it adds richness to desserts globally.
  • Graham Crackers: Invented in the early 1800s, these are a classic element in cheesecakes and crusts.

5. Equipment You’ll Need

  • Mixing bowl and spatula.
  • Electric hand or stand mixer.
  • Baking sheet lined with parchment paper.
  • Microwave-safe bowl for melting chocolate.
  • Small cookie scoop or spoon for shaping truffles.

6. Step-by-Step Instructions for Pumpkin Cheesecake Truffles

  1. Prepare the Truffle Base
    • In a large bowl, beat the softened cream cheese with a hand mixer until smooth.
    • Add pumpkin puree, powdered sugar, pumpkin pie spice, and vanilla extract. Beat until fully combined.
  2. Incorporate Graham Cracker Crumbs
    • Gently fold in the crushed graham cracker crumbs until the mixture is firm enough to scoop. Chill in the refrigerator for 30 minutes.
  3. Shape the Truffles
    • Using a small cookie scoop or spoon, portion out the mixture and roll into bite-sized balls. Place them on the prepared baking sheet. Chill for another 30 minutes to set.
  4. Melt the White Chocolate
    • In a microwave-safe bowl, combine white chocolate chips and coconut oil. Heat in 30-second intervals, stirring between, until smooth.
  5. Coat the Truffles
    • Dip each truffle into the melted chocolate using a fork or dipping tool. Let the excess chocolate drip off, then place the truffle back on the parchment paper.
  6. Add Toppings and Set
    • Sprinkle with toppings like crushed pecans or graham cracker crumbs before the chocolate hardens. Refrigerate for at least 1 hour to set completely.

7. Suggestions for Serving and Storing

  • Serving: Serve chilled for the best texture and flavor. Arrange on a platter for parties or as a dessert table highlight.
  • Storing: Keep in an airtight container in the refrigerator for up to 5 days. For longer storage, freeze truffles in a single layer and thaw as needed.

8. Chef Simon’s Tips for Pumpkin Cheesecake Truffles

  • Use High-Quality Chocolate: Good-quality white chocolate ensures a smoother, more luxurious coating.
  • Add Spice Gradually: Taste as you mix to avoid overpowering the delicate balance of flavors.
  • Double-Coat for Perfection: Dip the truffles a second time in chocolate for a thicker shell.

9. Emotional and Psychological Impact of Food

Pumpkin Cheesecake Truffles evoke feelings of warmth, nostalgia, and joy. Perfect for sharing, they create memorable moments with friends and family. Their autumn-inspired flavors bring comfort, while their elegant presentation adds a touch of sophistication to any occasion.


10. Mindful Cooking Techniques

  • Focus on the aromas of the pumpkin and spices as you mix.
  • Be deliberate with your motions when shaping and coating the truffles, appreciating the artistry of the process.

11. Tips for Keeping the Recipe Fresh Longer

  • Use fresh pumpkin puree for optimal flavor.
  • Coat truffles thoroughly in chocolate to seal in freshness.

12. Advanced Culinary Terms and Techniques

  • Tempering: For a shiny, crisp coating, temper the white chocolate before dipping.
  • Chilling the Mixture: This prevents stickiness and ensures easier shaping.

13. Healthy Ingredient Alternatives

  • Replace powdered sugar with coconut sugar or stevia for a lower-sugar option.
  • Use gluten-free graham crackers to accommodate dietary restrictions.
  • Substitute white chocolate with dark chocolate for a less sweet alternative.

14. More Serving Ideas

  • Drizzle with caramel or dark chocolate for added flavor.
  • Serve alongside coffee or spiced tea for a cozy dessert pairing.

15. Common Issues and Solutions

  • Mixture Too Sticky: Add more graham cracker crumbs and chill longer.
  • Chocolate Coating Too Thick: Thin it with a touch more coconut oil.

16. Variations to Try

  • Chocolate Pumpkin Truffles: Add cocoa powder to the mixture for a richer flavor.
  • Nutty Truffles: Roll in crushed walnuts or hazelnuts for added texture.
  • Spiced Truffles: Mix in a pinch of ground ginger or cardamom for a unique twist.

17. Nutritional Information and Health Benefits

  • Calories: ~120 per truffle (depends on size).
  • Vitamin A: From pumpkin, promoting eye health.
  • Antioxidants: Found in spices and chocolate, supporting overall wellness.

18. The Art of Pairing Pumpkin Cheesecake Truffles

Pair these truffles with hot drinks like chai tea, pumpkin spice lattes, or mulled cider. For a festive touch, serve them alongside sparkling wine or a creamy dessert cocktail.


19. Weather and Recipe Outcome

  • Cool Weather: Ideal for fall and winter, as the spices and pumpkin evoke seasonal warmth.
  • Warm Weather: Enjoy chilled, as they provide a creamy and refreshing treat.

20. Other Truffle Recipes to Explore

  • Dark Chocolate Espresso Truffles
  • Coconut Almond Bliss Truffles
  • Salted Caramel Pretzel Truffles

21. Focus on Tools and Equipment

  • Invest in a good-quality dipping tool for smooth, professional-looking truffles.
  • Use parchment paper to prevent sticking and ensure easy cleanup.

22. Frequently Asked Questions (with answers)

Q: Can I make these truffles ahead of time?
A: Absolutely! They store well in the refrigerator for up to 5 days or in the freezer for a month.

Q: What if I don’t have pumpkin pie spice?
A: Make your own blend with cinnamon, nutmeg, ginger, and cloves.

Q: Can I skip the white chocolate coating?
A: Yes, roll the truffles in cocoa powder, powdered sugar, or crushed nuts instead.


Conclusion

Pumpkin Cheesecake Truffles are a delightful combination of seasonal flavors and creamy indulgence. Easy to make yet luxurious in taste, these treats are perfect for elevating any occasion. Whether enjoyed as a snack, dessert, or edible gift, they’re guaranteed to impress and satisfy every palate. Try this recipe and savor the joy of homemade gourmet truffles!

Delicious Tomato and Oregano Soup: Fresh, Savory, and Comforting

tomato and oregano soup

Introduction

Warm, comforting, and delightfully simple, Tomato and Oregano Soup is the perfect dish for any season. Its rich tomato base, infused with the aromatic essence of oregano, offers a symphony of flavors that soothe the soul. Whether paired with crusty bread or enjoyed on its own, this timeless soup promises nourishment and satisfaction with every spoonful.


1. The Story Behind Tomato and Oregano Soup

Tomato soup has long been a staple of comfort food, with its origins dating back to the late 18th century. Adding oregano, a fragrant herb native to the Mediterranean, transforms the soup into a celebration of rustic Italian flavors. This combination reflects the harmony of simple ingredients, showcasing how herbs can elevate even the most basic dishes. This recipe draws inspiration from traditional Mediterranean kitchens, bringing a touch of their warmth and tradition into your home.


2. The Benefits of Making Your Own Tomato and Oregano Soup

  • Control Over Ingredients: Homemade soup ensures no hidden additives or preservatives.
  • Freshness: Using ripe, fresh tomatoes and oregano enhances both flavor and nutritional value.
  • Customizable: Adjust the consistency, seasoning, or garnish to suit your taste.
  • Budget-Friendly: A cost-effective option for a nourishing meal.
  • Healthier Option: Packed with vitamins, antioxidants, and the goodness of fresh produce.

3. Essential Ingredients for the Perfect Tomato and Oregano Soup

Here’s what you’ll need:

  • Fresh Tomatoes: 6 large ripe tomatoes (or 4 cups of canned tomatoes).
  • Oregano: 1 tablespoon dried or 2 tablespoons fresh oregano, chopped.
  • Olive Oil: 2 tablespoons, extra virgin for rich flavor.
  • Onion: 1 medium, finely chopped.
  • Garlic: 2 cloves, minced.
  • Vegetable Broth: 3 cups, low-sodium preferred.
  • Salt and Pepper: To taste.
  • Heavy Cream (Optional): ¼ cup for added richness.
  • Basil or Parsley (Optional): For garnish.

4. Cultural History of Ingredients

  • Tomatoes: Initially cultivated in South America, tomatoes became a global culinary staple after their introduction to Europe in the 16th century. They’re now central to countless cuisines.
  • Oregano: Known as “the joy of the mountain,” oregano is a quintessential Mediterranean herb that symbolizes health and vitality.
  • Olive Oil: A cornerstone of Mediterranean diets, olive oil has been treasured for its flavor and health benefits for millennia.

5. Equipment You’ll Need

  • Large pot for cooking.
  • Blender or immersion blender for pureeing the soup.
  • Fine mesh strainer (optional) for a smoother consistency.
  • Ladle for serving.
  • Knife and cutting board for prepping ingredients.

6. Step-by-Step Instructions for Tomato and Oregano Soup

  1. Prepare the Tomatoes
    • If using fresh tomatoes, blanch them in boiling water for 1–2 minutes. Remove the skins, then chop.
  2. Sauté the Base
    • Heat olive oil in a large pot over medium heat. Add onion and garlic, cooking until fragrant and translucent.
  3. Add Tomatoes and Oregano
    • Stir in the chopped tomatoes and oregano. Cook for 5–7 minutes, allowing the flavors to meld.
  4. Simmer with Broth
    • Pour in the vegetable broth. Bring to a boil, then reduce heat and simmer for 20 minutes.
  5. Blend the Soup
    • Use an immersion blender to puree the soup until smooth. For a silkier texture, strain through a fine mesh strainer.
  6. Season and Finish
    • Stir in salt, pepper, and cream (if using). Adjust seasoning as needed.
  7. Serve
    • Ladle into bowls and garnish with fresh basil, parsley, or a drizzle of olive oil.

7. Suggestions for Serving and Storing

  • Serving: Pair with toasted baguette slices, a side salad, or a dollop of sour cream.
  • Storing: Store in an airtight container in the fridge for up to 4 days. Freeze for up to 3 months. Thaw and reheat gently on the stove.

8. Chef Simon’s Tips for Tomato and Oregano Soup

  • Use Fresh Herbs: Fresh oregano provides a more robust flavor than dried.
  • Roast Tomatoes: Roasting tomatoes before adding them to the soup enhances their natural sweetness.
  • Add Depth: A splash of balsamic vinegar or red pepper flakes can elevate the flavor profile.

9. Emotional and Psychological Impact of Food

Tomato and Oregano Soup is more than sustenance—it’s comfort in a bowl. Its warmth and simplicity bring a sense of nostalgia, evoking memories of family dinners and cozy evenings. Enjoying this soup can reduce stress and foster a sense of well-being.


10. Mindful Cooking Techniques

  • Pay attention to the aromas of sautéing onions and garlic, which create the soup’s base.
  • Stir slowly and taste frequently, immersing yourself in the process.
  • Appreciate the vibrant colors and fresh ingredients, connecting with the dish on a sensory level.

11. Tips for Keeping the Recipe Fresh Longer

  • Store the soup in small portions to avoid repeated reheating.
  • Freeze in silicone molds for individual servings.

12. Advanced Culinary Terms and Techniques

  • Blanching: Quickly boiling and cooling tomatoes to remove their skins.
  • Deglazing: Adding broth to lift browned bits from the pot, enhancing flavor.

13. Healthy Ingredient Alternatives

  • Replace heavy cream with coconut milk for a dairy-free option.
  • Use low-sodium broth for a heart-healthier choice.
  • Add lentils or chickpeas for extra protein.

14. More Serving Ideas

  • Sprinkle with grated Parmesan for added richness.
  • Serve with a grilled cheese sandwich for a classic combination.

15. Common Issues and Solutions

  • Too Watery: Simmer uncovered to reduce and thicken the soup.
  • Overly Tangy: Add a pinch of sugar to balance acidity.

16. Variations to Try

  • Spicy Tomato Soup: Add red chili flakes or cayenne pepper.
  • Creamy Tomato Soup: Blend in cream cheese or cashews for extra creaminess.

17. Nutritional Information and Health Benefits

  • Calories: ~180 per serving (without cream).
  • Rich in Antioxidants: Tomatoes contain lycopene, promoting heart health.
  • Low in Fat: A healthy, guilt-free option for any diet.

18. The Art of Pairing Tomato and Oregano Soup

Pair with crusty bread, garlic knots, or a light salad with vinaigrette. A crisp Sauvignon Blanc or herbal tea complements the soup’s flavors beautifully.


19. Weather and Recipe Outcome

Tomato and Oregano Soup is ideal for chilly weather, offering warmth and comfort. However, its lightness also makes it suitable for summer evenings.


20. Other Soup Recipes to Explore

  • Roasted Red Pepper Soup
  • Carrot and Ginger Soup
  • Creamy Mushroom Soup

21. Focus on Tools and Equipment

  • Invest in a high-quality immersion blender for smooth purees.
  • Use heavy-bottomed pots to prevent burning.

22. Frequently Asked Questions (with answers)

Q: Can I make this soup vegan?
A: Yes, simply omit the cream and use vegetable broth.

Q: How do I thicken the soup without cream?
A: Blend in cooked potatoes or add a spoonful of tomato paste.


Conclusion

Tomato and Oregano Soup is a celebration of simplicity and flavor, a dish that embodies comfort and nourishment. Its rich, aromatic blend of ripe tomatoes and fragrant oregano makes it a favorite for all occasions. By following this recipe, you can bring the warmth of Mediterranean tradition into your kitchen and create a meal that satisfies both the palate and the soul. Enjoy every spoonful!