Discover Easy and Flavorful Recipes for Every Meal!

Easy Chicken Brine Recipe

Chicken Brine

Introduction

Brining is a transformative technique that elevates the flavor, texture, and juiciness of chicken. Whether you’re preparing a roast, grilling, or frying, a good chicken brine ensures your dish turns out perfectly every time. This recipe breaks down the process of creating a flavorful brine that infuses your chicken with deliciousness, ensuring every bite is tender and mouthwatering.


1. The Story Behind Chicken Brine

The practice of brining meat dates back centuries, originally developed as a preservation method. Over time, chefs and home cooks discovered that soaking chicken in a saltwater solution not only preserved it but also enhanced its flavor and moisture. Today, brining is an essential step for creating juicy chicken with a depth of flavor that can’t be achieved through seasoning alone.


2. The Benefits of Making Your Own Chicken Brine

  • Enhanced Flavor: A homemade brine allows you to tailor the taste with herbs, spices, and aromatics.
  • Superior Moisture Retention: Brining breaks down muscle proteins, helping the chicken retain moisture during cooking.
  • Tender Texture: The process tenderizes even the toughest cuts.
  • Customizable: From classic salt brines to flavorful herb-infused versions, you control the flavor profile.

3. Essential Ingredients for the Perfect Chicken Brine

A basic brine starts with a simple saltwater solution. From there, you can enhance it with additional ingredients for a robust flavor.

  • Water: The base of any brine; acts as the medium to dissolve salt and distribute flavors.
  • Salt: Creates the necessary chemical environment to tenderize and flavor the chicken.
  • Sugar (optional): Balances the saltiness and adds subtle sweetness.
  • Aromatics: Garlic, onions, bay leaves, and fresh herbs like thyme, rosemary, and parsley.
  • Spices: Black peppercorns, coriander seeds, and mustard seeds.
  • Acid (optional): Lemon juice, apple cider vinegar, or orange slices for a tangy kick.

4. Cultural History of Brining

Brining is rooted in ancient culinary traditions, with methods evolving based on regional preferences. Scandinavian countries used salt-heavy brines for preserving fish, while American Southern cuisine popularized brining poultry, especially for Thanksgiving turkeys. This universal technique has been adapted globally to enhance various meats.


5. Equipment You’ll Need

  • Large stockpot or mixing bowl
  • Measuring cups and spoons
  • Whisk
  • Airtight container or resealable plastic bag (to hold chicken and brine)
  • Refrigerator space for chilling

6. Step-by-Step Instructions for Chicken Brine

Ingredients:

  • 1 gallon of water
  • 3/4 cup kosher salt (or 1/2 cup table salt)
  • 1/2 cup granulated sugar
  • 4 garlic cloves, smashed
  • 1 onion, quartered
  • 2 bay leaves
  • 1 tablespoon black peppercorns
  • Fresh herbs (thyme, rosemary, parsley)

Instructions:

  1. Prepare the Brine Solution:
    In a large pot, combine the water, salt, and sugar. Heat over medium heat, stirring until the salt and sugar completely dissolve.
  2. Add Aromatics:
    Remove the pot from heat and stir in garlic, onion, bay leaves, peppercorns, and fresh herbs. Allow the mixture to steep for 10 minutes.
  3. Cool the Brine:
    Let the brine cool completely to room temperature, then chill it in the refrigerator. Adding chicken to a hot brine can start the cooking process prematurely, so ensure it’s cold.
  4. Brine the Chicken:
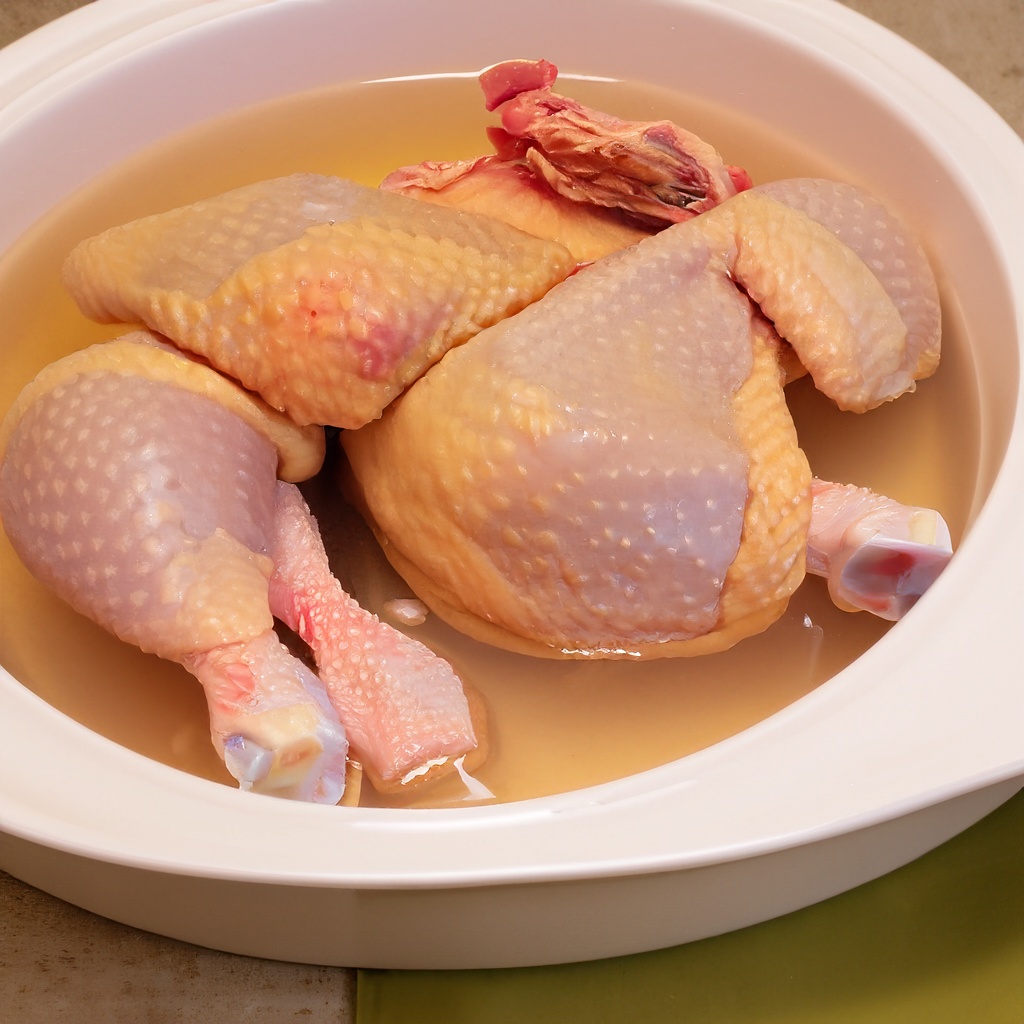
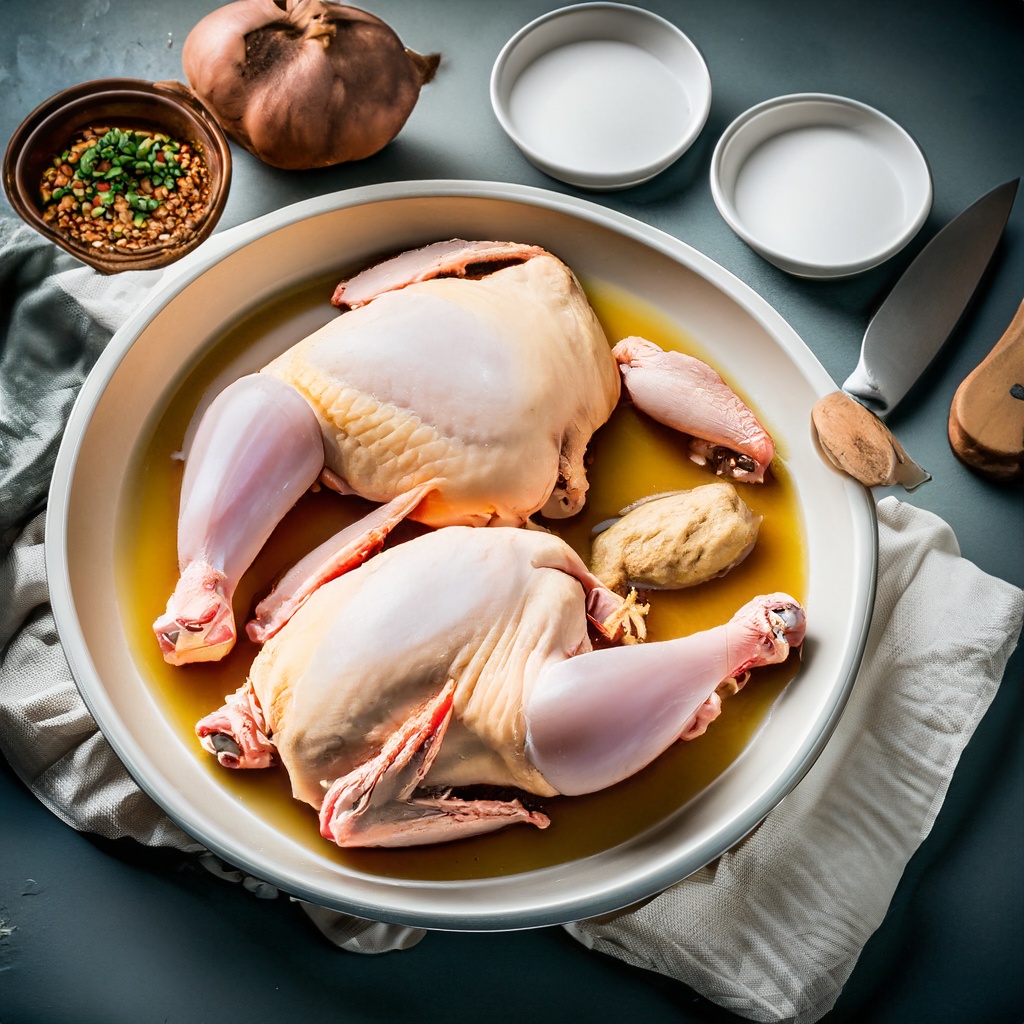
    Submerge the chicken in the cooled brine, ensuring it’s fully covered. Use a resealable plastic bag for small cuts or a large container for whole chickens.
  5. Refrigerate:
    Cover and refrigerate for:
    • Small cuts (breasts, thighs): 2-4 hours
    • Whole chicken: 8-12 hours
  6. Rinse and Pat Dry:
    Remove the chicken from the brine and rinse under cold water to remove excess salt. Pat dry with paper towels.
  7. Cook as Desired:
    Roast, grill, or fry your brined chicken, ensuring it’s cooked to an internal temperature of 165°F (74°C).

7. Suggestions for Serving and Storing

  • Serving: Brined chicken pairs beautifully with roasted vegetables, creamy mashed potatoes, or a crisp green salad.
  • Storing: If you’re not cooking immediately, refrigerate the brined chicken for up to 24 hours.

8. Chef Simon’s Tips for Chicken Brine

  • Balance Your Ratios: Stick to the 1-gallon water to 3/4-cup kosher salt ratio for optimal results.
  • Experiment with Flavors: Infuse your brine with unique ingredients like honey, smoked paprika, or fresh ginger.
  • Don’t Overbrine: Leaving the chicken in the brine too long can make it overly salty or mushy.

9. Emotional and Psychological Impact of Food

There’s something inherently satisfying about preparing a brine—it’s a deliberate process that slows you down, grounding you in the act of cooking. Sharing a juicy, flavorful chicken dish with loved ones fosters warmth and connection.


10. Mindful Cooking Techniques

  • Focus on Texture: Notice the salt granules dissolving and the aromas as you add fresh herbs.
  • Be Present: Use the brining process as a way to center yourself and embrace the joy of cooking.

11. Tips for Keeping the Recipe Fresh Longer

  • Store unused brine in the refrigerator for up to 3 days, but discard after one use with chicken.
  • If you’re preparing ahead, freeze the brine in ice cube trays for future use.

12. Advanced Culinary Terms and Techniques

  • Osmosis: The scientific process where salt and water penetrate the chicken, enhancing its flavor and moisture.
  • Brining vs. Marinating: Brining focuses on moisture and tenderness, while marinades emphasize surface flavor.

13. Healthy Ingredient Alternatives

  • Replace sugar with honey or maple syrup for a natural sweetener.
  • Use low-sodium salt for a heart-healthy option.

14. More Serving Ideas

  • Serve brined chicken shredded in tacos or burritos.
  • Use in chicken salads or as a topping for pasta.

15. Common Issues and Solutions

  • Too Salty Chicken: Rinse thoroughly after brining. Adjust salt in recipes if needed.
  • Rubbery Texture: Reduce brining time for smaller cuts of chicken.

16. Variations to Try

  • Citrus Brine: Add orange and lemon slices for a zesty twist.
  • Spicy Brine: Incorporate crushed red pepper flakes and smoked paprika.

17. Nutritional Information and Health Benefits

  • Low-Calorie Flavor Boost: Brining adds flavor without extra calories.
  • Rich in Minerals: Salt and herbs introduce essential trace minerals.

18. The Art of Pairing Brined Chicken

  • Pair with rich sides like macaroni and cheese, or balance it with a light vinaigrette salad.
  • Serve with a chilled glass of white wine or a crisp lager.

19. Weather and Recipe Outcome

Cold weather calls for roasted brined chicken, while brined grilled chicken is perfect for summer barbecues. Adjust seasoning based on seasonal herbs.


20. Other Chicken Recipes to Explore

  • Lemon Herb Roasted Chicken
  • Classic Fried Chicken
  • Grilled Chicken Skewers

21. Focus on Tools and Equipment

  • Digital Thermometer: Ensures chicken is cooked to perfection.
  • Large Container: For easy brining without spills.

22. Frequently Asked Questions

Q1: Can I reuse chicken brine?
A1: No, discard brine after one use to avoid cross-contamination.

Q2: Can I use frozen chicken in a brine?
A2: Yes, but ensure the chicken is fully thawed before brining for even absorption.


Conclusion

A well-prepared chicken brine is the secret to elevating your poultry dishes. This versatile technique promises succulent, flavorful chicken that’s perfect for any occasion. With the right ingredients and a little patience, your meals will shine with restaurant-quality flavor. Happy cooking!


Thank you for visiting SqueezyRecipes! We’re dedicated to making cooking enjoyable and accessible for everyone, regardless of your skill level. Chef Simon is always ready to share the best recipes that bring a creative touch to your daily meals. With each visit, you’ll discover new recipes and innovative ideas that cater to every occasion. Don’t miss out on exploring SqueezyRecipes for the latest delicious dishes, and feel free to leave your feedback and share your experiences with the recipes you’ve tried. Cooking together makes everything better!

Easy Sourdough Discard Biscuit Recipe

Sourdough Discard

Introduction

Transforming sourdough discard into soft, flaky biscuits is a perfect way to reduce waste while enjoying a delightful homemade treat. These biscuits are golden, buttery, and filled with subtle tanginess from the sourdough starter. Whether you serve them with a hearty soup, slather them with jam, or enjoy them straight from the oven with a pat of butter, they’re a versatile addition to any meal. Let’s explore the recipe in detail and unlock the secrets to making perfect sourdough discard biscuits.


1. The Story Behind Sourdough Discard Biscuits

Sourdough baking has captivated home bakers worldwide, bringing with it a constant challenge: what to do with the discard. Instead of throwing away your sourdough discard, why not turn it into something delicious? This recipe evolved as a practical solution to minimize food waste while embracing the tangy flavor of sourdough in a new way. Over the years, sourdough discard biscuits have become a favorite for their simplicity and ability to showcase the unique qualities of sourdough.


2. The Benefits of Making Your Own Sourdough Discard Biscuits

  • Waste Reduction: Making biscuits with sourdough discard helps you use every bit of your starter.
  • Healthier Option: Sourdough contains natural probiotics, which can aid digestion.
  • Freshness and Flavor: Homemade biscuits offer unmatched freshness with a delicious tangy twist.
  • Customizable: Add herbs, cheese, or even spices to adapt this recipe to your preferences.

3. Essential Ingredients for the Perfect Sourdough Discard Biscuit

  • All-purpose flour: The base ingredient for structure and softness.
  • Sourdough discard: Adds flavor and acts as part of the liquid content.
  • Butter: Creates those signature flaky layers and adds richness.
  • Buttermilk: Activates the baking powder for rise and enhances the tanginess.
  • Baking powder and baking soda: Essential for the lift and fluffy texture.
  • Salt: Balances flavors and enhances taste.

4. Cultural History of Ingredients

  • Sourdough: One of the oldest forms of leavened bread, dating back to Ancient Egypt, sourdough has a rich history of providing sustenance and flavor.
  • Butter: Revered across cultures, butter has been a symbol of luxury and essential in baking for centuries.
  • Buttermilk: A staple in Southern cooking, buttermilk has been used in biscuits for generations due to its tangy flavor and tenderizing properties.

5. Equipment You’ll Need

  • Large mixing bowl
  • Pastry cutter or fork
  • Measuring cups and spoons
  • Baking sheet
  • Rolling pin
  • Biscuit cutter (or a glass with a sharp edge)
  • Parchment paper

6. Step-by-Step Instructions for Sourdough Discard Biscuits

  1. Preheat Your Oven: Set your oven to 425°F (220°C) and line a baking sheet with parchment paper.
  2. Mix the Dry Ingredients: In a large bowl, combine 2 cups of all-purpose flour, 1 tablespoon of baking powder, 1/2 teaspoon of baking soda, and 1/2 teaspoon of salt.
  3. Cut in the Butter: Add 6 tablespoons of cold, unsalted butter (cut into cubes) to the dry ingredients. Use a pastry cutter or fork to work the butter into the flour until it resembles coarse crumbs.
  4. Incorporate the Sourdough Discard: Stir in 1 cup of sourdough discard until the mixture begins to come together.
  5. Add the Buttermilk: Gradually mix in 1/3 cup of cold buttermilk. You want the dough to just hold together without being overly sticky.
  6. Roll and Fold: Turn the dough out onto a floured surface. Gently roll it into a rectangle, fold it over itself, and roll it out again. Repeat this 2-3 times to create layers.
  7. Cut the Biscuits: Roll the dough to about 1/2-inch thickness and use a biscuit cutter to cut out rounds. Place them on the prepared baking sheet, ensuring the edges touch for a better rise.
  8. Bake: Bake for 12-15 minutes or until the tops are golden brown.
  9. Serve Warm: Enjoy immediately or let them cool on a wire rack.

7. Suggestions for Serving and Storing

  • Serving Ideas: Serve warm with butter, honey, or a dollop of fruit preserves. Pair them with gravy for a hearty breakfast or alongside soups and stews.
  • Storage Tips: Store leftover biscuits in an airtight container at room temperature for up to 2 days. To reheat, warm them in an oven at 350°F (175°C) for a few minutes. For longer storage, freeze biscuits and reheat as needed.

8. Chef Simon’s Tips for Sourdough Discard Biscuits

  • Cold is Key: Ensure your butter, sourdough discard, and buttermilk are cold to achieve the flakiest biscuits.
  • Don’t Overwork the Dough: Handle the dough gently to avoid tough biscuits.
  • Get Creative: Experiment with add-ins like shredded cheddar, fresh herbs, or garlic powder for a unique twist.

9. Emotional and Psychological Impact of Food

Homemade biscuits evoke a sense of warmth and comfort. Their rustic charm brings back memories of family meals and cozy mornings. Sharing these biscuits with loved ones can create a sense of connection and nostalgia, reminding us of the joys of simple pleasures.


10. Mindful Cooking Techniques

  • Be Present: Focus on the texture of the dough, the feel of the butter as you cut it into the flour, and the aromas filling your kitchen as they bake.
  • Savor the Process: Appreciate the transformation of humble ingredients into something magical.

11. Tips for Keeping the Recipe Fresh Longer

  • Use an airtight container or wrap biscuits individually before freezing to retain freshness.
  • Add a slice of bread to the container to absorb excess moisture and prevent biscuits from drying out.

12. Advanced Culinary Terms and Techniques

  • Docking: Poking small holes in dough (not used here but relevant to other pastries).
  • Laminating: Folding and rolling dough to create layers—a simplified version is used here to enhance flakiness.

13. Healthy Ingredient Alternatives

  • Replace butter with coconut oil for a dairy-free option.
  • Use whole wheat flour for added fiber and nutrients.

14. More Serving Ideas

  • Make mini biscuit sandwiches with eggs, cheese, and bacon.
  • Top with creamed spinach or a poached egg for an elegant brunch dish.

15. Common Issues and Solutions

  • Flat Biscuits: Ensure your baking powder and soda are fresh.
  • Dry Dough: Add a splash of buttermilk to bring the dough together.

16. Variations to Try

  • Cheddar and Chive Biscuits: Add 1 cup of shredded cheddar and 2 tablespoons of chopped chives to the dough.
  • Sweet Biscuits: Incorporate 2 tablespoons of sugar and top with cinnamon sugar before baking.

17. Nutritional Information and Health Benefits

  • Calories: ~200 per biscuit (varies by size).
  • Protein: Sourdough discard provides extra protein.
  • Vitamins: Buttermilk adds calcium and vitamin D.

18. The Art of Pairing Sourdough Discard Biscuits

  • Pair with Soup: Tomato bisque or chicken noodle soup complements these biscuits perfectly.
  • Tea or Coffee: A warm beverage enhances the biscuit’s comforting flavors.

19. Weather and Recipe Outcome

Biscuits are a year-round delight but especially satisfying on a cold, rainy day when their warmth and texture offer ultimate comfort.


20. Other Biscuit Recipes to Explore

  • Classic Southern Buttermilk Biscuits
  • Herb and Parmesan Drop Biscuits
  • Sweet Potato Biscuits

21. Focus on Tools and Equipment

  • Pastry Cutter: Ensures even distribution of butter.
  • Cooling Rack: Prevents soggy bottoms by allowing air circulation.

22. Frequently Asked Questions

Q1: Can I use active sourdough starter instead of discard?
A1: Yes, but the flavor may be slightly milder.

Q2: Can I skip the buttermilk?
A2: Substitute with milk and a splash of vinegar or lemon juice.


23. Conclusion

Sourdough discard biscuits are a delicious way to minimize waste while enjoying a versatile baked good. With their buttery layers and tangy undertones, they’re perfect for any meal or occasion. Following this detailed guide ensures biscuits that are flaky, flavorful, and utterly irresistible. Happy baking!


Thank you for visiting SqueezyRecipes! We’re dedicated to making cooking enjoyable and accessible for everyone, regardless of your skill level. Chef Simon is always ready to share the best recipes that bring a creative touch to your daily meals. With each visit, you’ll discover new recipes and innovative ideas that cater to every occasion. Don’t miss out on exploring SqueezyRecipes for the latest delicious dishes, and feel free to leave your feedback and share your experiences with the recipes you’ve tried. Cooking together makes everything better!