Discover Easy and Flavorful Recipes for Every Meal!

Flavorful Caesar Roasted Broccoli Recipe: Crispy and Delicious

Caesar Roasted Broccoli

If you’re looking to elevate your typical vegetable side dish, this Caesar Roasted Broccoli is the perfect recipe. Roasting the broccoli gives it a crispy, caramelized texture, and the rich, tangy Caesar dressing brings it to life with bold flavor. Whether served as a side for a weeknight dinner or as part of a larger meal spread, this broccoli dish will become a crowd-pleaser in no time.


1. The Story Behind Caesar Roasted Broccoli

The Caesar salad is a classic, beloved dish with roots tracing back to the 1920s in Tijuana, Mexico. Caesar Cardini, an Italian-American restaurateur, is credited with its invention, combining ingredients like romaine lettuce, Parmesan cheese, croutons, and a signature dressing. Over the years, Caesar-inspired dishes have taken many forms. This Caesar Roasted Broccoli offers a twist on the original by pairing roasted vegetables with the creamy, garlicky flavors of Caesar dressing, providing a savory vegetable side that’s both comforting and healthy.


2. The Benefits of Making Your Own Caesar Roasted Broccoli

  • Freshness: Homemade dressing means no preservatives or artificial ingredients.
  • Control the Flavors: Adjust the level of garlic, cheese, and acidity to suit your preferences.
  • Healthy: Broccoli is a nutrient-packed vegetable that provides fiber, vitamins, and antioxidants. Roasting it enhances its flavor without adding unnecessary calories.
  • Versatile: This dish can be a side to a variety of meals, from grilled meats to pasta dishes, or even enjoyed on its own.

3. Essential Ingredients for the Perfect Caesar Roasted Broccoli

  • Broccoli: The star of the dish. Look for fresh, vibrant green broccoli crowns for the best flavor.
  • Olive Oil: Adds richness and helps with the roasting process.
  • Caesar Dressing: Use a high-quality Caesar dressing, or make your own from scratch for a fresher flavor.
  • Parmesan Cheese: Freshly grated for a sharper, more robust flavor.
  • Garlic Powder: For an extra boost of savory flavor that complements the Caesar dressing.
  • Lemon: Fresh lemon juice brightens up the dish, balancing the richness of the dressing.

4. Cultural History of Ingredients

  • Broccoli: Native to the Mediterranean, broccoli has been a staple in European cuisine for centuries, valued for its health benefits.
  • Caesar Dressing: A creation of Caesar Cardini, this dressing has become a cornerstone of American and global cuisine, offering a creamy, tangy profile that pairs well with a variety of dishes.
  • Parmesan Cheese: A traditional Italian cheese, Parmesan has been produced for over 800 years and is known for its sharp, nutty flavor, often used in pasta dishes, salads, and, of course, Caesar salad.

5. Equipment You’ll Need

  • Baking Sheet: For roasting the broccoli.
  • Mixing Bowl: To toss the broccoli with dressing.
  • Grater: For freshly grated Parmesan cheese.
  • Tongs or Spoon: To mix and arrange the broccoli evenly on the baking sheet.

6. Step-by-Step Instructions for Caesar Roasted Broccoli

Ingredients:

  • 1 large head of broccoli, cut into florets
  • 2 tablespoons olive oil
  • 3 tablespoons Caesar dressing (store-bought or homemade)
  • 2 tablespoons freshly grated Parmesan cheese
  • 1 teaspoon garlic powder
  • Salt and pepper to taste
  • 1 tablespoon fresh lemon juice (optional)

Directions:

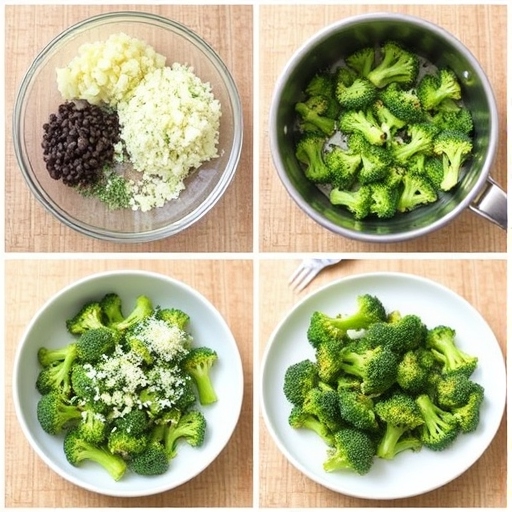
Step 1: Prepare the Broccoli
  1. Preheat your oven to 425°F (220°C).
  2. Wash and dry the broccoli thoroughly. Cut the broccoli into bite-sized florets. Make sure they’re evenly sized so they cook uniformly.
Step 2: Toss with Olive Oil and Seasoning
  1. In a large mixing bowl, toss the broccoli florets with olive oil, ensuring each piece is coated.
  2. Add salt, pepper, garlic powder, and half of the grated Parmesan cheese. Toss again to evenly distribute the seasonings.
Step 3: Roast the Broccoli
  1. Spread the seasoned broccoli in a single layer on a baking sheet.
  2. Roast in the preheated oven for 20-25 minutes, stirring halfway through, until the broccoli is golden and crispy at the edges.
Step 4: Add the Caesar Dressing
  1. Once roasted, remove the broccoli from the oven and place it back in the mixing bowl.
  2. Drizzle the Caesar dressing over the hot broccoli and toss to coat evenly. The warmth from the broccoli helps the dressing adhere better.
Step 5: Garnish and Serve
  1. Sprinkle the remaining Parmesan cheese over the broccoli and squeeze fresh lemon juice on top for added brightness.
  2. Serve immediately and enjoy the crispy, creamy goodness!

7. Suggestions for Serving and Storing

  • Serving: Serve this Caesar Roasted Broccoli alongside roasted chicken, grilled fish, or as a topping for your favorite pasta.
  • Storing: Store leftovers in an airtight container in the fridge for up to 2-3 days. Reheat in the oven for a few minutes to maintain the crispy texture.

8. Chef Simon’s Tips for Caesar Roasted Broccoli

  • Crispiness: For extra crispiness, broil the broccoli for the last 2-3 minutes of roasting.
  • Homemade Dressing: If you want to make your own Caesar dressing, blend mayonnaise, grated Parmesan, garlic, Dijon mustard, anchovy paste, lemon juice, and Worcestershire sauce.
  • Add Crunch: For a fun twist, sprinkle crumbled croutons or roasted nuts on top before serving.

9. Emotional and Psychological Impact of Food

Roasted vegetables like broccoli are associated with comfort and nourishment. The rich, creamy Caesar dressing adds indulgence, making this dish both satisfying and heartwarming. It’s a perfect way to enjoy a vegetable side that feels like a treat.


10. Mindful Cooking Techniques

  • Take time to appreciate the roasting process. Observe how the broccoli transforms, becoming tender inside and crispy on the outside.
  • Focus on the flavors—balance the richness of the dressing with the freshness of the lemon and the bite of Parmesan.

11. Tips for Keeping the Recipe Fresh Longer

  • Store leftover roasted broccoli in an airtight container. Reheat it in the oven at 375°F (190°C) for 5-7 minutes to restore its crispness.
  • The Caesar dressing can be stored separately in a jar for up to a week, so you can use it on other salads or roasted vegetables.

12. Advanced Culinary Terms and Techniques

  • Roasting: A dry-heat cooking method that involves cooking food at high temperatures in the oven, creating caramelization and enhancing natural flavors.
  • Deglaze: While not used in this recipe, deglazing can add depth to the flavor. You might consider deglazing your baking sheet with a splash of white wine or broth to add flavor when you’re making a sauce.

13. Healthy Ingredient Alternatives

  • Caesar Dressing: Opt for a lighter, yogurt-based Caesar dressing for fewer calories.
  • Cheese: Substitute Parmesan with a reduced-fat version or a dairy-free cheese for a healthier twist.

14. More Serving Ideas

  • Caesar Roasted Broccoli Salad: Toss the roasted broccoli with mixed greens, avocado, and a lemon vinaigrette for a refreshing salad.
  • Pair with Grains: Serve over quinoa, brown rice, or couscous for a complete vegetarian meal.

15. Common Issues and Solutions

  • Problem: Broccoli is too soggy.
    Solution: Ensure that you’re not overcrowding the baking sheet and that the broccoli has plenty of space to roast, not steam.
  • Problem: Caesar dressing separates.
    Solution: Make sure to toss the broccoli with the dressing when it’s hot to help it adhere better.

16. Variations to Try

  • Spicy Version: Add a pinch of red pepper flakes to the broccoli before roasting for a spicy kick.
  • Nutty Crunch: Sprinkle roasted almonds or pine nuts over the finished dish for added texture.

17. Nutritional Information and Health Benefits

Per serving (1 cup of roasted broccoli):

  • Calories: 140
  • Fat: 10g
  • Protein: 5g
  • Carbs: 7g
  • Fiber: 4g

18. The Art of Pairing Caesar Roasted Broccoli

Pair with a crisp, refreshing white wine like Sauvignon Blanc or Chardonnay to complement the creamy texture of the Caesar dressing.


19. Weather and Recipe Outcome

  • Roasted vegetables, especially in cooler weather, provide a cozy, comforting meal. The warmth from the roasted broccoli paired with the creamy Caesar dressing makes it ideal for fall and winter.

20. Other Vegetable Recipes to Explore

  • Roasted Brussels Sprouts with Balsamic Glaze
  • Garlic Parmesan Roasted Carrots
  • Spicy Roasted Sweet Potatoes

Conclusion

Caesar Roasted Broccoli brings together the bold flavors of Caesar salad with the natural sweetness of roasted vegetables. This simple yet indulgent dish will quickly become a favorite at your dinner table. Whether you’re making


Thank you for visiting SqueezyRecipes! We’re dedicated to making cooking enjoyable and accessible for everyone, regardless of your skill level. Chef Simon is always ready to share the best recipes that bring a creative touch to your daily meals. With each visit, you’ll discover new recipes and innovative ideas that cater to every occasion. Don’t miss out on exploring SqueezyRecipes for the latest delicious dishes, and feel free to leave your feedback and share your experiences with the recipes you’ve tried. Cooking together makes everything better!

Easy Crockpot Thai Yellow Curry Chicken Recipe: Flavorful and Tender

Crockpot Thai Yellow Curry Chicken

If you’re looking for an easy, comforting dish with vibrant flavors, this Crockpot Thai Yellow Curry Chicken is a must-try. The slow cooking method allows the chicken to absorb all the aromatic spices and coconut milk, creating a rich and creamy curry with a deep, layered flavor. Paired with steamed rice, this dish will transport you straight to the heart of Thai cuisine without the hassle of standing over the stove for hours.


1. The Story Behind Crockpot Thai Yellow Curry Chicken

Thai curry is a staple of Thai cuisine, known for its harmonious blend of spicy, sweet, sour, and salty flavors. Yellow curry, in particular, is a milder variety compared to green or red curry, with its signature yellow color coming from turmeric, cumin, and coriander. This version of Crockpot Thai Yellow Curry Chicken simplifies the process by using a slow cooker, which allows the flavors to meld together over time, making it a convenient and flavorful meal. The recipe brings the essence of Thai cooking into your home with minimal effort.


2. The Benefits of Making Your Own Crockpot Thai Yellow Curry Chicken

  • Flavor Control: By making it at home, you have full control over the spice level and sweetness of the curry.
  • Healthier Option: Making your own curry means you can choose healthier ingredients, such as light coconut milk and fresh vegetables.
  • Convenience: The slow cooker does all the work for you, allowing you to focus on other tasks while the curry simmers.
  • Versatility: This dish can be customized with your favorite vegetables or proteins, making it adaptable to different dietary preferences.

3. Essential Ingredients for the Perfect Crockpot Thai Yellow Curry Chicken

  • Chicken: Boneless, skinless chicken thighs work best for this recipe due to their tenderness, but chicken breasts can also be used.
  • Yellow Curry Paste: The base for the curry, made from a blend of turmeric, garlic, lemongrass, and other spices.
  • Coconut Milk: Full-fat coconut milk provides the creamy texture that is characteristic of Thai curries.
  • Vegetables: Bell peppers, carrots, and onions add sweetness and texture to the curry.
  • Garlic and Ginger: Fresh garlic and ginger are key to adding depth and warmth to the curry.
  • Fish Sauce: A classic ingredient in Thai cooking, fish sauce provides umami and a savory base.
  • Lime: Fresh lime juice adds brightness and balances the richness of the coconut milk.
  • Chicken Broth: Adds liquid to the curry and enhances the overall flavor.
  • Brown Sugar: A touch of sweetness to balance the spiciness and acidity in the dish.
  • Fresh Herbs: Thai basil or cilantro for garnish.

4. Cultural History of Ingredients

  • Curry Paste: Thai curry pastes are a blend of fresh herbs and spices, typically ground into a paste. Yellow curry paste is the mildest of the Thai curries, and its distinct flavor is rooted in Indian curry traditions, with added Thai ingredients like lemongrass and galangal.
  • Coconut Milk: Coconut milk is a central ingredient in many Southeast Asian cuisines, known for its richness and ability to carry and balance complex flavors.
  • Fish Sauce: A fermented condiment widely used in Southeast Asia, fish sauce adds a salty, umami flavor that is essential to Thai cooking.

5. Equipment You’ll Need

  • Crockpot: The star of the show! A slow cooker is essential for making this curry with minimal effort.
  • Knife and Cutting Board: To chop vegetables and chicken.
  • Measuring Spoons and Cups: For accurate measurements of spices and liquids.
  • Wooden Spoon or Tongs: For stirring the curry.

6. Step-by-Step Instructions for Crockpot Thai Yellow Curry Chicken

Ingredients:

  • 2 lbs boneless, skinless chicken thighs
  • 1 tablespoon yellow curry paste
  • 1 can (14 oz) coconut milk
  • 1 cup chicken broth
  • 1 medium onion, sliced
  • 2 medium carrots, sliced
  • 1 bell pepper, sliced
  • 2 cloves garlic, minced
  • 1-inch piece of fresh ginger, minced
  • 2 tablespoons fish sauce
  • 1 tablespoon brown sugar
  • 1 tablespoon lime juice (optional)
  • 1 tablespoon fresh cilantro or Thai basil for garnish

Directions:

Step 1: Prepare the Ingredients
  1. Prep the Chicken: Cut the chicken thighs into bite-sized pieces for even cooking.
  2. Chop the Veggies: Slice the onion, carrots, and bell pepper into thin pieces. Mince the garlic and ginger.
Step 2: Assemble in the Crockpot
  1. Place the chicken pieces in the bottom of the slow cooker.
  2. Add the sliced vegetables (onion, carrots, bell pepper), garlic, and ginger.
  3. In a small bowl, combine the yellow curry paste, coconut milk, chicken broth, fish sauce, and brown sugar. Pour this mixture over the chicken and vegetables. Stir to combine.
Step 3: Slow Cook
  1. Cover the crockpot and cook on low for 6 hours or high for 3 hours, until the chicken is cooked through and tender, and the flavors have melded together.
Step 4: Final Touches
  1. Before serving, stir in the lime juice for added brightness and adjust the seasoning if needed.
  2. Garnish with fresh cilantro or Thai basil.

7. Suggestions for Serving and Storing

  • Serving: Serve this Thai yellow curry chicken over steamed jasmine rice or with a side of naan bread to soak up the delicious sauce.
  • Storing: Leftovers can be stored in an airtight container in the fridge for up to 3 days. The curry also freezes well for up to 3 months—simply thaw and reheat.

8. Chef Simon’s Tips for Crockpot Thai Yellow Curry Chicken

  • Adjusting Spice Level: If you like more heat, add a chopped chili pepper or a pinch of cayenne pepper to the curry paste.
  • Creaminess: For a richer curry, substitute half of the chicken broth with additional coconut milk.
  • Veggie Variations: Add other vegetables like sweet potatoes, zucchini, or snap peas for added texture and flavor.

9. Emotional and Psychological Impact of Food

A warm bowl of curry can be incredibly comforting, offering both physical warmth and emotional satisfaction. The aromatic spices in this dish can have a calming effect, making it a perfect meal to enjoy after a long day. Plus, the creamy coconut milk provides a sense of indulgence that makes every bite feel special.


10. Mindful Cooking Techniques

While preparing this dish, focus on the smells and textures of the ingredients as you chop and combine them. Take a moment to appreciate the colorful vegetables, the aromatic curry paste, and the creamy coconut milk as they meld together in the slow cooker. Mindful cooking can make the process more enjoyable and the result more fulfilling.


11. Tips for Keeping the Recipe Fresh Longer

  • Reheating: Reheat leftovers gently over low heat, adding a splash of chicken broth or coconut milk to bring back the creamy texture.
  • Freezing: For long-term storage, freeze the curry in individual portions for easy meals later.

12. Advanced Culinary Terms and Techniques

  • Braising: While this recipe uses slow cooking, braising is a similar technique where meat is cooked in a liquid for a long period, resulting in tender, flavorful dishes.
  • Emulsification: Coconut milk is naturally an emulsion of water and fat. When combined with other ingredients in the slow cooker, it creates a smooth, cohesive sauce.

13. Healthy Ingredient Alternatives

  • Chicken: For a leaner option, use chicken breasts instead of thighs.
  • Coconut Milk: Swap for light coconut milk or use almond milk for a lower-fat version.
  • Brown Sugar: Use honey or a sugar substitute if you prefer a healthier alternative.

14. More Serving Ideas

  • Noodles: Serve over rice noodles for a more traditional Thai-style dish.
  • Add Heat: Spice things up with chili flakes or fresh Thai bird chilies.

15. Common Issues and Solutions

  • Problem: The curry is too thin.
    Solution: If the curry is too thin, let it cook uncovered for an additional 30 minutes to reduce the liquid. Alternatively, stir in a thickening agent such as cornstarch mixed with a little water.
  • Problem: The curry is too salty.
    Solution: Add a splash of coconut milk or a bit more sugar to balance out the saltiness.

16. Variations to Try

  • Vegetarian Version: Swap the chicken for tofu or chickpeas for a delicious plant-based option.
  • Spicy Version: Add more chili paste or fresh chopped chilies for a spicier curry.

17. Nutritional Information and Health Benefits

  • Calories: 350 per serving (without rice)
  • Fat: 22g
  • Carbs: 14g
  • Protein: 30g
  • Fiber: 3g
  • Health Benefits: This dish is a good source of protein, healthy fats, and vitamins. The turmeric in the yellow curry paste offers anti-inflammatory properties, while the coconut milk provides healthy medium-chain triglycerides (MCTs), which are beneficial for brain health and energy. The chicken provides a lean source of protein, supporting muscle repair and growth. Additionally, the vegetables contribute fiber, antioxidants, and essential nutrients.

18. Food Pairing and Recipe Matching

This Crockpot Thai Yellow Curry Chicken pairs beautifully with a variety of sides to enhance the flavors and textures of the dish.

  • Rice: Steamed jasmine rice or basmati rice is the perfect base for soaking up the curry sauce.
  • Vegetables: A simple cucumber salad with a tangy lime dressing complements the richness of the curry. You can also serve with stir-fried greens like spinach or bok choy for added nutrition and color.
  • Side Dishes: Pair with Thai-style spring rolls or Thai peanut noodles for a more filling meal.

19. Weather and Its Impact on the Recipe Outcome

Weather can impact the final outcome of any dish, especially when it comes to slow cooking. In colder months, the comforting warmth and richness of this curry are perfect for cozy dinners. In warmer months, while this dish is hearty, you may want to serve it with lighter sides like fresh salads to balance the richness. If you live in a humid area, the creamy texture of the coconut milk will feel indulgent and refreshing.


20. Other Recipes to Explore

If you enjoyed this Crockpot Thai Yellow Curry Chicken, here are some other recipes you might love to explore:

  • Crockpot Green Curry Chicken: For a spicier, tangier Thai curry.
  • Slow Cooker Chicken Tikka Masala: A rich and aromatic Indian curry.
  • Crockpot Butter Chicken: A creamy and savory curry that’s incredibly easy to make.

21. Focus on Tools and Equipment

While this recipe is designed to be easy and low-maintenance, using quality kitchen tools can elevate your cooking experience. Here are a few recommended tools for the perfect Crockpot Thai Yellow Curry Chicken:

  • Slow Cooker: A programmable crockpot with temperature control ensures your curry cooks evenly and perfectly.
  • Chef’s Knife: For chopping chicken and vegetables efficiently, a sharp chef’s knife makes prep work easier.
  • Wooden Spoon: To stir the curry and prevent it from sticking to the bottom of the crockpot.

22. FAQ (Frequently Asked Questions)

1. Can I make this curry spicier?

Yes! You can add extra chili paste or fresh chopped chilies to increase the heat. You can also adjust the level of spice by adding a small amount of red curry paste to balance it out.

2. Can I use chicken breasts instead of thighs?

Yes, chicken breasts can be substituted. However, they may dry out faster, so make sure not to overcook them. Chicken thighs remain more tender and juicy when slow-cooked.

3. Can I make this vegetarian?

Absolutely! Swap the chicken for tofu, tempeh, or chickpeas for a vegetarian-friendly version. For extra flavor, sauté the tofu before adding it to the crockpot.

4. How long does this curry last in the fridge?

The curry can be stored in an airtight container in the fridge for up to 3 days. For longer storage, you can freeze the curry for up to 3 months.

5. Can I add other vegetables to this curry?

Yes! Feel free to add sweet potatoes, zucchini, snap peas, or any other vegetables you like. Just ensure the vegetables are cut into similar-sized pieces for even cooking.


23. Conclusion

This Crockpot Thai Yellow Curry Chicken is the perfect dish to prepare on a busy day when you want something comforting, flavorful, and easy to make. The slow cooker does all the work for you, resulting in a rich and creamy curry that’s packed with spices, tender chicken, and vibrant vegetables. Whether you’re a seasoned cook or a beginner, this dish will bring the warmth and flavors of Thailand to your table with minimal effort.

So, gather your ingredients, set your slow cooker, and get ready to enjoy a comforting meal that’s sure to become a family favorite!


Enjoy your cooking journey, and don’t forget to share your results with us!


Thank you for visiting SqueezyRecipes! We’re dedicated to making cooking enjoyable and accessible for everyone, regardless of your skill level. Chef Simon is always ready to share the best recipes that bring a creative touch to your daily meals. With each visit, you’ll discover new recipes and innovative ideas that cater to every occasion. Don’t miss out on exploring SqueezyRecipes for the latest delicious dishes, and feel free to leave your feedback and share your experiences with the recipes you’ve tried. Cooking together makes everything better!

Epic Cioppino Recipe: A Bold and Flavorful Seafood Masterpiece

Cioppino recipe

Introduction

Cioppino is a rustic and flavorful seafood stew originating from the Italian-American fishing communities of San Francisco. This dish is a celebration of the sea, combining a medley of fresh fish and shellfish in a savory tomato and wine broth. Whether served with crusty bread for dipping or on its own, Cioppino is a heartwarming meal perfect for family gatherings or special occasions.


1. The Story Behind Cioppino

Cioppino’s origins can be traced back to the 19th century when Italian immigrant fishermen in San Francisco would prepare this dish using the day’s unsold catch. Its name is derived from the Ligurian dialect term “ciuppin,” meaning “to chop,” referring to the preparation of the seafood. This humble stew was a way to stretch limited resources into a satisfying meal, showcasing the ingenuity and resourcefulness of its creators. Today, Cioppino is a beloved dish served in homes and restaurants, often associated with the rich culinary heritage of the Bay Area.


2. The Benefits of Making Your Own Cioppino

  • Customizable Ingredients: You can tailor the seafood selection to your preferences, ensuring freshness and quality.
  • Budget-Friendly: Preparing Cioppino at home allows you to enjoy a luxurious dish at a fraction of the cost of dining out.
  • Health Benefits: Packed with lean protein, omega-3 fatty acids, and an abundance of vegetables, Cioppino is a nutritious choice.
  • Perfect for Gatherings: This one-pot wonder is ideal for entertaining, allowing guests to savor a communal dining experience.

3. Essential Ingredients for the Perfect Cioppino

To create a traditional and flavorful Cioppino, you’ll need the following ingredients:

  • Seafood:
    • 1 lb (450 g) fresh fish fillets (halibut, cod, or snapper), cut into chunks
    • 1 lb (450 g) mussels, cleaned and debearded
    • 1 lb (450 g) clams, scrubbed
    • 1/2 lb (225 g) shrimp, peeled and deveined
    • 1/2 lb (225 g) scallops
    • 1/2 lb (225 g) crab legs (optional)
  • Broth:
    • 2 tbsp olive oil
    • 1 large onion, finely chopped
    • 4 garlic cloves, minced
    • 1/2 tsp red pepper flakes
    • 1 can (28 oz) crushed tomatoes
    • 1 cup dry white wine
    • 4 cups seafood stock or clam juice
    • 2 tbsp tomato paste
    • 1 bay leaf
    • 1 tsp dried oregano
    • 1 tsp dried basil
    • Salt and pepper to taste
  • Garnishes and Sides:
    • Fresh parsley, chopped
    • Crusty bread for serving

4. Cultural History of Ingredients

The choice of seafood in Cioppino reflects the bountiful Pacific Coast. Italian immigrants adapted their traditional fish stew recipes to incorporate local ingredients like Dungeness crab, Pacific halibut, and clams. The use of tomatoes, wine, and aromatic herbs is rooted in Mediterranean cooking traditions, creating a harmonious blend of old-world and new-world flavors.


5. Equipment You’ll Need

  • A large heavy-bottomed pot or Dutch oven
  • A sharp chef’s knife for chopping vegetables and fish
  • A ladle for serving
  • A seafood cracker (if using crab legs)

6. Step-by-Step Instructions for Cioppino

Step 1: Prepare the Seafood

  • Rinse the fish fillets, mussels, clams, shrimp, and scallops.
  • Check mussels and clams for any open shells; discard those that do not close when tapped.

Step 2: Sauté Aromatics

  • Heat olive oil in a large pot over medium heat.
  • Add the chopped onion and sauté until translucent (about 5 minutes).
  • Stir in garlic and red pepper flakes, cooking until fragrant.

Step 3: Build the Broth

  • Add the tomato paste and cook for 1 minute.
  • Stir in the crushed tomatoes, white wine, seafood stock, bay leaf, oregano, and basil.
  • Bring the mixture to a simmer and let it cook for 20–25 minutes to develop flavors.

Step 4: Cook the Seafood

  • Add the clams and mussels to the simmering broth. Cover and cook for 5 minutes, or until the shells open. Discard any that do not open.
  • Gently add the shrimp, scallops, and fish chunks. Simmer for an additional 5 minutes until the seafood is just cooked through.

Step 5: Serve

  • Remove the bay leaf and ladle the Cioppino into bowls.
  • Garnish with fresh parsley and serve with warm, crusty bread.

7. Suggestions for Serving and Storing

  • Serving: Serve Cioppino piping hot with a side of garlic bread or over a bed of steamed rice.
  • Storing: Leftovers can be refrigerated in an airtight container for up to 2 days. Reheat gently to avoid overcooking the seafood.
  • Freezing: While the broth can be frozen, it’s best to add fresh seafood upon reheating for the best texture and flavor.

8. Chef Simon’s Tips for Cioppino

  • Use the freshest seafood available for the best results.
  • Add the seafood in stages to ensure everything is cooked perfectly without overcooking.
  • Don’t skimp on the wine—it adds depth and richness to the broth.

9. Emotional and Psychological Impact of Food

Cioppino evokes feelings of warmth, comfort, and connection. Its communal nature brings people together, creating a sense of belonging. The robust flavors transport diners to the bustling markets and coastal villages where the dish originated.


10. Mindful Cooking Techniques

Take your time to savor the process of making Cioppino. From selecting fresh seafood to simmering the aromatic broth, every step is an opportunity to immerse yourself in the sensory experience of cooking.


11. Tips for Keeping the Recipe Fresh Longer

  • Use seafood as fresh as possible to maximize its shelf life.
  • Store leftovers promptly in the refrigerator to maintain flavor and safety.

12. Advanced Culinary Terms and Techniques

  • Deglazing: Adding wine to the pot after sautéing aromatics to lift and incorporate flavorful browned bits.
  • Sweating: Gently cooking onions to release their natural sweetness without browning.

13. Healthy Ingredient Alternatives

  • Substitute olive oil with avocado oil for added health benefits.
  • Use low-sodium broth to reduce salt content.
  • Swap white wine with vegetable broth for a non-alcoholic version.

14. More Serving Ideas

  • Pair with a crisp white wine like Sauvignon Blanc or Pinot Grigio.
  • Serve with a fresh green salad dressed in lemon vinaigrette for added brightness.

15. Common Issues and Solutions

  • Overcooked Seafood: Add delicate seafood like shrimp and scallops last to prevent toughness.
  • Cloudy Broth: Use clarified stock or strain the broth through a fine mesh sieve.

16. Variations to Try

  • Add calamari rings for extra texture.
  • Experiment with spicy chorizo for a smoky kick.

17. Nutritional Information and Health Benefits

Cioppino is high in protein, omega-3 fatty acids, and vitamins like B12 and D. It’s a heart-healthy dish that supports brain function and immune health.


18. The Art of Pairing Cioppino

Pair Cioppino with crusty sourdough bread, roasted asparagus, or a light citrus sorbet for dessert to cleanse the palate.


19. Weather and Recipe Outcome

Cioppino is perfect for chilly weather, offering warmth and comfort. Its bold flavors are equally enjoyable on a breezy summer evening by the sea.


20. Other Seafood Recipes to Explore

  • Bouillabaisse
  • New England Clam Chowder
  • Seafood Paella

21. Focus on Tools and Equipment

  • A seafood cracker is essential for tackling crab legs.
  • Use a fish spatula for gentle handling of delicate fillets.

22. Frequently Asked Questions

Q: Can I use frozen seafood?

A: Yes, but thaw it completely and pat dry before adding it to the stew.

Q: What’s the best way to clean mussels and clams?

A: Scrub the shells and soak them in cold salted water to remove sand and grit.


Conclusion

Cioppino is more than just a seafood stew—it’s a testament to the resourcefulness and culinary creativity of Italian-American communities. With its robust flavors and heartwarming appeal, this dish is a must-try for seafood lovers. Prepare it for your next gathering and savor the taste of tradition and the sea in every bite.


Thank you for visiting SqueezyRecipes! We’re dedicated to making cooking enjoyable and accessible for everyone, regardless of your skill level. Chef Simon is always ready to share the best recipes that bring a creative touch to your daily meals. With each visit, you’ll discover new recipes and innovative ideas that cater to every occasion. Don’t miss out on exploring SqueezyRecipes for the latest delicious dishes, and feel free to leave your feedback and share your experiences with the recipes you’ve tried. Cooking together makes everything better!

Decadent Parsnip Gratin with Gruyere and Thyme: A Gourmet Delight

Parsnip Gratin with Gruyere and Thyme

Introduction

Parsnip Gratin with Gruyere and Thyme is a luxurious twist on a classic gratin. This dish features thinly sliced parsnips layered with creamy Gruyere cheese and infused with the earthy aroma of fresh thyme. Perfect as a side dish for a holiday meal or a cozy weeknight dinner, this gratin is an elegant way to enjoy the humble parsnip.


1. The Story Behind Parsnip Gratin

Parsnip Gratin is a creative adaptation of the traditional potato gratin, celebrating the sweet and nutty flavor of parsnips. This dish hails from European cuisine, where root vegetables have long been staples during colder months. The addition of Gruyere cheese and thyme elevates it to a gourmet experience, marrying rustic charm with refined flavors.


2. The Benefits of Making Your Own Parsnip Gratin

  • Control Ingredients: Adjust creaminess, cheesiness, or seasoning to your preference.
  • Healthier Choice: Parsnips are rich in vitamins and fiber, making this dish a nutritious indulgence.
  • Versatility: Great as a side dish for roasted meats, poultry, or even vegetarian mains.
  • Impressive Presentation: The golden, bubbling crust is a showstopper on any table.

3. Essential Ingredients for the Perfect Parsnip Gratin

To craft a rich and flavorful gratin, gather the following:

Main Ingredients

  • 2 lbs (900 g) parsnips, peeled and thinly sliced
  • 2 cups (500 ml) heavy cream
  • 1 cup (100 g) Gruyere cheese, grated
  • 1/2 cup (50 g) Parmesan cheese, grated
  • 2 cloves garlic, minced
  • 2 tsp fresh thyme leaves
  • 1/2 tsp nutmeg (optional)
  • Salt and pepper to taste

Optional Garnish

  • Fresh thyme sprigs
  • A drizzle of olive oil or melted butter

4. Cultural History of Ingredients

Parsnips were a vital staple in European cuisine before the introduction of potatoes. Their natural sweetness made them a popular choice in stews, soups, and side dishes. Gruyere cheese, originating from Switzerland, is prized for its nutty, buttery flavor that pairs beautifully with root vegetables. Thyme, a Mediterranean herb, adds a subtle earthiness, enhancing the dish’s overall depth.


5. Equipment You’ll Need

  • Mandoline slicer or sharp knife for slicing parsnips evenly
  • Large mixing bowl
  • 9×13-inch (23×33 cm) baking dish
  • Saucepan for heating cream
  • Foil for covering during baking

6. Step-by-Step Instructions for Parsnip Gratin

Step 1: Prepare the Parsnips

  • Peel the parsnips and slice them into thin, uniform rounds using a mandoline or sharp knife.

Step 2: Make the Cream Mixture

  • In a saucepan over low heat, combine heavy cream, garlic, thyme, nutmeg, salt, and pepper. Heat until warm (but not boiling) to infuse the cream with flavor.

Step 3: Assemble the Gratin

  • Preheat your oven to 375°F (190°C).
  • Grease a baking dish with butter or non-stick spray.
  • Arrange half of the parsnips in an overlapping pattern in the dish.
  • Pour half of the cream mixture over the parsnips, then sprinkle with half of the Gruyere and Parmesan cheeses.
  • Add the remaining parsnips, cream, and cheeses, spreading everything evenly.

Step 4: Bake

  • Cover the dish with foil and bake for 40 minutes.
  • Remove the foil and bake for an additional 20 minutes, or until the top is golden brown and bubbling.

Step 5: Serve

  • Let the gratin rest for 10 minutes before serving to allow the flavors to meld. Garnish with fresh thyme sprigs for a decorative touch.

7. Suggestions for Serving and Storing

  • Serving: Pair with roasted chicken, beef tenderloin, or a vegetarian main like lentil loaf.
  • Storing: Leftovers can be stored in an airtight container in the refrigerator for up to 3 days.
  • Reheating: Warm in the oven at 350°F (175°C) until heated through to maintain the crisp crust.

8. Chef Simon’s Tips for Parsnip Gratin

  • Use a combination of parsnips and potatoes if you want a milder flavor.
  • For an extra crunchy topping, add breadcrumbs mixed with melted butter during the last 10 minutes of baking.
  • Test for doneness by inserting a knife into the center; the parsnips should be tender but not mushy.

9. Emotional and Psychological Impact of Food

The golden, cheesy crust and aromatic thyme create a comforting sensory experience. Parsnip Gratin is more than just a side dish—it’s a source of warmth and joy, perfect for bringing people together around the table.


10. Mindful Cooking Techniques

  • Slice parsnips uniformly for even cooking.
  • Take a moment to appreciate the fragrant aroma of thyme and garlic as they infuse the cream.

11. Tips for Keeping the Recipe Fresh Longer

  • Use fresh parsnips for optimal flavor and texture. Avoid parsnips with soft spots or blemishes.
  • Store leftovers promptly in the refrigerator and reheat only as much as needed to avoid repeated heating.

12. Advanced Culinary Terms and Techniques

  • Gratinée: The golden crust formed by broiling cheese and cream.
  • Infusion: Gently heating cream with herbs and garlic to extract their flavors without cooking.

13. Healthy Ingredient Alternatives

  • Substitute heavy cream with a mix of milk and Greek yogurt for a lighter version.
  • Use low-fat cheese or reduce the amount for a healthier option.
  • Swap parsnips with turnips or celeriac for variety.

14. More Serving Ideas

  • Add caramelized onions or sautéed mushrooms between the layers for added depth.
  • Serve alongside a green salad with a tangy vinaigrette to balance the richness.

15. Common Issues and Solutions

  • Watery Gratin: Ensure parsnips are dry before layering and use heavy cream for consistency.
  • Burnt Top: Cover with foil if the cheese browns too quickly during baking.

16. Variations to Try

  • Truffle Gratin: Drizzle truffle oil over the top before serving for an earthy twist.
  • Vegan Gratin: Use plant-based cream and vegan cheese alternatives.

17. Nutritional Information and Health Benefits

Parsnip Gratin is a good source of fiber, vitamin C, and potassium. While rich in calories, moderation ensures you enjoy its indulgent flavors without overindulgence.


18. The Art of Pairing Parsnip Gratin

Pair with roasted meats, herb-crusted salmon, or a glass of dry white wine like Chardonnay to complement its creamy richness.


19. Weather and Recipe Outcome

Perfect for cold weather, Parsnip Gratin provides a hearty, warming addition to any meal. Its rich flavors are best enjoyed on crisp autumn or winter days.


20. Other Gratin Recipes to Explore

  • Potato Dauphinoise
  • Cauliflower Gratin
  • Sweet Potato and Sage Gratin

21. Focus on Tools and Equipment

  • Use a mandoline slicer for precision.
  • A ceramic baking dish retains heat well, ensuring even cooking.

22. Frequently Asked Questions (with answers)

Q: Can I make Parsnip Gratin ahead of time?

A: Yes, assemble the gratin and refrigerate it (unbaked) for up to 24 hours. Bake when ready to serve.

Q: Can I freeze Parsnip Gratin?

A: It’s best enjoyed fresh, but you can freeze portions in an airtight container for up to 1 month. Thaw and reheat in the oven.


Conclusion

Parsnip Gratin with Gruyere and Thyme is a delightful blend of rustic roots and gourmet flavors. Its creamy texture, fragrant herbs, and golden crust make it a standout dish for any occasion. Whether paired with a festive feast or served as the star of a weeknight dinner, this gratin is sure to impress and satisfy.


Thank you for visiting SqueezyRecipes! We’re dedicated to making cooking enjoyable and accessible for everyone, regardless of your skill level. Chef Simon is always ready to share the best recipes that bring a creative touch to your daily meals. With each visit, you’ll discover new recipes and innovative ideas that cater to every occasion. Don’t miss out on exploring SqueezyRecipes for the latest delicious dishes, and feel free to leave your feedback and share your experiences with the recipes you’ve tried. Cooking together makes everything better!

Quick and Easy Midweek Meal Recipe

Midweek meal recipe

Introduction

This Garlic Butter Shrimp with Lemon Pasta is the ultimate midweek meal—quick, simple, and loaded with flavor. With tender shrimp, silky pasta, and a burst of citrus, it’s the perfect balance of comforting and refreshing. Ready in just 30 minutes, it’s ideal for busy weeknights when you want something satisfying without spending hours in the kitchen.


1. The Story Behind Garlic Butter Shrimp with Lemon Pasta

Pasta dishes are a staple in midweek meal rotations for their versatility and ease of preparation. This recipe was inspired by coastal Italian cuisine, where fresh seafood and simple ingredients shine. The pairing of shrimp with lemon and garlic highlights bright and bold flavors, transforming humble pantry items into a gourmet experience.


2. The Benefits of Making Your Own Midweek Meal

  • Fresh Ingredients: Control the quality and quantity of ingredients.
  • Budget-Friendly: Cheaper than takeout and just as delicious.
  • Customizable: Adjust the spice, garlic, or lemon to your liking.
  • Time-Saving: Quick preparation fits perfectly into a hectic schedule.

3. Essential Ingredients for the Perfect Garlic Butter Shrimp with Lemon Pasta

Main Ingredients

  • 12 oz (340 g) spaghetti or linguine
  • 1 lb (450 g) large shrimp, peeled and deveined
  • 4 tbsp unsalted butter
  • 3 cloves garlic, minced
  • 1/2 cup (120 ml) fresh lemon juice (about 2 lemons)
  • 1/4 cup (60 ml) olive oil
  • 1/4 cup (60 ml) pasta water (reserved)
  • Salt and pepper to taste

Optional Garnish

  • 1/4 cup (30 g) Parmesan cheese, grated
  • 2 tbsp fresh parsley, chopped
  • Lemon zest for extra citrus flavor

4. Cultural History of Ingredients

Shrimp, garlic, and pasta are integral to Mediterranean cuisine, with their roots in ancient culinary traditions. Lemon is a hallmark of Italian cooking, symbolizing freshness and vitality, while butter and olive oil bring richness and depth, often combined to create velvety sauces in traditional recipes.


5. Equipment You’ll Need

  • Large pot for boiling pasta
  • Skillet for cooking shrimp
  • Tongs or pasta fork for tossing
  • Citrus juicer for fresh lemon juice

6. Step-by-Step Instructions for Garlic Butter Shrimp with Lemon Pasta

Step 1: Cook the Pasta

  1. Boil salted water in a large pot and cook the pasta until al dente (1-2 minutes less than package instructions).
  2. Reserve 1/4 cup of pasta water before draining.

Step 2: Prepare the Shrimp

  1. Pat the shrimp dry with paper towels and season with salt and pepper.
  2. Heat olive oil in a skillet over medium heat. Add shrimp and cook for 2-3 minutes per side until pink and opaque. Remove and set aside.

Step 3: Make the Garlic Butter Sauce

  1. In the same skillet, melt butter over low heat.
  2. Add minced garlic and sauté until fragrant (about 1 minute).
  3. Stir in lemon juice and reserved pasta water, whisking to combine.

Step 4: Combine and Serve

  1. Toss the cooked pasta in the skillet with the sauce.
  2. Add the shrimp and mix gently to coat everything evenly.
  3. Garnish with parsley, Parmesan, and lemon zest. Serve immediately.

7. Suggestions for Serving and Storing

  • Serving: Pair with a simple green salad or crusty garlic bread.
  • Storing: Store leftovers in an airtight container in the refrigerator for up to 2 days.
  • Reheating: Heat gently in a skillet with a splash of olive oil or water to avoid drying out.

8. Chef Simon’s Tips for Garlic Butter Shrimp with Lemon Pasta

  • Use fresh lemon juice for the best flavor. Bottled juice lacks the vibrancy needed for this dish.
  • Don’t overcook the shrimp; they can become rubbery. Watch closely as they cook quickly.
  • Add a pinch of red pepper flakes for a spicy kick.

9. Emotional and Psychological Impact of Food

This meal is light yet indulgent, offering a sense of comfort and satisfaction. The bright lemony flavors and tender shrimp uplift the spirit, making it a feel-good dinner for the middle of the week.


10. Mindful Cooking Techniques

  • Focus on the aromas as the garlic sizzles in butter and olive oil.
  • Take your time to layer flavors, ensuring each bite is balanced and vibrant.

11. Tips for Keeping the Recipe Fresh Longer

  • Shrimp should be cooked fresh for the best taste. If using frozen shrimp, thaw them properly beforehand.
  • Lemon sauce may separate when stored; stir well while reheating to recombine.

12. Advanced Culinary Terms and Techniques

  • Deglazing: Adding liquid (lemon juice) to the pan to lift flavorful bits, enhancing the sauce.
  • Emulsification: Combining butter and pasta water to create a smooth, creamy sauce.

13. Healthy Ingredient Alternatives

  • Use whole-grain or gluten-free pasta for a healthier option.
  • Replace butter with avocado oil for a dairy-free version.
  • Opt for zucchini noodles (zoodles) to reduce carbs.

14. More Serving Ideas

  • Add steamed broccoli or sautéed spinach for a vegetable boost.
  • Sprinkle toasted pine nuts for added crunch.
  • Include a side of roasted asparagus to complement the citrusy flavors.

15. Common Issues and Solutions

  • Dry Pasta: Ensure you reserve enough pasta water to loosen the sauce.
  • Overcooked Shrimp: Cook shrimp only until they turn pink; remove immediately.

16. Variations to Try

  • Creamy Lemon Pasta: Add a splash of heavy cream for a richer sauce.
  • Garlic Butter Scallops: Swap shrimp with scallops for a decadent alternative.
  • Mediterranean Style: Add olives, cherry tomatoes, and feta for a Greek twist.

17. Nutritional Information and Health Benefits

This dish is high in protein and omega-3 fatty acids from shrimp. It’s a good source of vitamin C from the lemon and offers energy-boosting carbohydrates from the pasta.


18. The Art of Pairing Garlic Butter Shrimp with Lemon Pasta

Pair with a crisp white wine like Sauvignon Blanc or Pinot Grigio. For non-alcoholic options, serve with sparkling water infused with lemon and mint.


19. Weather and Recipe Outcome

Perfect for any season, this dish’s light yet satisfying nature makes it a versatile choice year-round. Its zesty lemon flavor is particularly refreshing during warm weather.


20. Other Midweek Recipes to Explore

  • Spaghetti Aglio e Olio
  • Chicken Piccata with Capers
  • Shrimp Fried Rice

21. Focus on Tools and Equipment

  • Use a zester for fine lemon zest without the bitter pith.
  • A heavy-bottomed skillet ensures even heat distribution for cooking shrimp and sauce.

22. Frequently Asked Questions (with answers)

Q: Can I use frozen shrimp?

A: Yes, just make sure to thaw and pat them dry before cooking.

Q: What pasta works best for this dish?

A: Spaghetti or linguine is ideal, but fettuccine or angel hair also works well.


Conclusion

Garlic Butter Shrimp with Lemon Pasta is the quintessential midweek meal—quick, flavorful, and elegant. This recipe combines simple ingredients to create a dish that feels indulgent without demanding too much time or effort. With its balance of creamy butter, bright lemon, and tender shrimp, it’s a guaranteed hit for busy weeknights or casual dinner parties.


Thank you for visiting SqueezyRecipes! We’re dedicated to making cooking enjoyable and accessible for everyone, regardless of your skill level. Chef Simon is always ready to share the best recipes that bring a creative touch to your daily meals. With each visit, you’ll discover new recipes and innovative ideas that cater to every occasion. Don’t miss out on exploring SqueezyRecipes for the latest delicious dishes, and feel free to leave your feedback and share your experiences with the recipes you’ve tried. Cooking together makes everything better!

Classic Pecan Pie Recipe: Perfectly Sweet and Irresistible

Classic pecan pie

Introduction

A Classic Pecan Pie is a must-have dessert for any festive table, combining a rich, buttery filling with crunchy pecans and a flaky crust. This timeless recipe is an American classic, often enjoyed during Thanksgiving and other holiday gatherings. With its irresistible caramelized flavor and satisfying texture, pecan pie is a dessert that feels like a warm hug from home.


1. The Story Behind the Classic Pecan Pie

Pecan pie’s origins trace back to the Southern United States, where pecans are native. It gained widespread popularity in the 19th century and became a Thanksgiving staple. This pie is known for its unique combination of sweet and nutty flavors, creating a dessert that celebrates the simplicity and bounty of pecans.


2. The Benefits of Making Your Own Pecan Pie

  • Freshness: Homemade ensures no preservatives and top-quality ingredients.
  • Customization: Adjust sweetness, add bourbon, or mix in chocolate chips to suit your taste.
  • Cost-effective: Store-bought pecan pies can be expensive—making it at home saves money.
  • Tradition: Baking your own pie creates cherished memories and traditions with loved ones.

3. Essential Ingredients for the Perfect Pecan Pie

For the Crust

  • 1 1/4 cups all-purpose flour
  • 1/2 cup unsalted butter, cold and cubed
  • 1/4 tsp salt
  • 3-4 tbsp ice water

For the Filling

  • 1 cup light corn syrup
  • 1 cup packed brown sugar
  • 3 large eggs
  • 1/3 cup unsalted butter, melted
  • 1 tsp pure vanilla extract
  • 1/4 tsp salt
  • 1 1/2 cups pecan halves

4. Cultural History of Ingredients

Pecans are native to North America and have been used in cooking by Native Americans for centuries. Corn syrup, a common ingredient in pecan pie, became widely used in the 20th century, making this pie an accessible dessert for home bakers.


5. Equipment You’ll Need

  • Rolling pin for the crust
  • 9-inch pie dish
  • Mixing bowls
  • Whisk
  • Parchment paper and pie weights (or dried beans)

6. Step-by-Step Instructions for Classic Pecan Pie

Step 1: Prepare the Crust

  1. In a mixing bowl, combine flour and salt.
  2. Add cold butter and use a pastry cutter or fork to blend until crumbly.
  3. Gradually add ice water, 1 tablespoon at a time, until the dough comes together.
  4. Shape into a disc, wrap in plastic, and refrigerate for at least 30 minutes.

Step 2: Prebake the Crust

  1. Roll out the chilled dough on a floured surface into a 12-inch circle.
  2. Transfer to a 9-inch pie dish and trim excess edges.
  3. Line the crust with parchment paper and fill with pie weights.
  4. Bake at 375°F (190°C) for 15 minutes. Remove weights and bake for another 5 minutes.

Step 3: Make the Filling

  1. In a large bowl, whisk together corn syrup, brown sugar, eggs, melted butter, vanilla extract, and salt until smooth.
  2. Stir in the pecan halves, ensuring they are evenly coated.

Step 4: Assemble the Pie

  1. Pour the filling into the prebaked crust. Arrange additional pecan halves on top for decoration if desired.
  2. Bake at 350°F (175°C) for 50-55 minutes or until the filling is set and slightly puffed.

Step 5: Cool and Serve

  1. Let the pie cool completely before slicing to allow the filling to set.
  2. Serve with whipped cream or a scoop of vanilla ice cream.

7. Suggestions for Serving and Storing

  • Serving: Best served warm or at room temperature. Pair with coffee or a dessert wine.
  • Storing: Cover and refrigerate for up to 4 days.
  • Freezing: Wrap tightly and freeze for up to 3 months. Thaw overnight in the fridge before serving.

8. Chef Simon’s Tips for the Perfect Pecan Pie

  • Toast the pecans lightly before adding them to the filling to enhance their flavor.
  • Avoid overmixing the filling; gentle whisking prevents a grainy texture.
  • Use a pie shield or foil to prevent the crust edges from overbrowning.

9. Emotional and Psychological Impact of Food

Pecan pie evokes a sense of warmth and nostalgia, connecting families during holiday feasts. Its comforting flavors and textures create moments of joy and togetherness, making every bite special.


10. Mindful Cooking Techniques

  • Take your time rolling out the dough; enjoy the meditative process of creating something by hand.
  • Focus on the aroma of toasting pecans and caramelizing sugar for a sensory cooking experience.

11. Tips for Keeping the Recipe Fresh Longer

  • Store leftovers in an airtight container in the fridge to prevent the filling from drying out.
  • Brush the crust with a light egg wash to keep it crisp and flavorful.

12. Advanced Culinary Terms and Techniques

  • Blind Baking: Prebaking the crust prevents it from becoming soggy.
  • Docking: Poking small holes in the crust with a fork to allow steam to escape.
  • Caramelization: The browning of sugar during baking adds depth to the pie’s flavor.

13. Healthy Ingredient Alternatives

  • Replace corn syrup with pure maple syrup or honey for a natural sweetener.
  • Use whole-wheat flour for a more nutritious crust.
  • Substitute coconut oil for butter in the filling for a dairy-free option.

14. More Serving Ideas

  • Drizzle with caramel sauce for added decadence.
  • Add a dollop of cinnamon-spiced whipped cream for a festive touch.
  • Sprinkle sea salt flakes on top for a sweet-salty contrast.

15. Common Issues and Solutions

  • Runny Filling: Ensure the pie cools completely before slicing; this allows the filling to set properly.
  • Burnt Crust: Use a pie shield to protect the edges during baking.
  • Too Sweet: Balance sweetness by serving with unsweetened whipped cream.

16. Variations to Try

  • Chocolate Pecan Pie: Add 1/2 cup of melted dark chocolate to the filling.
  • Bourbon Pecan Pie: Stir in 2 tablespoons of bourbon for a Southern twist.
  • Maple Pecan Pie: Replace corn syrup with pure maple syrup for a richer flavor.

17. Nutritional Information and Health Benefits

Pecans are rich in healthy fats, fiber, and antioxidants. While pecan pie is indulgent, moderation allows you to enjoy its deliciousness as part of a balanced diet.


18. The Art of Pairing Pecan Pie

Pair with a robust coffee, a glass of dessert wine like port, or a spiced chai latte for a comforting combination.


19. Weather and Recipe Outcome

Pecan pie is a versatile dessert that shines in cooler weather. Its warm, rich flavors are especially comforting on crisp autumn or winter days.


20. Other Pie Recipes to Explore

  • Classic Apple Pie
  • Chocolate Silk Pie
  • Sweet Potato Pie

21. Focus on Tools and Equipment

  • Use a high-quality pie dish for even baking.
  • Invest in a sturdy pastry cutter for effortless dough preparation.

22. Frequently Asked Questions (with answers)

Q: Can I make pecan pie ahead of time?

A: Yes, pecan pie can be made up to 2 days in advance and stored in the refrigerator.

Q: Can I use a store-bought crust?

A: Absolutely! A store-bought crust saves time, but a homemade crust adds a special touch.

Q: Why is my pie filling grainy?

A: Overmixing the eggs can cause the filling to curdle. Whisk gently for a smooth texture.


Conclusion

The Classic Pecan Pie is a dessert that embodies tradition, warmth, and indulgence. Perfect for holidays or special occasions, its rich flavors and satisfying crunch make it a beloved favorite across generations. With this detailed recipe, you’re sure to create a pie that impresses and delights every time.


Thank you for visiting SqueezyRecipes! We’re dedicated to making cooking enjoyable and accessible for everyone, regardless of your skill level. Chef Simon is always ready to share the best recipes that bring a creative touch to your daily meals. With each visit, you’ll discover new recipes and innovative ideas that cater to every occasion. Don’t miss out on exploring SqueezyRecipes for the latest delicious dishes, and feel free to leave your feedback and share your experiences with the recipes you’ve tried. Cooking together makes everything better!