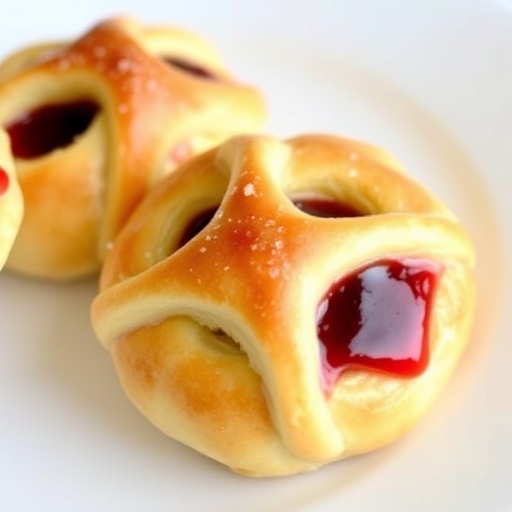
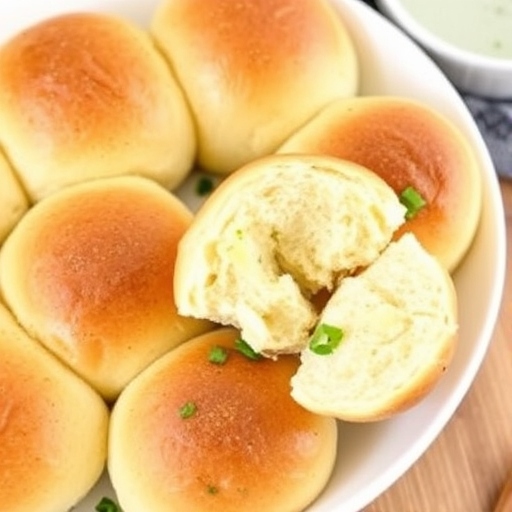
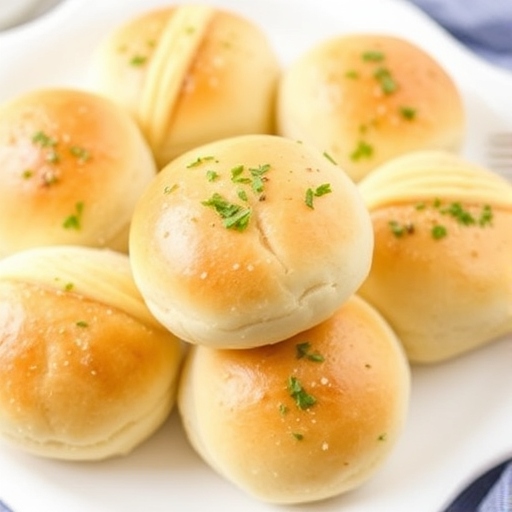
Discover Easy and Flavorful Recipes for Every Meal!

One-Pan Taco Zucchini Skillet

One-Pan Taco Zucchini Skillet

On a busy weeknight when I’m craving something flavorful but don’t want to spend too much time in the kitchen, I turn to my One-Pan Taco Zucchini Skillet. It’s a dish that’s bursting with savory taco flavors, yet lightened up with fresh zucchini. The best part? It’s a one-pan wonder, making cleanup a breeze. Whether you’re following a low-carb diet, or simply want a quick and delicious meal, this skillet checks all the boxes.

The zucchini absorbs all those delicious taco seasonings, while ground beef (or turkey!) provides the perfect savory base. Topped with melted cheese and fresh toppings, it’s a dinner that feels comforting yet fresh. And, honestly, it’s one of those meals that everyone in the family will love—no matter their dietary preferences.

Short Description


This One-Pan Taco Zucchini Skillet is a quick, easy, and healthy dinner full of flavor. Sautéed zucchini and seasoned ground beef come together for a satisfying meal, topped with cheese and your favorite taco toppings. The perfect one-pan meal for busy weeknights!

Key Ingredients

  • 1 lb ground beef (or turkey)
  • 4 medium zucchinis, chopped
  • 1 medium onion, diced
  • 2 cloves garlic, minced
  • 1 packet taco seasoning (or homemade)
  • 1/2 cup water
  • 1/2 cup shredded cheddar cheese
  • 1 tablespoon olive oil
  • Salt and pepper, to taste

Taco Toppings (optional):

  • Sour cream
  • Sliced avocado
  • Salsa
  • Chopped cilantro
  • Sliced jalapeños

Tools Needed

  • Large skillet
  • Spoon or spatula for stirring
  • Knife and cutting board
  • Cheese grater (if using block cheese)

Instructions

Step 1: Cook the Ground Beef
Heat the olive oil in a large skillet over medium heat. Add the ground beef and cook, breaking it up with a spatula, until browned and fully cooked—about 5–7 minutes. Drain any excess fat.

Step 2: Sauté the Zucchini
Add the diced onion to the skillet and cook for 2–3 minutes, until softened. Add the garlic and chopped zucchini, stirring to combine. Season with salt and pepper. Cook for another 5–7 minutes until the zucchini starts to soften but still retains some texture.

Step 3: Add Taco Seasoning
Sprinkle the taco seasoning over the beef and zucchini mixture. Add the water, stir to coat, and let everything simmer together for 3–5 minutes until the flavors meld and the zucchini is tender.

Step 4: Top with Cheese
Sprinkle the shredded cheddar cheese over the skillet. Cover and cook for 1-2 minutes, or until the cheese is melted and bubbly.

Step 5: Serve and Garnish
Serve your taco zucchini skillet hot, topped with your favorite taco toppings like sour cream, salsa, chopped cilantro, or sliced avocado. Enjoy!

Why You’ll Love This Recipe

  • Quick & Easy – Ready in 30 minutes with minimal cleanup.
  • Healthy – Lightened up with zucchini instead of heavy tortillas, making it low-carb and veggie-packed.
  • Flavorful – All the taco flavors you love, with cheese and perfectly seasoned beef and veggies.
  • Customizable – Top with your favorite taco toppings to make it your own.

Tips & Variations

  • Add More Veggies – Feel free to toss in other veggies like bell peppers or tomatoes for added color and nutrition.
  • Ground Turkey or Chicken – Swap the ground beef for ground turkey or chicken for a leaner version.
  • Spicy Kick – Add some chopped jalapeños to the skillet or top with hot sauce if you like it spicy.
  • Cheese Options – Try using a blend of cheeses like Monterey Jack or pepper jack for extra flavor.

Storage Tips

  • Store leftovers in an airtight container in the fridge for up to 3 days.
  • Reheat in the skillet or microwave until heated through.
  • This dish doesn’t freeze well due to the zucchini’s high water content, so it’s best enjoyed fresh.

FAQs

Can I use different toppings?
Absolutely! Sour cream, salsa, guacamole, or even shredded lettuce would all work great as toppings.

Can I make this dish vegetarian?
Yes! Simply omit the ground beef and substitute with black beans, lentils, or tofu for a vegetarian version.

What kind of taco seasoning should I use?
You can use a store-bought packet, or make your own taco seasoning with chili powder, cumin, paprika, garlic powder, and onion powder.

Final Thoughts

One-Pan Taco Zucchini Skillet is one of those meals that feels indulgent while still being healthy. It’s perfect for busy nights when you want something quick but flavorful. The zucchini adds a nice touch of freshness, while the taco seasonings provide that savory, comforting taste that everyone loves. Whether you’re cooking for one or for the whole family, this is a dish that’s sure to satisfy.

Creamy Honey Pepper Chicken Mac and Cheese Delight

Creamy Honey Pepper Chicken Mac and Cheese Delight

It all started on a chilly Saturday night when comfort food was calling my name. I wanted something rich, warm, and satisfying—but with a twist. I had leftover grilled chicken, a handful of shredded cheese, and a bottle of honey sitting on the counter. And just like that, the idea for Creamy Honey Pepper Chicken Mac and Cheese was born.

The moment the creamy cheese sauce came together and that sweet, peppery chicken hit the skillet, I knew this would be something special. It’s bold, cheesy, just a little sweet, and perfectly peppery—everything a good comfort meal should be. Now, it’s one of our go-to dishes when we want something easy but unforgettable.

Short Description


This creamy honey pepper chicken mac and cheese is the perfect blend of sweet heat and cheesy comfort. Tender bites of chicken tossed in a honey pepper glaze are folded into a rich, velvety cheese sauce and elbow macaroni. It’s indulgent, satisfying, and absolutely delicious.

Key Ingredients

For the Chicken:

  • 2 boneless, skinless chicken breasts, cooked and cubed
  • 2 tbsp honey
  • 1/2 tsp black pepper
  • 1/4 tsp smoked paprika
  • 1 tbsp olive oil
  • Pinch of salt

For the Mac and Cheese:

  • 8 oz elbow macaroni
  • 2 tbsp butter
  • 2 tbsp all-purpose flour
  • 2 cups milk
  • 1 cup shredded cheddar cheese
  • 1 cup shredded mozzarella cheese
  • 1/4 cup grated Parmesan
  • Salt and pepper, to taste
  • Optional: pinch of red pepper flakes for extra heat

Tools Needed

  • Large saucepan
  • Skillet
  • Whisk
  • Mixing spoon
  • Cheese grater
  • Strainer

Instructions

Step 1: Cook the Pasta
Boil a pot of salted water and cook the macaroni until al dente. Drain and set aside.

Step 2: Make the Honey Pepper Chicken
In a skillet, heat olive oil over medium heat. Add the cubed chicken, honey, black pepper, smoked paprika, and a pinch of salt. Stir to coat and let the chicken caramelize slightly for 3–5 minutes. Remove from heat and set aside.

Step 3: Prepare the Cheese Sauce
In a large saucepan, melt the butter over medium heat. Whisk in the flour and cook for 1 minute to make a roux. Slowly pour in the milk, whisking constantly, until the sauce thickens—about 3–5 minutes.

Step 4: Add the Cheese
Lower the heat and stir in cheddar, mozzarella, and Parmesan until fully melted and smooth. Season with salt, pepper, and a pinch of red pepper flakes if you like a little heat.

Step 5: Combine Everything
Add the cooked macaroni to the cheese sauce and stir to coat. Fold in the honey pepper chicken until everything is well combined and heated through.

Step 6: Serve & Enjoy
Serve hot, with a little extra cheese or cracked black pepper on top if desired. For an extra finish, pop it under the broiler for 2–3 minutes to get a golden cheesy top.

Why You’ll Love This Recipe

  • Sweet & Savory Fusion – Honey and pepper bring a delicious balance to the cheesy richness.
  • Ultra Creamy – The cheese sauce is velvety, thick, and indulgent.
  • Weeknight-Friendly – Easy enough to whip up in under 30 minutes.
  • Versatile – Use leftover chicken, rotisserie, or even grilled shrimp!

Tips & Variations

  • Spice It Up – Add crushed red pepper or a dash of hot sauce for more heat.
  • Make It Smoky – Swap paprika for chipotle powder or add a dash of liquid smoke.
  • Veggie Boost – Stir in sautéed spinach, peas, or roasted broccoli.
  • Crunch Factor – Top with buttered breadcrumbs or crushed Ritz crackers for texture.

Storage Tips

  • Store leftovers in an airtight container in the fridge for up to 3 days.
  • Reheat gently on the stovetop or in the microwave, adding a splash of milk if needed to loosen the sauce.
  • Not freezer-friendly due to the dairy, but best enjoyed fresh!

FAQs

Can I use a different pasta?
Absolutely! Shells, penne, or cavatappi work wonderfully.

What kind of cheese is best?
A mix of sharp cheddar, mozzarella, and Parmesan creates the best blend of creamy, melty, and flavorful.

Can I make it ahead?
Yes! Make the dish, cool completely, and reheat before serving.

Final Thoughts

Creamy Honey Pepper Chicken Mac and Cheese is more than just comfort food—it’s a little bit sweet, a little bit spicy, and a whole lot of cozy. It’s the kind of dish you make once and end up dreaming about later. Whether you’re cooking for a family dinner or just need a bowl of something warm after a long day, this recipe delivers every single time.

Maple Cookies with Maple Icing

Maple Cookies with Maple Icing

It was a crisp fall afternoon—the kind where the leaves crunch underfoot, and the air smells like woodsmoke and cozy sweaters. I had a craving for something sweet but not overly rich—something with that nostalgic, autumn flavor. Maple came to mind instantly. There’s something so comforting about the warm, mellow sweetness of real maple syrup. And so, these soft, chewy maple cookies with a drizzle of maple icing were born.

The moment they came out of the oven, the kitchen smelled like a maple dream. I couldn’t wait for them to cool before whisking together a simple glaze and letting it drizzle down in delicate, golden lines. One bite, and I was hooked—soft, lightly spiced cookies with just the right touch of sweetness. These have become a seasonal favorite in our home, but honestly? They’re too good to save just for fall.

Short Description


These soft and chewy maple cookies are bursting with real maple flavor and topped with a simple maple icing that adds the perfect sweet finish. Cozy, comforting, and easy to make—these cookies are a must-bake for maple lovers.

Key Ingredients

For the Cookies:

  • 1 cup (2 sticks) unsalted butter, softened
  • 1 cup packed brown sugar
  • 1/2 cup pure maple syrup (Grade A dark or amber preferred)
  • 1 large egg
  • 1 tsp vanilla extract
  • 2 1/2 cups all-purpose flour
  • 1/2 tsp baking soda
  • 1/2 tsp salt
  • 1/2 tsp ground cinnamon (optional)

For the Maple Icing:

  • 1 cup powdered sugar
  • 2–3 tbsp pure maple syrup
  • 1–2 tsp milk or cream (as needed for consistency)

Tools Needed

  • Mixing bowls
  • Electric mixer (hand or stand)
  • Measuring cups and spoons
  • Baking sheet
  • Parchment paper
  • Wire rack

Instructions

Step 1: Preheat the Oven
Preheat your oven to 350°F (175°C). Line a baking sheet with parchment paper.

Step 2: Cream the Butter and Sugar
In a large bowl, cream the softened butter and brown sugar together until light and fluffy.

Step 3: Add the Wet Ingredients
Beat in the maple syrup, egg, and vanilla extract until smooth and well combined.

Step 4: Mix the Dry Ingredients
In a separate bowl, whisk together the flour, baking soda, salt, and cinnamon (if using). Gradually add the dry ingredients to the wet ingredients, mixing until a soft dough forms.

Step 5: Scoop and Bake
Scoop tablespoon-sized portions of dough onto the prepared baking sheet, spacing them about 2 inches apart.
Bake for 10–12 minutes, or until the edges are just golden. Let cool on the pan for 5 minutes before transferring to a wire rack to cool completely.

Step 6: Make the Maple Icing
In a small bowl, whisk together the powdered sugar and maple syrup. Add milk or cream a little at a time until the icing is smooth and drizzly.

Step 7: Ice the Cookies
Once the cookies are completely cool, drizzle the icing over the top using a spoon or piping bag. Let the icing set before serving (if you can wait!).

Why You’ll Love These Cookies

  • Real Maple Flavor – Both the cookie and the icing are sweetened with real maple syrup.
  • Soft & Chewy Texture – Buttery and tender, just the way homemade cookies should be.
  • Simple to Make – No chilling needed—ready in under 30 minutes.
  • Perfect for Gifting – They pack well and look beautiful with that shiny maple drizzle.

Tips & Variations

  • Maple Sugar Bonus – Sprinkle with a touch of maple sugar for extra flair.
  • Nutty Twist – Add chopped pecans or walnuts for crunch.
  • Make Them Sandwich Cookies – Use the icing as a filling between two cookies for a decadent treat.
  • Vegan-Friendly – Use plant-based butter and a flax egg to make them vegan.

Storage Tips

  • Room Temp: Store in an airtight container for up to 5 days.
  • Freezer: Freeze cookies (without icing) for up to 2 months. Thaw and ice when ready to serve.

FAQs

Can I use imitation maple syrup?
You can, but the flavor won’t be as rich. Pure maple syrup really makes a difference!

Can I make the dough ahead of time?
Yes! You can refrigerate the dough for up to 24 hours before baking.

How long does the icing take to set?
About 20–30 minutes at room temperature, depending on humidity.

Final Thoughts

These Maple Cookies with Maple Icing are like a cozy sweater in dessert form—comforting, warm, and full of sweet, nostalgic flavor. They’re simple enough for a weekday bake but special enough to share during the holidays or at a fall gathering. Once you try them, they’re bound to become a staple in your recipe collection—because who can resist a buttery, maple-kissed cookie with just the right amount of icing?

Italian Sausage and Pepper Casserole

Italian Sausage and Pepper Casserole

It was one of those chilly evenings when all I wanted was something warm, comforting, and full of flavor. I looked in the fridge and saw Italian sausage and a rainbow of bell peppers just waiting to be turned into something special. That’s when the idea of a rustic, bubbling casserole came to life.

The smell that filled the kitchen as it baked was incredible—savory sausage, sweet roasted peppers, and a hint of garlic and herbs. By the time it came out of the oven, the cheese was perfectly melted, and the edges were golden and bubbly. I served it with some crusty bread and a glass of red wine, and let’s just say, there were no leftovers.

Short Description


This Italian Sausage and Pepper Casserole is a hearty, flavorful bake made with savory sausage, tender bell peppers, onions, and gooey cheese. It’s an easy, family-friendly meal perfect for any night of the week.

Key Ingredients

  • 1 lb Italian sausage (mild or hot, casings removed)
  • 1 red bell pepper, sliced
  • 1 yellow bell pepper, sliced
  • 1 green bell pepper, sliced
  • 1 large onion, sliced
  • 2 cloves garlic, minced
  • 1 (14.5 oz) can diced tomatoes, drained
  • 1 tsp dried oregano
  • 1 tsp dried basil
  • Salt and pepper, to taste
  • 1 cup shredded mozzarella cheese
  • 1/2 cup grated Parmesan cheese
  • 2 tbsp olive oil

Tools Needed

  • Large skillet
  • Casserole dish (9×13 inch)
  • Cutting board and knife
  • Wooden spoon or spatula
  • Oven

Instructions

Step 1: Preheat and Prep
Preheat your oven to 375°F (190°C). Lightly grease your casserole dish.

Step 2: Cook the Sausage
Heat olive oil in a large skillet over medium heat. Add Italian sausage and cook until browned, breaking it up with a spoon. Remove sausage and set aside.

Step 3: Sauté the Veggies
In the same skillet, add a little more oil if needed. Sauté the onions and peppers until tender, about 5–7 minutes. Add garlic and cook for 1 more minute.

Step 4: Combine the Ingredients
In a large bowl, combine the cooked sausage, sautéed veggies, drained tomatoes, oregano, basil, salt, and pepper. Mix everything together well.

Step 5: Assemble the Casserole
Pour the mixture into the prepared casserole dish. Top with shredded mozzarella and Parmesan.

Step 6: Bake
Bake uncovered for 25–30 minutes, or until the cheese is melted and bubbling.

Step 7: Rest and Serve
Let the casserole sit for 5 minutes before serving. It gives the flavors time to settle—and it makes it easier to slice!

Why You’ll Love This Recipe

  • Bold Italian Flavors – Sausage, peppers, tomatoes, and herbs are a classic combo.
  • One-Pan Meal – Everything comes together in one dish for easy cleanup.
  • Customizable – Add pasta, rice, or potatoes to bulk it up.
  • Perfect for Leftovers – Tastes even better the next day!

Tips & Variations

  • Add Pasta – Stir in cooked pasta before baking for a complete meal.
  • Go Spicy – Use hot Italian sausage or add crushed red pepper flakes.
  • Cheesy Twist – Try provolone or fontina for extra melty goodness.
  • Vegetarian Option – Swap sausage for plant-based crumbles.

Storage Tips

  • Fridge: Store in an airtight container for up to 4 days.
  • Freezer: Freeze leftovers for up to 2 months. Reheat from frozen or thaw overnight.
  • Reheat: Warm in the oven or microwave until heated through.

FAQs

Can I use pre-cooked sausage?
Absolutely! Just slice it up and add it with the peppers and onions.

What kind of peppers work best?
Bell peppers of any color work great—use a mix for extra flavor and color.

Can I make this ahead of time?
Yes! Assemble the casserole up to a day ahead and store in the fridge until ready to bake.

Final Thoughts

This Italian Sausage and Pepper Casserole has become one of those go-to recipes when I want a crowd-pleasing, comforting dinner without a lot of fuss. It’s rustic, hearty, and bursting with flavor—and the best part? It’s just as delicious the next day (if you have any left). Whether it’s a busy weeknight or a cozy weekend, this dish always hits the spot.

Air Fryer Honey Garlic Steak Sweet Pepper Bites

Air Fryer Honey Garlic Steak Sweet Pepper Bites

I made these on a weeknight when I needed something quick but still packed with flavor. I had a few colorful sweet peppers in the fridge and some steak tips thawed and ready to go—and that’s when the idea hit. Toss them in a quick honey garlic marinade and pop them into the air fryer? Yes, please.

The result was better than I imagined. The steak came out tender and juicy, with that irresistible sweet and savory glaze, and the peppers? Perfectly roasted with just the right amount of char. It’s one of those recipes that looks fancy but is secretly super easy—and now it’s a regular on our dinner rotation.

Short Description


These Air Fryer Honey Garlic Steak Sweet Pepper Bites are a quick and flavorful dish featuring juicy steak and roasted sweet peppers coated in a sticky honey garlic glaze. Perfect as an appetizer or main course!

Key Ingredients

  • 1 lb steak (sirloin, ribeye, or flank), cut into bite-sized cubes
  • 1½ cups sweet mini peppers, sliced into rings or chunks
  • 2 tablespoons soy sauce
  • 2 tablespoons honey
  • 1 tablespoon olive oil
  • 2 cloves garlic, minced
  • 1 teaspoon cornstarch (optional, for thickening)
  • 1 teaspoon black pepper
  • 1 teaspoon chili flakes (optional, for heat)
  • Salt to taste

Tools Needed

  • Air fryer
  • Mixing bowl
  • Whisk or spoon
  • Tongs
  • Small saucepan (optional for thickening sauce)

Instructions

Step 1: Make the Marinade
In a bowl, whisk together soy sauce, honey, olive oil, minced garlic, black pepper, and chili flakes (if using). Set aside.

Step 2: Marinate the Steak
Add the steak cubes to the marinade and toss to coat. Let it sit for 15–30 minutes (or longer if you have time).

Step 3: Preheat the Air Fryer
Preheat your air fryer to 400°F (200°C) for 3–5 minutes.

Step 4: Cook the Steak & Peppers
Toss the sweet pepper pieces into the bowl with the marinated steak. Mix well. Arrange everything in a single layer in the air fryer basket (cook in batches if needed).

Air fry at 400°F for 10–12 minutes, shaking the basket halfway through, until the steak is browned and the peppers are slightly charred.

Step 5: Optional Sauce Glaze
If you’d like a thicker glaze, pour the leftover marinade into a small saucepan. Heat until bubbling, then stir in 1 tsp of cornstarch mixed with 1 tbsp water. Simmer for 1–2 minutes until thickened, then drizzle over the cooked bites.

Why You’ll Love This Recipe

  • Quick & Easy – From prep to plate in under 30 minutes.
  • Sweet & Savory – That honey garlic glaze is next-level.
  • Perfect Texture – Juicy steak and tender, roasted peppers.
  • Versatile – Great as an appetizer, party snack, or dinner over rice or noodles.

Tips & Variations

  • Swap the Protein – Chicken or shrimp work great too!
  • Make it Low-Sodium – Use low-sodium soy sauce.
  • More Veggies – Add zucchini, mushrooms, or onions for more variety.
  • Spice It Up – Add sriracha or a splash of hot sauce for extra heat.

Storage Tips

  • Fridge: Store leftovers in an airtight container for up to 3 days.
  • Reheat: Reheat in the air fryer at 350°F for 3–4 minutes or until warmed through.
  • Freezer: Freeze cooked bites for up to a month. Reheat straight from frozen.

FAQs

Can I use frozen steak?
Yes, just make sure to thaw it completely before marinating for best results.

Can I cook this without an air fryer?
Definitely! Sauté in a hot skillet or roast on a baking sheet at 425°F for about 15 minutes.

Can I make it ahead of time?
Yes, you can marinate the steak and peppers a day in advance and cook them when ready.

Final Thoughts

These Air Fryer Honey Garlic Steak Sweet Pepper Bites are everything I love in a dish—bold flavor, quick prep, and minimal cleanup. They’re perfect when you want something fun and satisfying without fussing over the stove. Whether you’re making them for guests, game night, or just a lazy dinner at home, this recipe will hit the spot every time.

Baileys Chocolate Cheesecake Trifle

Baileys Chocolate Cheesecake Trifle

It was during one of those cozy winter nights, the kind where you want something indulgent after dinner, that I first made this Baileys Chocolate Cheesecake Trifle. I had a bottle of Baileys calling my name, some leftover brownies, and a spark of inspiration. What came together was nothing short of magic: rich layers of creamy cheesecake filling, decadent chocolate, and just a whisper of Irish cream that makes it feel like a grown-up treat.

It’s now my go-to dessert when I want to impress guests or just treat myself to something utterly luxurious without spending hours in the kitchen.

Short Description


This Baileys Chocolate Cheesecake Trifle is an indulgent, layered dessert with rich chocolate brownies, fluffy Baileys cheesecake mousse, and chocolate pudding, all topped with whipped cream and chocolate shavings. Perfect for holidays, parties, or any time you want to spoil yourself.

Key Ingredients

  • 1 batch of brownies, cooled and cut into cubes (store-bought or homemade)
  • 1 (8 oz) package cream cheese, softened
  • 1/2 cup powdered sugar
  • 1/4 cup Baileys Irish Cream
  • 1 cup heavy whipping cream, whipped
  • 1 (3.9 oz) box instant chocolate pudding mix
  • 2 cups cold milk
  • 1 tub whipped topping (like Cool Whip), for layering
  • Chocolate shavings or chips, for garnish

Tools Needed

  • Hand mixer or stand mixer
  • Mixing bowls
  • Trifle bowl or individual dessert cups
  • Rubber spatula
  • Knife and cutting board

Instructions

Step 1: Make the Chocolate Pudding
In a bowl, whisk together the chocolate pudding mix and cold milk for 2 minutes until thickened. Set aside in the fridge to chill.

Step 2: Prepare the Cheesecake Layer
Beat the softened cream cheese and powdered sugar together until smooth. Slowly mix in the Baileys Irish Cream. Fold in the whipped heavy cream gently until the mixture is light and fluffy.

Step 3: Layer the Trifle
In a large trifle dish or individual serving glasses, start with a layer of brownie cubes. Add a layer of the Baileys cheesecake mixture, then a layer of chocolate pudding. Repeat the layers until the dish is full.

Step 4: Top It Off
Finish with a generous layer of whipped topping and garnish with chocolate shavings or mini chips.

Step 5: Chill Before Serving
Refrigerate the trifle for at least 2 hours before serving to allow the flavors to meld and the texture to set beautifully.

Why You’ll Love This Dessert

  • Rich & Creamy – The cheesecake mousse is fluffy and luxurious with a hint of Irish cream.
  • Easy to Make Ahead – Perfect for entertaining or holidays.
  • Grown-Up Flavor – A fun, boozy twist that’s still family-friendly if you use Baileys-flavored creamer instead.
  • Customizable – Swap brownies for chocolate cake or cookies if you’d like.

Tips & Variations

  • No Baileys? Use Irish cream-flavored coffee creamer or leave it out for a non-alcoholic version.
  • Add Crunch: Sprinkle crushed Oreos, toffee bits, or chopped nuts between layers.
  • Make It Mini: Serve in mason jars or dessert cups for individual portions.

Storage Tips

  • Fridge: Store covered in the refrigerator for up to 3 days.
  • Freezer: Not recommended, as the textures of the layers may change after freezing.

FAQs

Can I make this without alcohol?
Yes! Use a Baileys-flavored creamer or skip it altogether—it’s still delicious.

Can I use store-bought brownies?
Absolutely. This dessert is all about convenience and indulgence.

Can I use homemade whipped cream instead of Cool Whip?
Yes, fresh whipped cream works beautifully in this trifle.

Final Thoughts

This Baileys Chocolate Cheesecake Trifle is the kind of dessert that makes you close your eyes with the first bite. It’s indulgent without being too heavy, and the layers of texture—from fudgy brownies to silky cheesecake mousse—are just heavenly.

It’s a show-stopper on any dessert table and a dreamy treat for those nights when you just want to spoil yourself. Once you make it, I promise it’ll become a repeat request.