Make your dinner a delightful experience with our simple yet flavorful recipes! Whether you’re craving a vegetarian dish, tender meat, or a light meal, you’ll find the perfect recipe to please your family. Our dinner recipes focus on balance and flavor, with tips for creating healthy, quick, and delicious meals. Explore a variety of global cuisines, from classic American comfort food to international dishes that surprise and satisfy.
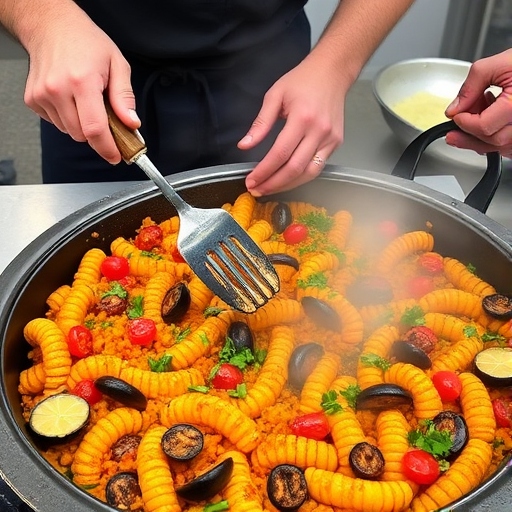
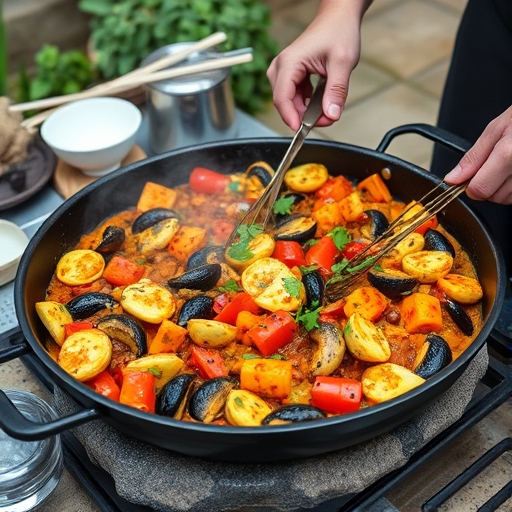
Paella, the jewel of Spanish cuisine, is more than just a dish—it’s an experience. Originating from Valencia, this saffron-infused rice dish is a harmonious blend of flavors, textures, and traditions. Whether you’re crafting the classic seafood version, a meaty variant, or a vegetarian delight, paella promises to bring people together over its vibrant and aromatic presentation.
Table of Contents
1. The Story Behind Paella
Paella has humble beginnings as a rural dish cooked by farmers and laborers over open flames. Traditionally, it combined local ingredients like rice, tomatoes, green beans, rabbit, and sometimes snails, flavored with saffron and olive oil. Over time, it evolved into various regional versions, such as the seafood paella popular along the coast and the mixed paella that includes both meat and seafood. Its versatility and rich cultural significance have made it a global favorite.
Here’s what you’ll need for a classic mixed paella:
Rice: 2 cups of Spanish bomba rice (or arborio as an alternative).
Saffron: A pinch for authentic flavor and vibrant yellow color.
Chicken: 1 pound, cut into pieces.
Shrimp: 1 pound, deveined.
Mussels: 12, cleaned.
Chorizo (optional): ½ pound, sliced.
Green Beans: 1 cup, trimmed.
Tomatoes: 2, grated.
Garlic: 3 cloves, minced.
Paprika: 1 teaspoon, for smoky depth.
Olive Oil: 4 tablespoons.
Chicken Stock: 4 cups, warmed.
Lemon Wedges: For garnish.
4. Cultural History of Ingredients
Rice: Introduced by the Moors to Spain, rice became a staple in Valencia’s wetlands.
Saffron: Harvested from the crocus flower, it was a prized Moorish import.
Seafood: Coastal Valencia’s abundant seafood shaped many paella recipes.
Paprika: A gift from the Americas, paprika adds depth to Spanish dishes.
5. Equipment You’ll Need
Paella Pan: A wide, shallow pan ensures even cooking.
Wooden Spoon: For stirring without damaging the pan.
Heat Source: Traditional paella is cooked over an open flame, but a stovetop or oven works too.
6. Step-by-Step Instructions for Paella
Preparation:
Preheat Pan: Heat olive oil in a paella pan over medium heat.
Cook Proteins: Sear chicken and chorizo until browned, then set aside.
Sauté Aromatics: Add garlic and tomatoes, cooking until fragrant.
Add Vegetables: Toss in green beans and paprika.
Cooking:
Toast Rice: Stir rice into the mixture for 2 minutes to coat it with flavors.
Add Stock: Pour in warm chicken stock and sprinkle saffron. Do not stir.
Layer Proteins: Arrange shrimp, mussels, chicken, and chorizo on top.
Simmer:
Cook Evenly: Simmer without stirring until liquid is absorbed, about 20 minutes. Adjust heat as needed to avoid burning.
Finishing Touches:
Rest and Garnish: Cover with a clean cloth for 5 minutes to rest. Serve with lemon wedges.
7. Suggestions for Serving and Storing
Serving: Serve straight from the paella pan for authenticity. Pair with a fresh salad and crusty bread.
Storing: Refrigerate leftovers in an airtight container for up to 2 days. Reheat gently to avoid drying out the rice.
8. Chef Simon’s Tips for Paella
Use high-quality saffron for authentic flavor and color.
Avoid over-stirring to achieve the prized socarrat—a caramelized rice crust at the bottom.
Experiment with seasonal ingredients for a unique twist.
9. Emotional and Psychological Impact of Food
Paella is a communal dish that fosters connection and joy. Sharing it with family and friends creates lasting memories and a sense of togetherness.
10. Mindful Cooking Techniques
Focus on each step, from sautéing to simmering. Mindfulness in preparation enhances the overall experience and results in a better dish.
11. Tips for Keeping the Recipe Fresh Longer
Store saffron in an airtight container in a cool, dark place.
Use fresh seafood, and cook it on the same day if possible.
12. Advanced Culinary Terms and Techniques
Socarrat: The golden crust of rice at the bottom of the pan, achieved by controlled heat.
Deglazing: Scraping up browned bits with stock for extra flavor.
13. Healthy Ingredient Alternatives
Use turkey instead of chicken for a leaner option.
Replace chorizo with smoked paprika for similar flavor without added fat.
14. More Serving Ideas
Pair with a crisp white wine or non-alcoholic sparkling beverage.
Serve alongside tapas like patatas bravas or Spanish olives.
15. Common Issues and Solutions
Burned Rice: Adjust heat to medium-low and monitor closely.
Undercooked Mussels: Steam them separately before adding to the paella.
16. Variations to Try
Vegetarian Paella: Use artichokes, bell peppers, and peas.
Black Rice Paella: Add squid ink for a dramatic color and briny flavor.
17. Nutritional Information and Health Benefits
Calories: ~400 per serving (depending on ingredients).
Rich in Protein: From chicken and seafood.
High in Fiber: Thanks to vegetables and rice.
18. The Art of Pairing Paella
Wines: A dry Spanish white wine or rosé complements the flavors.
Side Dishes: A fresh citrus salad or roasted red peppers works beautifully.
19. Weather and Recipe Outcome
In cooler weather, enjoy paella indoors with warming ingredients like chorizo.
On warm days, seafood paella served outdoors evokes Mediterranean vibes.
20. Other Rice Recipes to Explore
Risotto: Creamy Italian comfort food.
Biryani: Spiced Indian rice dish with meat or vegetables.
21. Focus on Tools and Equipment
Invest in a sturdy paella pan for even cooking and authentic presentation.
22. Frequently Asked Questions (with answers)
Q: Can I use regular rice? A: It’s best to use short-grain rice like bomba or arborio for proper texture.
Q: Can I make paella without saffron? A: You can substitute turmeric for color, but saffron provides unmatched flavor.
Q: How do I know if mussels are fresh? A: Fresh mussels should close tightly when tapped. Discard any that remain open.
Conclusion
Paella is a celebration of flavors, culture, and togetherness. By mastering this recipe, you not only recreate a beloved Spanish tradition but also bring the warmth and joy of communal dining into your home. Ready your pan, gather fresh ingredients, and let the magic of paella transport you to the sun-soaked coasts of Valencia.
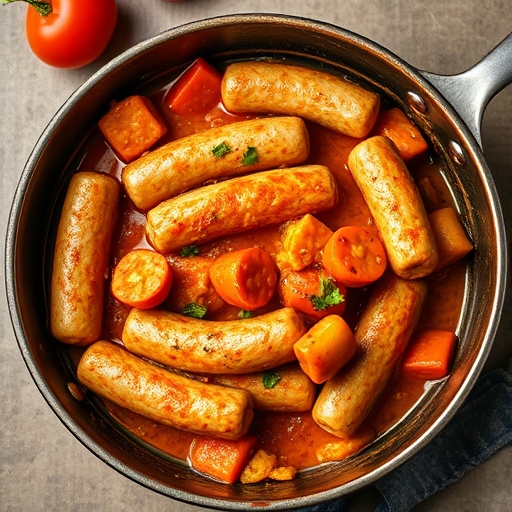
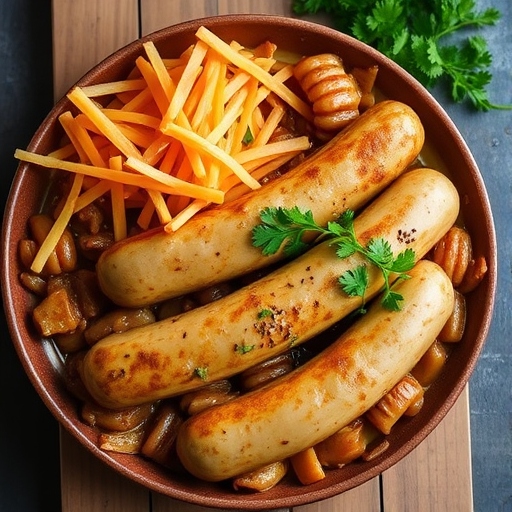
Curried sausages are a delicious, comforting dish that brings together tender sausages and a rich, fragrant curry sauce. This recipe is a family favorite and a great way to add a flavorful twist to your weekly meal plan. It’s quick to prepare, hearty, and pairs wonderfully with rice or mashed potatoes. Perfect for busy weeknights or when you crave something warm and satisfying, this dish is an easy way to bring the taste of curry into your kitchen.
Curried sausages are a classic dish with a unique blend of Western and Indian flavors. They have roots in the British love for curry, which was introduced during colonial times. Over the years, the recipe has evolved, and today, it’s a staple comfort food in countries like Australia and New Zealand. This version simplifies the process while keeping the flavors authentic and bold, making it an all-time favorite for home cooks.
Customizable Spices: You can adjust the spice level to your preference.
Affordable Ingredients: The dish uses budget-friendly items, making it economical.
Healthy Option: Homemade versions allow you to control the amount of salt, sugar, and fat.
Quick to Prepare: It’s a simple one-pan meal, perfect for busy schedules.
Versatile: It pairs well with rice, bread, or even noodles for variety.
Essential Ingredients for the Perfect Curried Sausages
Sausages: Beef or chicken sausages work best. Use high-quality ones for a richer flavor.
Curry Powder: The star ingredient! Choose mild, medium, or hot depending on your spice tolerance.
Vegetables: Common choices include onions, carrots, and peas for a hearty texture.
Broth: Beef or chicken broth forms the base of the curry sauce.
Thickener: Flour or cornstarch ensures a smooth, creamy sauce.
Aromatics: Garlic and ginger elevate the dish’s depth of flavor.
Coconut Milk or Cream: Adds richness and a subtle sweetness.
Cultural History of Ingredients
Curry Powder: A British adaptation of Indian spice blends, it symbolizes the fusion of cuisines.
Sausages: A staple across European and Western cuisines, providing protein in an easy-to-cook form.
Coconut Milk: A nod to Indian and Southeast Asian culinary influences.
Vegetables: Common in Western stews, they enhance the dish’s nutritional profile.
Equipment You’ll Need
A large skillet or frying pan
A sharp knife and cutting board
A wooden spoon for stirring
Measuring cups and spoons
A saucepan for cooking rice (optional)
Step-by-Step Instructions for Curried Sausages
Ingredients:
6 beef or chicken sausages
1 tablespoon oil
1 large onion, diced
2 garlic cloves, minced
1 teaspoon grated ginger
2 carrots, sliced
1 cup frozen peas
2 tablespoons curry powder
2 cups beef or chicken broth
1 tablespoon flour or cornstarch (mixed with 2 tablespoons water)
1/2 cup coconut milk (optional)
Salt and pepper to taste
Instructions:
Cook the Sausages: Boil the sausages in water for 5 minutes to firm them up. Let them cool, then slice into bite-sized pieces.
Prepare the Base: Heat oil in a large skillet over medium heat. Add onions, garlic, and ginger. Sauté until fragrant and the onions are soft.
Add Curry Powder: Stir in the curry powder and cook for 1 minute to release its flavors.
Incorporate Vegetables: Add carrots and cook for another 2–3 minutes.
Create the Sauce: Pour in the broth, and stir to combine. Add the sliced sausages and bring to a simmer.
Thicken the Sauce: Stir in the flour or cornstarch mixture and cook until the sauce thickens.
Finish with Coconut Milk: Stir in coconut milk for extra richness (optional).
Add Peas: Add frozen peas and cook for 2 minutes. Season with salt and pepper.
Serve: Serve hot over rice, mashed potatoes, or with crusty bread.
Suggestions for Serving and Storing
Serving: Garnish with fresh cilantro or parsley for added freshness.
Storing: Store in an airtight container in the fridge for up to 3 days.
Freezing: This dish freezes well; freeze in portions for easy meal prep.
Chef Simon’s Tips for Curried Sausages
Use pre-cooked sausages to save time.
For extra depth, add a teaspoon of garam masala or smoked paprika.
If you like a hint of sweetness, stir in a tablespoon of mango chutney.
Emotional and Psychological Impact of Food
Curried sausages evoke a sense of warmth and comfort, often bringing back childhood memories of family dinners. The fragrant aroma of spices can uplift your mood and create a welcoming atmosphere at the table.
Mindful Cooking Techniques
Take your time to sauté the aromatics, as this step builds the flavor foundation.
Stir the sauce gently to ensure even cooking and prevent sticking.
Tips for Keeping the Recipe Fresh Longer
Cool the dish completely before storing it in the refrigerator.
Reheat on low heat to preserve the texture and flavors.
Advanced Culinary Terms and Techniques
Deglazing: Scrape up browned bits from the pan when adding the broth for extra flavor.
Blooming Spices: Cooking curry powder in oil helps release its full aroma.
Healthy Ingredient Alternatives
Use turkey or plant-based sausages for a lighter option.
Replace coconut milk with low-fat yogurt.
Add extra vegetables like zucchini or spinach for more nutrients.
More Serving Ideas
Serve with naan bread for a more authentic curry experience.
Top with crispy fried onions for added texture.
Common Issues and Solutions
Sauce Too Thin: Add more cornstarch slurry.
Overcooked Vegetables: Add them later in the cooking process.
Variations to Try
Spicy Kick: Add a chopped chili or a teaspoon of chili powder.
Creamy Version: Use heavy cream instead of coconut milk.
Nutritional Information and Health Benefits
Approximate values per serving:
Calories: 320
Protein: 16g
Carbohydrates: 20g
Fat: 18g
The Art of Pairing Curried Sausages
Serve with a cold lager, a refreshing lemonade, or a creamy lassi to balance the spice.
Weather and Recipe Outcome
Curried sausages are perfect for cool weather, as the hearty dish provides warmth and comfort.
Other Recipes to Explore
Chicken Korma
Beef Stroganoff
Vegetable Coconut Curry
Focus on Tools and Equipment
Invest in a heavy-bottomed skillet to prevent burning and ensure even cooking.
Frequently Asked Questions (with answers)
Q1: Can I make this vegetarian? Yes, substitute the sausages with plant-based options.
Q2: Can I skip the coconut milk? Absolutely! The broth alone will still create a flavorful sauce.
Q3: How do I make it spicier? Add cayenne pepper or fresh chili.
Conclusion
Curried sausages are a quick, flavorful, and hearty dish that’s perfect for any occasion. With its rich sauce, tender sausages, and customizable flavors, it’s sure to become a family favorite. Enjoy this dish as a comforting meal that warms both body and soul!
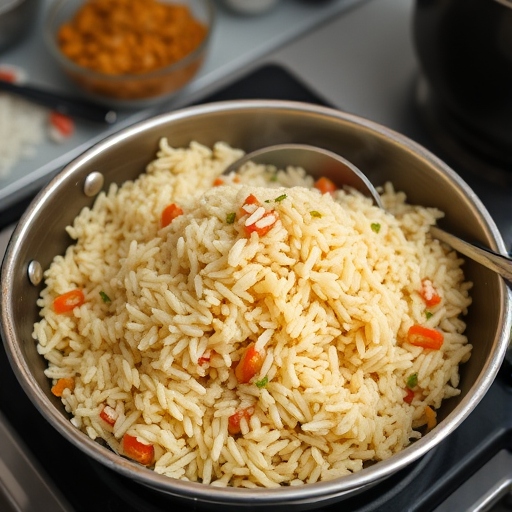
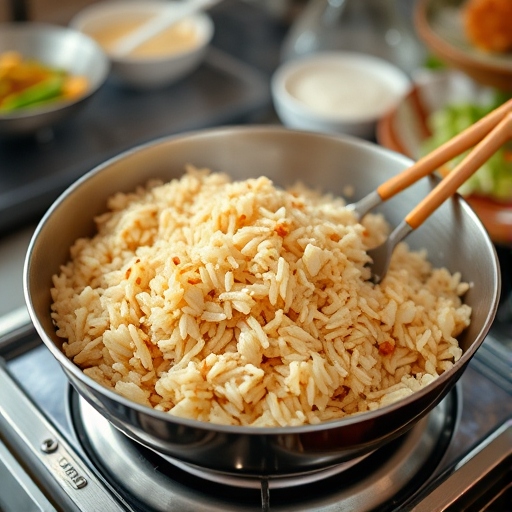
Fried rice is a timeless dish loved for its simplicity, flavor, and versatility. Originating in Asian cuisines, this dish transforms leftover rice into a flavorful meal with a medley of vegetables, protein, and aromatic seasonings. Whether it’s a quick lunch or a hearty dinner, fried rice is your go-to recipe for a satisfying experience.
Fried rice is believed to have originated in China during the Sui Dynasty. It was created as a way to use leftover rice and prevent food waste. Over centuries, the dish has evolved and spread across the globe, gaining local twists in flavors and ingredients. From Indonesia’s Nasi Goreng to Thailand’s Khao Pad, fried rice reflects the cultural diversity of its roots while remaining universally loved.
The Benefits of Making Your Own Fried Rice
Customizable Ingredients: Use your favorite vegetables, proteins, and seasonings.
Quick and Easy: A perfect meal ready in under 30 minutes.
Reduces Food Waste: A great way to repurpose leftover rice and veggies.
Healthy Option: You control the oil, salt, and other additives.
Rice: Day-old, cold rice is ideal for the perfect texture.
Vegetables: Carrots, peas, bell peppers, and scallions add flavor and color.
Protein: Chicken, shrimp, tofu, or eggs are common choices.
Aromatics: Garlic and onion for a fragrant base.
Sauces: Soy sauce, oyster sauce, or sesame oil enhance the umami flavor.
Seasonings: Salt, pepper, and optional chili flakes for heat.
Cultural History of Ingredients
Rice: A staple in Asian cuisines, symbolizing prosperity and sustenance.
Soy Sauce: An ancient condiment originating in China, essential in Asian cooking.
Eggs: Widely used in fried rice for added protein and richness.
Vegetables: Common in Chinese stir-fries for their vibrant colors and nutrients.
Equipment You’ll Need
A large wok or non-stick skillet
A wooden spoon or spatula for stirring
A sharp knife and cutting board
Measuring cups and spoons
Step-by-Step Instructions for Fried Rice
Ingredients:
3 cups cooked, cold rice (preferably day-old)
2 tablespoons vegetable oil
2 eggs, beaten
1 small onion, diced
2 garlic cloves, minced
1 cup mixed vegetables (carrots, peas, bell peppers)
1/2 cup cooked chicken, shrimp, or tofu (optional)
3 tablespoons soy sauce
1 tablespoon oyster sauce (optional)
1 teaspoon sesame oil
Salt and pepper to taste
2 scallions, chopped (for garnish)
Instructions:
Prepare the Rice: Break up any clumps in the cold rice using your hands or a fork.
Cook the Eggs: Heat 1 tablespoon of oil in a wok over medium heat. Add beaten eggs and scramble until set. Remove and set aside.
Sauté Aromatics: In the same wok, add the remaining oil. Sauté onions and garlic until fragrant.
Add Vegetables: Stir in mixed vegetables and cook for 2–3 minutes until slightly tender.
Incorporate Protein: If using chicken, shrimp, or tofu, add it now and stir until heated through.
Add Rice: Increase the heat to high and add the rice. Toss well to combine with the vegetables and protein.
Season the Dish: Pour in soy sauce, oyster sauce, and sesame oil. Stir-fry for 2–3 minutes to coat the rice evenly.
Combine Everything: Add the scrambled eggs back into the wok and mix.
Garnish and Serve: Sprinkle with chopped scallions and serve hot.
Suggestions for Serving and Storing
Serving: Pair with a side of spring rolls or soup for a complete meal.
Storing: Store in an airtight container in the fridge for up to 3 days.
Reheating: Reheat in a skillet with a splash of water to restore moisture.
Chef Simon’s Tips for Fried Rice
Use a hot wok to achieve the signature smoky flavor known as “wok hei.”
Don’t overcrowd the pan; stir-fry in batches if needed.
A drizzle of lime juice adds a refreshing tang.
Emotional and Psychological Impact of Food
Fried rice is more than just a meal; it’s a symbol of comfort and togetherness. The aroma of fried rice sizzling in a pan evokes feelings of nostalgia and joy, making it a universal comfort food.
Mindful Cooking Techniques
Focus on the sizzling sounds to gauge cooking progress.
Keep stirring to prevent sticking and ensure even cooking.
Tips for Keeping the Recipe Fresh Longer
Avoid adding too much moisture during storage to maintain the rice’s texture.
Cool the dish completely before refrigerating to prevent condensation.
Advanced Culinary Terms and Techniques
Tossing: A technique used in stir-frying to combine ingredients evenly.
Velveting: A method of marinating proteins to keep them tender during stir-frying.
Healthy Ingredient Alternatives
Use brown rice or quinoa for added fiber.
Substitute soy sauce with coconut aminos for a lower-sodium option.
Add more leafy greens like spinach or kale for extra nutrients.
More Serving Ideas
Serve with kimchi for a spicy kick.
Add a fried egg on top for a Korean-inspired twist.
Common Issues and Solutions
Rice Sticking to the Pan: Ensure the wok is well-heated and use enough oil.
Soggy Fried Rice: Use cold, day-old rice to avoid excess moisture.
Variations to Try
Spicy Fried Rice: Add chili paste or hot sauce.
Seafood Fried Rice: Use shrimp, scallops, and fish sauce for a coastal vibe.
Vegetarian Fried Rice: Skip the protein and load up on vegetables.
Nutritional Information and Health Benefits
Approximate values per serving:
Calories: 350
Protein: 12g
Carbohydrates: 50g
Fat: 10g
The Art of Pairing Fried Rice
Fried rice pairs wonderfully with green tea, a crisp white wine, or even a refreshing cucumber cooler.
Weather and Recipe Outcome
Fried rice is perfect for any season, offering warmth in the winter and a light, quick meal in the summer.
Other Recipes to Explore
Pad Thai
Nasi Goreng
Shrimp Fried Rice
Focus on Tools and Equipment
A seasoned wok is the best tool for fried rice, as it ensures even cooking and enhances the flavors.
Frequently Asked Questions (with answers)
Q1: Can I use freshly cooked rice? Yes, but spread it on a tray and let it cool completely to avoid clumping.
Q2: Can I make this dish vegan? Absolutely! Skip the eggs and use tofu or tempeh as a protein.
Q3: What if I don’t have a wok? A large non-stick skillet works well as an alternative.
Conclusion
Fried rice is the ultimate crowd-pleaser with its endless customizations and universal appeal. With a handful of ingredients and a hot skillet, you can create a dish that’s both flavorful and comforting. Try this recipe today and discover the magic of homemade fried rice!
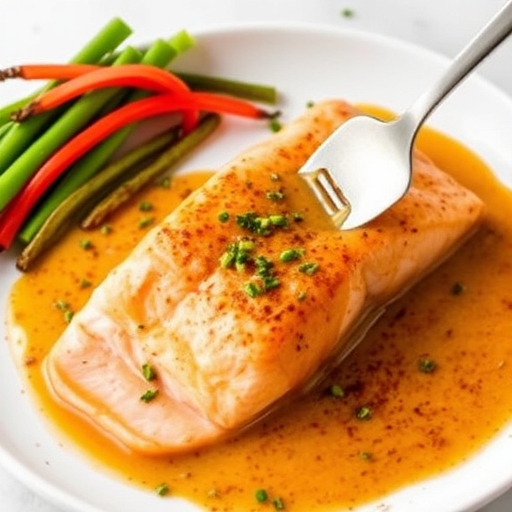
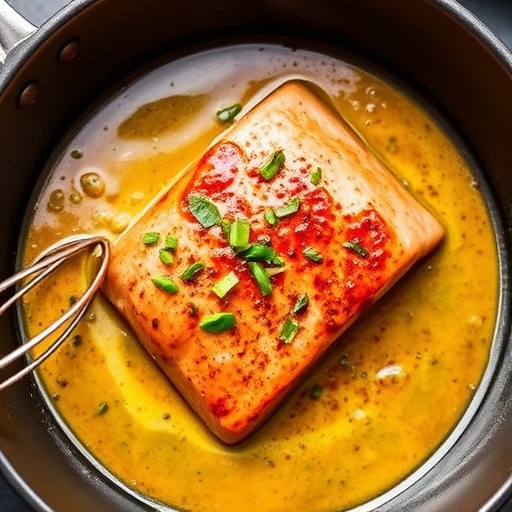
Salmon with Cajun Butter Sauce is the epitome of bold flavors meeting healthy eating. The tender, flaky salmon is seasoned to perfection and paired with a rich, spicy Cajun butter sauce that enhances every bite. This dish is perfect for weeknight dinners or special occasions, offering a restaurant-quality meal right from your kitchen.
Table of Contents
1. The Story Behind the Recipe
This recipe was inspired by the vibrant flavors of Louisiana cuisine, known for its hearty and spicy dishes. Cajun spices bring warmth and depth, while the butter sauce adds a luxurious touch. Combining these flavors with nutrient-packed salmon creates a balance of indulgence and wholesomeness.
2. The Benefits of Making Your Own Salmon with Cajun Butter Sauce
Customization: Adjust the spice levels to suit your palate.
Freshness: You control the ingredients, ensuring premium quality.
Healthier Option: Homemade allows you to use less sodium and healthier fats.
Cost-Effective: Enjoy a gourmet meal without the hefty restaurant price.
Season the Salmon: Pat the fillets dry and rub them generously with Cajun seasoning.
Sear the Salmon: Heat olive oil in a skillet over medium-high heat. Sear the salmon for 4-5 minutes per side until golden brown and cooked through. Remove and set aside.
Prepare the Cajun Butter Sauce: In the same skillet, melt the butter over low heat. Add minced garlic and sauté for 1-2 minutes until fragrant. Stir in smoked paprika, cayenne pepper, and lemon juice.
Combine: Return the salmon to the skillet, spoon the sauce over the fillets, and let them absorb the flavors for 1-2 minutes.
Garnish and Serve: Sprinkle with parsley and serve immediately.
7. Suggestions for Serving and Storing
Serving: Pair with steamed vegetables, mashed potatoes, or a side of fluffy rice.
Storing: Store leftovers in an airtight container in the refrigerator for up to 3 days. Reheat gently to maintain the salmon’s texture.
8. Chef Simon’s Tips for Salmon with Cajun Butter Sauce
Choose salmon fillets of even thickness for uniform cooking.
For extra crispy skin, press the salmon gently onto the skillet when searing.
Use freshly squeezed lemon juice for a bright, tangy flavor.
9. Emotional and Psychological Impact of Food
This dish is comfort food with a twist. The richness of the butter sauce paired with the heartiness of salmon evokes a sense of indulgence, while the vibrant Cajun spices add excitement and warmth, making it perfect for unwinding after a long day.
10. Mindful Cooking Techniques
Take your time to let the salmon sear properly; avoid rushing.
Be present when preparing the sauce, allowing the aromas of garlic and spices to envelop your senses.
11. Tips for Keeping the Recipe Fresh Longer
Store cooked salmon with the sauce separately to avoid sogginess.
Always refrigerate leftovers promptly to maintain freshness.
12. Advanced Culinary Terms and Techniques
Searing: A high-heat cooking method to create a crust on the salmon.
Deglazing: Using lemon juice to scrape up browned bits from the skillet, enhancing the sauce.
Emulsification: Whisking butter with spices and lemon juice for a creamy, cohesive sauce.
13. Healthy Ingredient Alternatives
Replace butter with olive oil for a lighter sauce.
Use Greek yogurt for a creamy, low-fat topping instead of the butter sauce.
Opt for salt-free Cajun seasoning to reduce sodium.
14. More Serving Ideas
Serve atop a bed of quinoa for a high-protein meal.
Pair with a fresh green salad and a vinaigrette dressing for a light option.
Add a dollop of avocado crema for a creamy contrast.
15. Common Issues and Solutions
Dry Salmon: Avoid overcooking; remove from heat as soon as it flakes easily.
Overly Spicy Sauce: Reduce the cayenne pepper or balance with a touch of honey.
Sauce Separation: Stir constantly when melting butter to prevent breaking.
16. Variations to Try
Swap salmon for shrimp or cod for a different protein.
Add a splash of cream to the Cajun butter sauce for a richer flavor.
Incorporate diced tomatoes or bell peppers into the sauce for added texture.
17. Nutritional Information and Health Benefits
Calories: 350 per serving
Protein: 25g (from salmon)
Omega-3s: Promotes heart health and reduces inflammation.
Vitamin D: Supports bone health and immunity.
18. The Art of Pairing Salmon with Cajun Butter Sauce
Complement the bold flavors with a glass of chilled Chardonnay or a light, hoppy beer. Non-alcoholic pairings like sparkling water with a slice of lime or iced tea with lemon work wonderfully too.
19. Weather and Recipe Outcome
This dish is versatile, perfect for summer grilling or a cozy winter dinner. Adjust the accompaniments seasonally for the best results.
20. Other Recipes to Explore
Cajun Shrimp Alfredo
Blackened Chicken Tacos
Lemon Garlic Tilapia
21. Focus on Tools and Equipment
A good-quality non-stick skillet is essential for achieving a flawless sear.
A fish spatula ensures you can flip the salmon without breaking it.
22. Frequently Asked Questions (with answers)
Q: Can I use frozen salmon? A: Yes, but ensure it’s thawed completely and patted dry before cooking.
Q: Can I make the sauce in advance? A: Yes, but reheat gently to prevent it from separating.
Conclusion
Salmon with Cajun Butter Sauce is a flavorful dish that’s as delightful to eat as it is to prepare. With its bold spices, creamy sauce, and tender salmon, this recipe will become a family favorite. Whether you’re hosting a dinner party or treating yourself, this dish is guaranteed to impress.
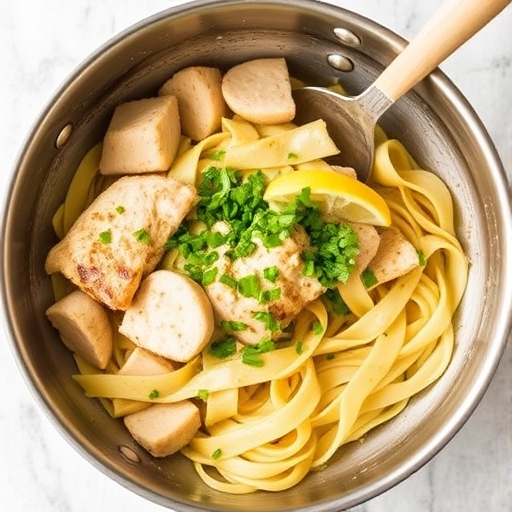
When life gives you lemons, why not make a delightful Lemon Caper Chicken Pasta? This recipe combines zesty lemons, savory capers, and tender chicken over a bed of al dente pasta. Perfect for weeknight dinners or special occasions, it’s a dish that tastes as good as it looks.
Table of Contents
1. The Story Behind the Recipe
The inspiration for Lemon Caper Chicken Pasta comes from the sunny Mediterranean, where simple ingredients like lemons, olive oil, and capers reign supreme. This dish brings together bright citrus flavors, briny capers, and juicy chicken, creating a meal that feels light, elegant, and deeply satisfying.
Chicken Breasts: Boneless and skinless for lean protein.
Capers: Add a tangy, salty flavor that balances the richness of the sauce.
Lemons: Freshly squeezed juice and zest are non-negotiable.
Pasta: Choose long strands like spaghetti or linguine for a classic pairing.
Garlic: Infuses the sauce with a warm, aromatic base.
Olive Oil: The foundation of many Mediterranean dishes.
Parmesan Cheese: For a creamy, savory finish.
4. Cultural History of Ingredients
Lemons: Native to Asia, lemons became a Mediterranean staple, celebrated for their vibrant flavor and health benefits.
Capers: These briny flower buds are a hallmark of Mediterranean cuisine, often used to elevate simple dishes.
Pasta: A culinary gift from Italy, pasta provides a versatile base for countless recipes.
5. Equipment You’ll Need
Large pot for boiling pasta
Skillet for cooking chicken and sauce
Zester for fresh lemon zest
Tongs for tossing pasta
Cutting board and sharp knife
6. Step-by-Step Instructions for Lemon Caper Chicken Pasta
Ingredients
12 oz (340g) spaghetti or linguine
2 chicken breasts, thinly sliced
2 tbsp olive oil
3 cloves garlic, minced
2 tbsp capers, drained
Juice and zest of 2 lemons
1 cup chicken broth
2 tbsp unsalted butter
½ cup grated Parmesan cheese
Salt and black pepper to taste
Fresh parsley for garnish
Instructions
Cook the Pasta: Bring a large pot of salted water to a boil. Cook pasta according to package instructions until al dente. Reserve ½ cup of pasta water and drain the rest.
Prepare the Chicken: Season chicken slices with salt and pepper. Heat olive oil in a skillet over medium heat and cook chicken until golden and fully cooked, about 3-4 minutes per side. Remove and set aside.
Make the Sauce: In the same skillet, add minced garlic and sauté for 1 minute until fragrant. Stir in capers, lemon juice, zest, and chicken broth. Let it simmer for 2-3 minutes.
Combine: Return the chicken to the skillet and add the cooked pasta. Toss to coat evenly in the sauce. If needed, add reserved pasta water for a silkier texture.
Finish with Butter and Cheese: Stir in butter and Parmesan cheese until melted. Adjust seasoning with salt and pepper.
Serve: Garnish with fresh parsley and an extra sprinkle of Parmesan.
7. Suggestions for Serving and Storing
Serving: Pair with a crisp green salad and crusty bread for a complete meal.
Storing: Store leftovers in an airtight container in the refrigerator for up to 3 days. Reheat gently with a splash of water or broth.
8. Chef Simon’s Tips for Lemon Caper Chicken Pasta
Always use freshly squeezed lemon juice for the best flavor.
Don’t overcook the pasta—al dente is key for perfect texture.
Add a pinch of red pepper flakes for a spicy kick.
9. Emotional and Psychological Impact of Food
The citrusy brightness of this dish evokes feelings of joy and renewal, making it perfect for lifting spirits. Its comforting yet light nature makes it equally ideal for celebrations or casual gatherings.
10. Mindful Cooking Techniques
Pay attention to the chicken as it cooks to achieve a golden crust without drying out.
Taste the sauce as you go, adjusting lemon and caper levels to your preference.
11. Tips for Keeping the Recipe Fresh Longer
Store sauce and pasta separately to maintain the best texture.
Use airtight containers to prevent the dish from absorbing other refrigerator odors.
12. Advanced Culinary Terms and Techniques
Deglazing: Adding broth to the skillet to release flavorful browned bits from the bottom.
Emulsification: The process of creating a creamy sauce by combining butter with broth and lemon juice.
13. Healthy Ingredient Alternatives
Replace butter with olive oil for a dairy-free version.
Use whole-grain pasta for added fiber.
Substitute chicken with shrimp or tofu for variety.
14. More Serving Ideas
Add roasted cherry tomatoes for a burst of sweetness.
Top with toasted breadcrumbs for added texture.
Serve alongside a chilled glass of Sauvignon Blanc.
15. Common Issues and Solutions
Too Tart: Balance excessive lemon flavor with a pinch of sugar or more Parmesan.
Dry Chicken: Slice chicken thinly for even cooking and avoid overcooking.
Clumpy Sauce: Ensure the skillet is not too hot when adding butter and Parmesan.
16. Variations to Try
Add spinach or arugula for a pop of green.
Include olives for an additional Mediterranean flair.
Replace chicken with salmon for a seafood twist.
17. Nutritional Information and Health Benefits
Calories: 420 per serving
Protein: 35g (from chicken and Parmesan)
Vitamin C: Boosts immunity and skin health from lemons.
Antioxidants: Found in capers and parsley.
18. The Art of Pairing Lemon Caper Chicken Pasta
Pair with a crisp white wine like Pinot Grigio or a sparkling lemonade for non-alcoholic options. A light dessert, like lemon sorbet, complements the meal beautifully.
19. Weather and Recipe Outcome
This dish is versatile, brightening up rainy days with its citrusy zing or perfectly complementing sunny picnics and alfresco dining.
20. Other Recipes to Explore
Lemon Garlic Shrimp Pasta
Mediterranean Chicken with Olives and Capers
Creamy Lemon Risotto
21. Focus on Tools and Equipment
A sharp zester ensures fine lemon zest without bitterness.
Use a heavy-bottomed skillet to evenly cook chicken and sauce.
22. Frequently Asked Questions (with answers)
Q: Can I use bottled lemon juice? A: Fresh lemon juice is highly recommended for the best flavor.
Q: Can this dish be made gluten-free? A: Absolutely—use gluten-free pasta.
Conclusion
Lemon Caper Chicken Pasta is a delightful fusion of zesty, savory, and creamy flavors. Its simplicity, elegance, and bold taste make it a family favorite and an entertainer’s delight. Dive into the Mediterranean spirit with this unforgettable dish!
Introduction A Strawberry Chocolate Ice Cream Cake is the ultimate dessert, combining the rich indulgence of chocolate with the fresh sweetness of strawberries. This layered cake is perfect for celebrations, summer parties, or just as a special treat for your loved ones. With its decadent layers of chocolate cake, creamy strawberry ice cream, and a luscious chocolate fudge topping, it’s a dessert that will steal the show at any occasion. Whether you’re celebrating a birthday or just craving a refreshing, yet indulgent dessert, this cake hits all the right notes.
Ice cream cakes have been a popular dessert for decades, especially for birthdays and festive occasions. The combination of cake and ice cream makes for a delightful contrast in textures and temperatures. The pairing of strawberry and chocolate has been a classic one in the culinary world—both flavors are beloved by many for their perfect balance of sweetness and richness. This strawberry chocolate version elevates the traditional ice cream cake, combining the best of both worlds into one decadent, refreshing treat.
Full Control Over Ingredients: When you make your own ice cream cake, you can use fresh, high-quality ingredients. This means you can choose a premium brand of chocolate and select the ripest strawberries, resulting in a more flavorful and satisfying dessert.
Customization: You can tailor the cake’s layers, fillings, and toppings to suit your tastes. Want to add an extra layer of fruit or top it with more chocolate? The choice is yours!
No Artificial Additives: Homemade cakes are free from preservatives and artificial flavors, giving you a healthier, fresher alternative to store-bought versions.
Essential Ingredients for the Perfect Strawberry Chocolate Ice Cream Cake
Chocolate: Chocolate is one of the most beloved treats in the world. It originates from ancient Mesoamerican civilizations, where cocoa beans were used to make a bitter drink. Over time, the sweetness of chocolate evolved, and it became a staple in desserts globally. Chocolate cake and ice cream are now classic dessert choices in many cultures.
Strawberries: Strawberries have been enjoyed since ancient times. They are one of the first fruits to ripen in spring, symbolizing the start of a new season. Known for their vibrant color and sweet, slightly tangy taste, strawberries are commonly used in desserts, jams, and beverages.
Ice Cream: Ice cream’s history dates back to ancient Rome and China, where it was made from snow and flavored with fruits. Today, it’s a beloved dessert, especially during warmer months, and the perfect ingredient for layering in cakes and pies.
Equipment You’ll Need
9-inch round cake pan (for baking the cake)
Electric mixer (optional, for smooth cake batter)
Spatula
Double boiler or microwave-safe bowl (for making the chocolate fudge)
Cake plate or serving dish
Parchment paper (optional, for lining the cake pan)
Knife (for slicing the cake and serving)
Step-by-Step Instructions for Strawberry Chocolate Ice Cream Cake
Step 1: Bake the Chocolate Cake
Preheat your oven to 350°F (175°C).
Grease a 9-inch round cake pan and line the bottom with parchment paper to prevent sticking.
Prepare the chocolate cake mix according to the instructions on the box, or use your favorite homemade chocolate cake recipe.
Pour the batter into the prepared pan and bake according to the package directions or until a toothpick inserted into the center comes out clean.
Allow the cake to cool completely in the pan, then remove from the pan and set aside.
Step 2: Prepare the Strawberry Ice Cream Layer
While the cake is cooling, soften the strawberry ice cream by leaving it at room temperature for about 10–15 minutes.
Once softened, gently fold in the crushed strawberries to add extra flavor and texture.
Spread the ice cream mixture evenly over the top of the cooled cake.
Place the cake in the freezer for at least 2 hours to allow the ice cream to set.
Step 3: Make the Chocolate Fudge Layer
In a double boiler or microwave-safe bowl, combine the heavy cream and chocolate chips.
Heat over medium heat or microwave in 30-second intervals, stirring frequently, until the chocolate is melted and the mixture is smooth.
Stir in the butter until fully incorporated, then allow the fudge to cool slightly before using.
Step 4: Assemble the Cake
Once the ice cream layer has set, pour the cooled chocolate fudge sauce over the top of the cake.
Use a spatula to spread the fudge evenly across the surface of the cake, ensuring it covers the ice cream layer.
Return the cake to the freezer and freeze for at least 2 more hours to allow the fudge to harden.
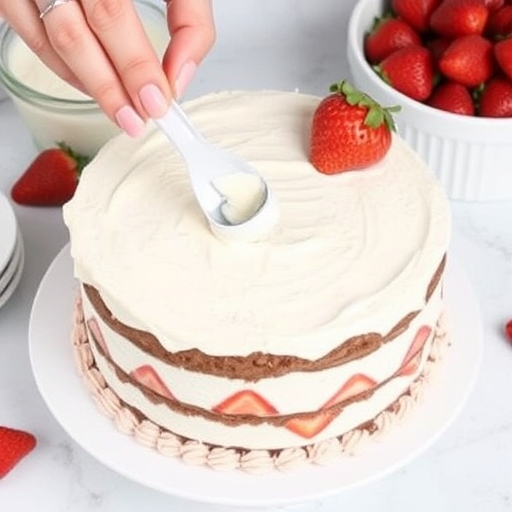
Step 5: Garnish and Serve
Once fully frozen, remove the cake from the freezer.
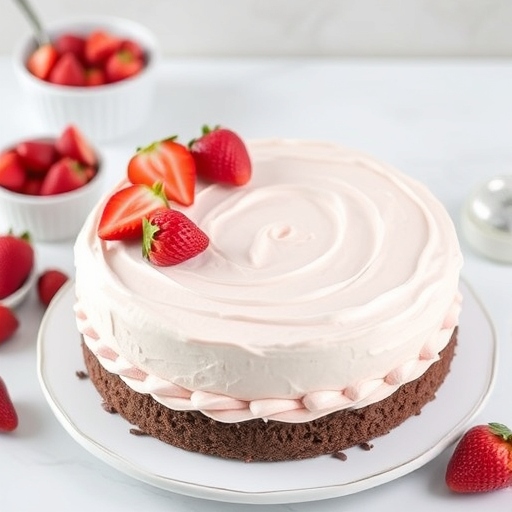
Garnish with fresh strawberries and optional whipped cream on top.
Slice and serve, making sure to let the cake sit for a few minutes at room temperature to make slicing easier.
Suggestions for Serving and Storing
Serving Tips: Serve the cake with a scoop of extra strawberry ice cream or a drizzle of hot fudge sauce for added indulgence.
Storage: Store any leftover cake in the freezer, covered tightly with plastic wrap or foil, for up to 1 week. If you plan to store the cake for longer, consider individually wrapping slices to prevent freezer burn.
Chef Simon’s Tips for Strawberry Chocolate Ice Cream Cake
Cake Texture: If you’re making your own chocolate cake from scratch, make sure not to overmix the batter. Overmixing can result in a dense cake that won’t absorb the ice cream properly.
Layering: For a cleaner look when slicing, allow the cake to freeze for a few hours after each layer is added. This will help maintain the distinct layers of cake, ice cream, and fudge.
Ice Cream Variations: Try mixing up the flavors! If strawberry isn’t your favorite, substitute with any fruit-flavored ice cream or even chocolate or vanilla.
Emotional and Psychological Impact of Food
Food, especially something as indulgent as a Strawberry Chocolate Ice Cream Cake, often brings comfort and joy. It can remind us of celebrations, happy memories, and shared moments with loved ones. The combination of chocolate and strawberries, two flavors that are universally adored, invokes a sense of nostalgia and contentment.
Mindful Cooking Techniques
Enjoy the Process: Making this cake from scratch is not just about the end product; it’s about enjoying the process. Take your time to appreciate each step, from mixing the cake batter to creating the perfect chocolate fudge topping.
Visual Appeal: As you layer the ice cream and fudge, take a moment to admire the colors and textures. This is a dessert that’s not just delicious but also a feast for the eyes.
Tips for Keeping the Recipe Fresh Longer
Avoid Freezer Burn: Be sure to wrap the cake tightly in plastic wrap or foil when storing in the freezer. If you have any leftover fudge or ice cream, store them separately to preserve their texture and flavor.
Serving Freshness: If the cake has been stored for a while, let it sit at room temperature for 5–10 minutes before serving for a smoother texture and easier slicing.
Advanced Culinary Terms and Techniques
Ganache: A rich chocolate mixture made from melting chocolate and heavy cream. It’s often used as a topping or filling in cakes and pastries.
Churned Ice Cream: Ice cream that has been churned during the freezing process, which helps to incorporate air and create a smoother, creamier texture.
Healthy Ingredient Alternatives
Low-Fat Ice Cream: For a lighter version, opt for low-fat or non-dairy ice cream options. Coconut milk-based ice creams can provide a similar creamy texture without the added calories.
Sugar Substitutes: Use sugar substitutes like stevia or monk fruit for a healthier version of the cake and ice cream without sacrificing taste.
More Serving Ideas
Toppings: Serve with additional toppings like chopped nuts, caramel sauce, or a drizzle of strawberry syrup.
Beverages: Pair this cake with a chilled glass of sparkling water or a fruity iced tea to balance the richness of the dessert.
Common Issues and Solutions
Cake is Too Dense:
Solution: Ensure you don’t overmix the cake batter. Overmixing can lead to a denser texture. Mix just until the ingredients are combined for a light and fluffy cake. Additionally, check that your baking powder or soda is fresh for proper leavening.
Ice Cream Layer Melting Too Fast: Solution: If your ice cream layer starts melting too quickly, ensure the cake is fully chilled before spreading the ice cream. It’s also important to work in small batches when spreading the ice cream layer to avoid it melting prematurely.
Chocolate Fudge Not Setting Properly: Solution: Make sure the fudge mixture has cooled before pouring it onto the cake. If it’s too hot, it might melt the ice cream layer underneath. Also, ensure you give the cake enough time in the freezer after adding the fudge to allow it to set.
Variations to Try
Caramel Ice Cream Layer: Instead of strawberry ice cream, try a caramel or butterscotch ice cream for a new twist. This variation will bring a rich, buttery flavor that pairs beautifully with chocolate cake.
Fruit Toppings: Add a variety of fruits like raspberries, blueberries, or kiwi on top of the cake for a more refreshing, fruity dessert. The tartness of these fruits will balance out the sweetness of the cake.
Nutty Add-ins: For a bit of crunch, try adding crushed nuts like almonds, hazelnuts, or walnuts into the ice cream layer. This adds texture and a nutty flavor that pairs wonderfully with the chocolate.
Nutritional Information and Health Benefits
While this dessert is indulgent and rich, it can be enjoyed in moderation as part of a balanced diet. Here’s an approximate breakdown of the nutritional content per serving (based on 12 servings):
Calories: 380–400 kcal per slice
Fat: 23g
Carbohydrates: 43g
Protein: 4g
Sugar: 30g
Fiber: 1g
Health Benefits:
Strawberries: Rich in antioxidants like vitamin C, strawberries help boost the immune system, fight free radicals, and promote skin health.
Dark Chocolate (in the fudge): Contains antioxidants that can benefit heart health and provide a small dose of iron and magnesium.
While this dessert isn’t low in calories or sugar, it offers a few benefits from the nutrient-rich ingredients like strawberries and dark chocolate. It’s a great way to treat yourself while enjoying a burst of antioxidants and natural goodness.
The Art of Pairing Strawberry Chocolate Ice Cream Cake
To elevate your dessert experience, pair this ice cream cake with a few complementary items:
Beverages:
Coffee: A cup of freshly brewed coffee (especially dark roast) enhances the chocolate flavors in the cake and provides a slight contrast to the sweetness.
Wine: A light white wine such as a Moscato or a sweet Riesling pairs beautifully with the strawberry layer, while a richer red wine like Merlot complements the chocolate.
Side Dishes:
Fresh Fruit Salad: A refreshing side of fresh berries or citrus fruits can balance out the richness of the ice cream cake.
Light Sorbet: Serve a scoop of lemon or raspberry sorbet to cleanse the palate between bites of the rich cake.
Weather and Recipe Outcome
The outcome of this Strawberry Chocolate Ice Cream Cake is ideal for warm weather months, especially during spring and summer. The cold, creamy layers of ice cream provide a refreshing contrast to the heat, making it a perfect treat for hot days or summer gatherings. On colder days, while still delicious, it may be more comforting to enjoy this dessert after a warm meal, as the chilled layers contrast with the coziness of the meal.
Other Ice Cream Cakes to Explore
If you’re a fan of ice cream cakes, here are a few more variations to try:
Mint Chocolate Chip Ice Cream Cake: Layer chocolate cake with mint chocolate chip ice cream and top with a chocolate ganache drizzle for a refreshing twist.
Cookies and Cream Ice Cream Cake: Chocolate or vanilla cake layers paired with cookies and cream ice cream and crushed Oreos make for a fun and delicious treat.
Peanut Butter Cup Ice Cream Cake: A rich chocolate cake layered with peanut butter ice cream and chunks of peanut butter cups for an indulgent, satisfying dessert.
Focus on Tools and Equipment
To make the preparation of your Strawberry Chocolate Ice Cream Cake easier and more efficient, consider the following tools:
Electric Mixer: For a smoother cake batter, using an electric mixer can speed up the process and ensure everything is thoroughly incorporated.
Double Boiler or Microwave: A double boiler is ideal for melting chocolate without scorching it. If you don’t have one, you can also use the microwave in short bursts, stirring in between.
Cake Slicing Knife: When it’s time to serve the cake, a serrated cake slicer or a sharp chef’s knife ensures you get clean slices without melting the ice cream.
Frequently Asked Questions (with answers)
Can I use store-bought cake for this recipe? Yes! If you want to save time, you can use a store-bought chocolate cake or even brownies as the base for your ice cream cake. Just ensure it’s fully cooled before layering with ice cream.
Can I add more than one flavor of ice cream? Absolutely! You can create layers with different flavors of ice cream, like vanilla, chocolate, and strawberry, for a more complex and indulgent dessert.
How can I make this cake gluten-free? To make this cake gluten-free, simply substitute the regular chocolate cake mix with a gluten-free version. Ensure that the ice cream and chocolate fudge sauce are also gluten-free.
Can I make this cake without ice cream? If you prefer not to use ice cream, you can replace it with a layer of whipped cream or mousse. However, this will alter the texture and flavor of the cake.
Conclusion
The Strawberry Chocolate Ice Cream Cake is a delightful, indulgent treat that combines the best of both worlds—creamy, cold ice cream and rich, moist chocolate cake. This dessert is a crowd-pleaser that will satisfy even the most discerning sweet tooth. It’s perfect for birthdays, holiday gatherings, or any special occasion. By following the steps, experimenting with flavors, and adding your personal touches, you’ll create a show-stopping dessert that everyone will love. So, gather your ingredients, enjoy the process, and treat your family and friends to this delicious and refreshing ice cream cake!