Introduction
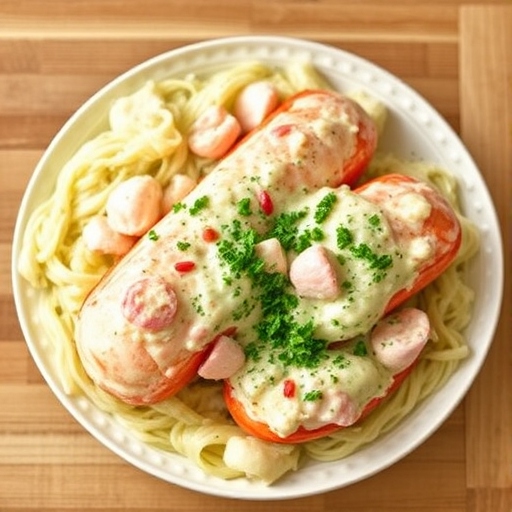
Lobster Thermidor is the epitome of indulgence, an iconic French seafood dish characterized by its luxurious creamy sauce, tender lobster meat, and delightful cheese crust. Whether you’re celebrating a special occasion or simply treating yourself, this recipe transforms lobster into a restaurant-worthy masterpiece in the comfort of your kitchen. With its origins steeped in French culinary tradition, Lobster Thermidor showcases the elegance of seafood paired with rich, creamy flavors.
Table of Contents
1. The Story Behind Lobster Thermidor
Lobster Thermidor has an intriguing history that dates back to the late 19th century. Named after a play titled Thermidor, performed at the Comédie-Française in Paris, the dish was created to impress theatergoers. Over time, it became a staple of French haute cuisine, representing sophistication and celebration. The original recipe was characterized by its classic béchamel sauce and a topping of Gruyère cheese, baked to perfection. Lobster Thermidor has since gained international acclaim, gracing the menus of fine dining restaurants across the globe.
2. The Benefits of Making Your Own Lobster Thermidor
Making Lobster Thermidor at home offers several advantages:
- Cost-Effective: Lobster Thermidor in a restaurant can be pricey. By preparing it yourself, you enjoy the same luxurious experience at a fraction of the cost.
- Customizable: Tailor the dish to your liking, adjusting the seasoning, cheese, or sauce consistency to suit your preferences.
- Fresh Ingredients: Homemade ensures you use the freshest lobster and ingredients for an authentic, flavorful experience.
- Impressive Presentation: Serving a homemade Lobster Thermidor is sure to wow your guests and elevate your culinary reputation.
3. Essential Ingredients for the Perfect Lobster Thermidor
For this recipe, you will need:
- Lobsters: 2 large lobsters (1.5–2 lbs each), cooked and halved.
- Butter: 4 tbsp, unsalted.
- Shallots: 2, finely chopped.
- Garlic: 2 cloves, minced.
- Dry White Wine: ½ cup (or chicken broth as a substitute).
- Heavy Cream: 1 cup.
- Dijon Mustard: 1 tbsp.
- Gruyère Cheese: 1 cup, grated.
- Parsley: 2 tbsp, freshly chopped.
- Paprika: 1 tsp.
- Salt and Pepper: To taste.
4. Cultural History of Ingredients
- Lobster: Historically, lobster was considered a food for the poor until the 19th century, when it became a symbol of luxury and fine dining.
- Gruyère Cheese: Originating from Switzerland, Gruyère adds a nutty, creamy flavor, perfect for Lobster Thermidor.
- Dijon Mustard: A French classic, it provides a slight tang and depth to the dish’s rich sauce.
- Dry White Wine: Integral to many French recipes, wine enhances the sauce with acidity and balance.
5. Equipment You’ll Need
- A large pot for boiling lobsters.
- Sharp kitchen shears for cutting lobster shells.
- A small saucepan for the sauce.
- A baking dish for broiling.
- A whisk for a smooth sauce.
6. Step-by-Step Instructions for Lobster Thermidor
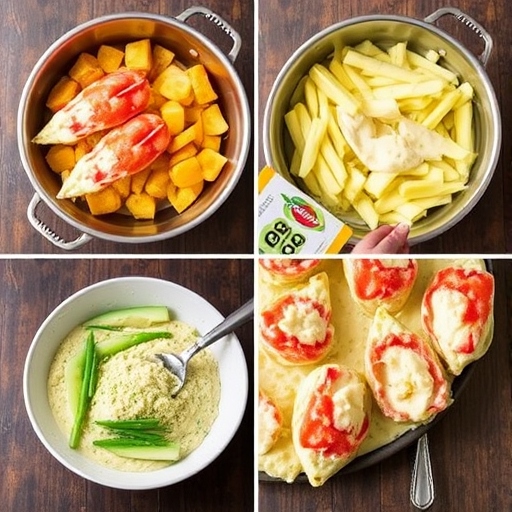
- Cook the Lobsters
- Boil the lobsters in salted water for 10–12 minutes or until bright red. Remove and let cool.
- Halve each lobster lengthwise and carefully remove the meat, preserving the shells.
- Prepare the Sauce
- In a saucepan, melt butter over medium heat. Sauté shallots and garlic until fragrant.
- Add white wine and let it reduce by half.
- Stir in heavy cream, Dijon mustard, paprika, salt, and pepper. Simmer until the sauce thickens.
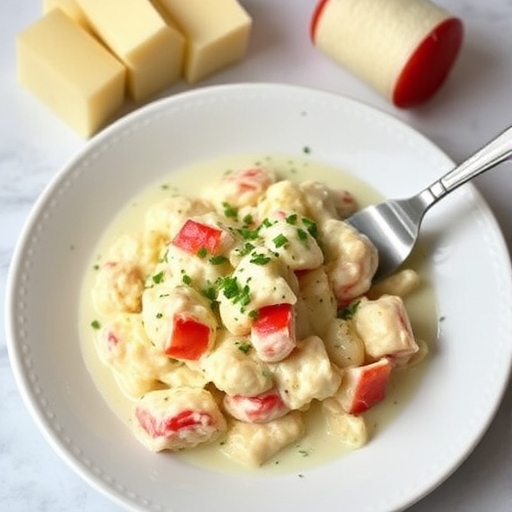
- Combine Lobster and Sauce
- Chop the lobster meat into bite-sized pieces and fold into the sauce. Add half the Gruyère cheese and parsley.
- Stuff the Lobster Shells
- Spoon the creamy lobster mixture back into the shells. Place them in a baking dish.
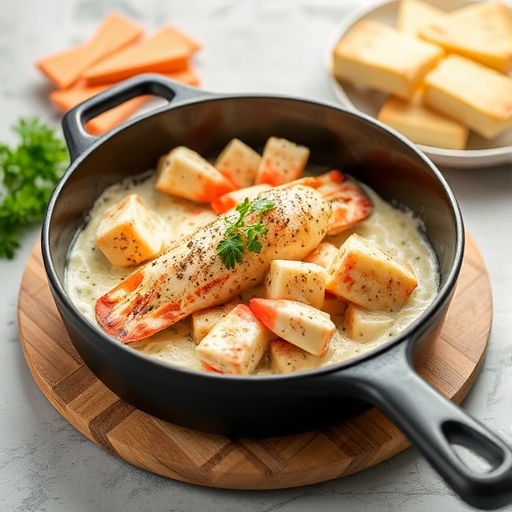
- Broil to Perfection
- Top the stuffed lobsters with the remaining Gruyère cheese. Broil for 5–7 minutes, or until golden and bubbling.
7. Suggestions for Serving and Storing
- Serve Lobster Thermidor with a side of garlic bread, roasted vegetables, or a crisp green salad.
- Leftovers can be stored in an airtight container in the fridge for up to 2 days. Reheat in the oven at 350°F to maintain texture.
8. Chef Simon’s Tips for Lobster Thermidor
- Fresh Lobster: Opt for live lobsters for the best flavor and texture.
- Cheese Variation: Swap Gruyère for Parmesan or Comté for a unique twist.
- Wine Substitute: Use chicken broth or a splash of lemon juice if wine is unavailable.
9. Emotional and Psychological Impact of Food
Lobster Thermidor exudes luxury, making it a dish often associated with special moments. Preparing and enjoying it can evoke feelings of indulgence and accomplishment, creating memorable dining experiences.
10. Mindful Cooking Techniques
- Focus on each step, from boiling the lobsters to crafting the sauce, as an opportunity to connect with the culinary process.
- Engage your senses—observe the vibrant colors, inhale the aromatic flavors, and savor the creamy richness of the final dish.
11. Tips for Keeping the Recipe Fresh Longer
- Store unused lobster meat in a vacuum-sealed bag or airtight container.
- Freeze lobster shells for future seafood stock, enhancing other recipes.
12. Advanced Culinary Terms and Techniques
- Reduction: Simmering the white wine to intensify its flavor.
- Gratin: A French technique of topping a dish with cheese or breadcrumbs, then broiling for a golden crust.
13. Healthy Ingredient Alternatives
- Use low-fat cream to reduce calories.
- Replace butter with olive oil for a heart-healthy option.
14. More Serving Ideas
- Serve alongside risotto for a more filling meal.
- Pair with a glass of chilled Chardonnay or sparkling water with lemon.
15. Common Issues and Solutions
- Sauce Splitting: Whisk continuously to prevent cream from curdling.
- Overcooked Lobster: Cook lobsters just until the shell turns bright red to maintain tender meat.
16. Variations to Try
- Spicy Lobster Thermidor: Add cayenne pepper or chili flakes for heat.
- Herbaceous Twist: Mix in fresh tarragon or dill for an aromatic flavor.
17. Nutritional Information and Health Benefits
- Calories: ~450 per serving.
- Protein: Lobster is an excellent lean protein source.
- Omega-3 Fatty Acids: Promotes heart and brain health.
18. The Art of Pairing Lobster Thermidor
Pair with buttery mashed potatoes, crusty French bread, or crisp asparagus. A chilled white wine, such as Sauvignon Blanc or Chablis, complements the dish beautifully.
19. Weather and Recipe Outcome
Lobster Thermidor is ideal for colder months, providing a warm and comforting meal. However, its light yet indulgent nature makes it suitable for summer celebrations as well.
20. Other Seafood Recipes to Explore
- Garlic Butter Shrimp Scampi
- Crab-Stuffed Mushrooms
- Baked Salmon with Dill Sauce
21. Focus on Tools and Equipment
- Invest in a quality seafood cracker for effortless shell cracking.
- Use ramekins for individual servings, adding a touch of elegance.
22. Frequently Asked Questions (with answers)
Q: Can I make Lobster Thermidor ahead of time?
A: Yes, prepare the sauce and lobster meat in advance. Assemble just before baking for the freshest results.
Q: Can I use frozen lobster?
A: Absolutely. Thaw frozen lobster thoroughly before cooking.
Conclusion
Creamy Lobster Thermidor is a timeless recipe that captures the essence of French sophistication. Perfect for special occasions or as a personal indulgence, this dish showcases the natural sweetness of lobster paired with a rich, velvety sauce and a golden cheese crust. With this detailed guide, you’ll master the art of Lobster Thermidor and impress your loved ones with a culinary masterpiece.