Zesty Lemon Blueberry Bread: Moist, Sweet, and Irresistible

Lemon Blueberry Bread Recipe

Introduction
Lemon blueberry bread is a delightful combination of tangy citrus and sweet, juicy blueberries, perfect for breakfast, dessert, or a midday snack. Its moist crumb, vibrant flavors, and fragrant aroma make it a crowd-pleaser that’s easy to whip up in any kitchen. This recipe will guide you in creating a loaf bursting with natural sweetness and a refreshing lemon glaze.


The Story Behind Lemon Blueberry Bread

Lemon and blueberry are a classic pairing, celebrated for their complementary flavors. This bread likely evolved from traditional quick bread recipes, offering a balance of tartness from lemons and natural sweetness from blueberries. Perfect for summer, it also brings brightness to colder months, offering a slice of sunshine with every bite.


The Benefits of Making Your Own Lemon Blueberry Bread

  • Fresh Ingredients: Homemade bread avoids artificial flavors and preservatives.
  • Customizable: Adjust sweetness or add ingredients like nuts or spices.
  • Cost-Effective: A fraction of the price of store-bought versions.
  • Comforting Activity: Baking can be therapeutic and enjoyable.

Essential Ingredients for the Perfect Lemon Blueberry Bread

For the Bread

  • 1 ¾ cups all-purpose flour
  • 1 teaspoon baking powder
  • ½ teaspoon baking soda
  • ½ teaspoon salt
  • ½ cup unsalted butter, softened
  • 1 cup granulated sugar
  • 2 large eggs
  • ½ cup buttermilk (or milk with 1 tablespoon lemon juice)
  • 2 tablespoons lemon juice (freshly squeezed)
  • Zest of 1 lemon
  • 1 cup fresh or frozen blueberries (tossed in 1 tablespoon flour)

For the Glaze

  • 1 cup powdered sugar
  • 2–3 tablespoons lemon juice

Cultural History of Ingredients

  • Lemons: A symbol of freshness and vitality, lemons have been a staple in Mediterranean and Asian cuisines for centuries.
  • Blueberries: Native to North America, blueberries are celebrated for their antioxidant properties and versatile flavor.
  • Buttermilk: A traditional baking ingredient, its acidity tenderizes the bread and enhances the tangy lemon flavor.

Equipment You’ll Need

  • Mixing bowls
  • Electric mixer or whisk
  • 9×5-inch loaf pan
  • Parchment paper
  • Microplane for zesting

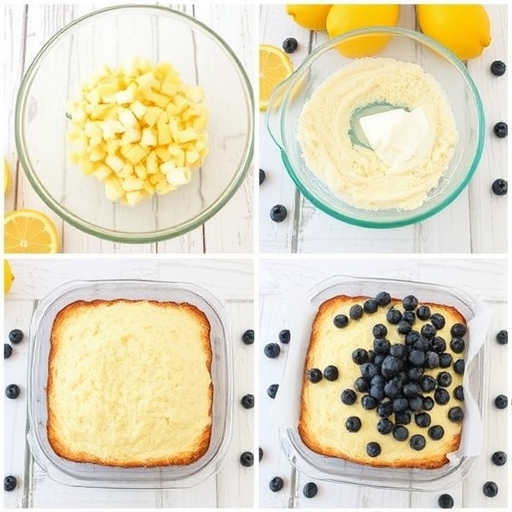
Step-by-Step Instructions for Lemon Blueberry Bread

Step 1: Prepare the Pan

  1. Preheat the oven to 350°F (175°C).
  2. Line the loaf pan with parchment paper or grease it with butter.

Step 2: Mix Dry Ingredients

  1. In a bowl, whisk together flour, baking powder, baking soda, and salt.

Step 3: Cream Butter and Sugar

  1. In a separate bowl, cream the butter and sugar until light and fluffy.
  2. Beat in eggs, one at a time, then mix in the lemon juice and zest.

Step 4: Combine Wet and Dry Ingredients

  1. Alternate adding the dry ingredients and buttermilk to the butter mixture, starting and ending with the dry ingredients.
  2. Gently fold in the blueberries, ensuring they’re evenly distributed.

Step 5: Bake

  1. Pour the batter into the prepared loaf pan.
  2. Bake for 50–60 minutes or until a toothpick inserted into the center comes out clean.
  3. Let the bread cool in the pan for 10 minutes before transferring it to a wire rack.

Step 6: Prepare the Glaze

  1. Whisk together powdered sugar and lemon juice until smooth.
  2. Drizzle the glaze over the cooled bread.

Suggestions for Serving and Storing

  • Serving: Pair with tea, coffee, or a dollop of whipped cream.
  • Storing: Store in an airtight container at room temperature for up to 3 days.
  • Freezing: Wrap tightly in plastic wrap and aluminum foil; freeze for up to 3 months.

Chef Simon’s Tips for Lemon Blueberry Bread

  • Tossing blueberries in flour prevents them from sinking to the bottom.
  • Use fresh lemons for zest and juice for maximum flavor.
  • Don’t overmix the batter; this ensures a tender crumb.

Emotional and Psychological Impact of Food

A slice of lemon blueberry bread can evoke comfort, nostalgia, and happiness. Its bright flavors have a mood-boosting effect, perfect for starting the day on a positive note or unwinding in the evening.


Mindful Cooking Techniques

  • Focus on the aroma of lemon zest as you grate it.
  • Enjoy the process of folding blueberries into the batter, appreciating their burst of color.

Tips for Keeping the Recipe Fresh Longer

  • Add a layer of plastic wrap before storing to keep the bread moist.
  • Avoid slicing the bread until ready to serve to retain freshness.

Advanced Culinary Terms and Techniques

  • Creaming Method: Incorporating air into butter and sugar for a light texture.
  • Zesting: Using a microplane to extract the outermost layer of citrus peel without the bitter white pith.

Healthy Ingredient Alternatives

  • Use whole wheat flour for added fiber.
  • Substitute honey or maple syrup for sugar.
  • Opt for Greek yogurt instead of buttermilk for a protein boost.

More Serving Ideas

  • Toast slices and spread with butter or cream cheese.
  • Top with a spoonful of blueberry compote for an indulgent dessert.

Common Issues and Solutions

  • Dense Bread: Ensure ingredients are at room temperature and avoid overmixing.
  • Burnt Edges: Cover with foil during the last 10 minutes of baking if the top browns too quickly.

Variations to Try

  • Raspberry Lemon Bread: Swap blueberries for raspberries.
  • Lemon Poppy Seed Bread: Add 1 tablespoon of poppy seeds to the batter.
  • Orange Cranberry Bread: Use orange zest and juice with dried cranberries.

Nutritional Information and Health Benefits

  • Calories: ~220 per slice
  • Antioxidants: From blueberries and lemon.
  • Vitamin C: Boosts immunity.

The Art of Pairing Lemon Blueberry Bread

Pair with a cup of Earl Grey tea or a refreshing iced coffee for a complementary flavor experience.


Weather and Recipe Outcome

This bread is ideal for spring or summer gatherings but also brings a refreshing contrast to cozy winter meals.


Other Quick Bread Recipes to Explore

  • Banana Walnut Bread
  • Pumpkin Spice Bread
  • Zucchini Bread

Focus on Tools and Equipment

Invest in a good quality loaf pan and microplane zester for perfect results every time.


Frequently Asked Questions (with answers)

Q: Can I use frozen blueberries?
A: Yes, just don’t thaw them before adding to the batter.

Q: Can I skip the glaze?
A: Absolutely, but the glaze adds extra flavor and a touch of sweetness.

Q: How can I tell if the bread is done?
A: Insert a toothpick into the center; if it comes out clean, the bread is ready.


Conclusion

Lemon blueberry bread is a testament to the joy of baking with simple, fresh ingredients. Whether enjoyed with your morning coffee or as a sweet treat after dinner, this recipe guarantees a loaf that’s moist, flavorful, and irresistibly delightful. Give it a try and savor the perfect balance of tangy and sweet in every bite!

Best Italian Brunch Torte Recipe

Italian Brunch Torte

Introduction
The Italian Brunch Torte is a savory masterpiece perfect for breakfast, brunch, or a special occasion. This layered dish combines rich flavors of Italian meats, cheeses, and vegetables, encased in a flaky, golden crust. It’s as delicious as it is visually impressive, making it a go-to recipe for entertaining or elevating a simple family meal.


The Story Behind the Italian Brunch Torte

This dish originates from Italy’s tradition of creating hearty, layered savory pies. Often served during celebrations, it embodies the love for bold flavors and artisanal ingredients. While the recipe may seem elaborate, its roots lie in simplicity and the desire to craft a meal that brings people together.


The Benefits of Making Your Own Italian Brunch Torte

  • Customizable: Tailor the ingredients to your preferences, including vegetarian options.
  • Impressive Presentation: Its layered structure makes it a showstopper for any table.
  • Make-Ahead Friendly: Prepare it in advance for stress-free hosting.
  • Nutrient-Dense: Packed with protein, vegetables, and healthy fats.

Essential Ingredients for the Perfect Italian Brunch Torte

For the Crust

  • 2 premade pie crusts (or homemade)

For the Filling

  • 6 large eggs, beaten
  • 1 cup ricotta cheese
  • 1 cup shredded mozzarella cheese
  • 1 cup grated Parmesan cheese
  • ½ cup chopped fresh spinach
  • ½ cup roasted red bell peppers, diced
  • ½ cup cooked Italian sausage, crumbled
  • ¼ cup chopped black olives
  • ¼ cup sun-dried tomatoes, chopped
  • ½ teaspoon Italian seasoning
  • Salt and black pepper to taste

Cultural History of Ingredients

  • Ricotta Cheese: A staple in Italian cuisine, ricotta adds a creamy texture to the torte.
  • Sun-Dried Tomatoes: A concentrated burst of flavor rooted in traditional preservation methods.
  • Italian Sausage: Reflects Italy’s regional diversity in spices and sausage-making techniques.

Equipment You’ll Need

  • 9-inch springform pan or deep-dish pie pan
  • Mixing bowls
  • Whisk
  • Pastry brush

Step-by-Step Instructions for Italian Brunch Torte

Step 1: Prepare the Crust

  1. Roll out one pie crust and press it into the springform pan, ensuring it covers the bottom and sides.
  2. Trim excess dough, leaving a slight overhang.

Step 2: Make the Filling

  1. In a large bowl, mix ricotta, mozzarella, Parmesan, and eggs until smooth.
  2. Add spinach, roasted red peppers, sausage, olives, sun-dried tomatoes, and Italian seasoning. Season with salt and pepper.

Step 3: Assemble the Torte

  1. Pour half of the filling into the prepared crust.
  2. Add a thin layer of mozzarella cheese for extra flavor.
  3. Pour the remaining filling on top and smooth the surface.

Step 4: Cover with the Second Crust

  1. Roll out the second pie crust and place it over the filling.
  2. Trim excess dough and crimp the edges to seal.
  3. Cut slits in the top crust to allow steam to escape.

Step 5: Bake

  1. Preheat the oven to 375°F (190°C).
  2. Brush the top crust with a beaten egg for a glossy finish.
  3. Bake for 45–55 minutes or until the crust is golden brown.
  4. Let it cool for 10 minutes before slicing.

Suggestions for Serving and Storing

  • Serving: Pair with a fresh green salad or a side of fruit for balance.
  • Storing: Keep in an airtight container in the refrigerator for up to 3 days.
  • Reheating: Warm individual slices in the oven or microwave.

Chef Simon’s Tips for Italian Brunch Torte

  • Use a variety of cheeses for a more complex flavor profile.
  • Ensure the filling ingredients are well-drained to prevent a soggy crust.
  • For added flair, sprinkle sesame seeds or grated Parmesan on the crust before baking.

Emotional and Psychological Impact of Food

This torte evokes feelings of indulgence and joy, making it a centerpiece that turns any gathering into a celebration. Its rich flavors and textures provide comfort and satisfaction, perfect for creating cherished memories.


Mindful Cooking Techniques

  • Take your time layering the ingredients for a visually appealing cross-section.
  • Focus on the aromas of the cheeses and herbs as they blend during preparation.

Tips for Keeping the Recipe Fresh Longer

  • Wrap leftovers tightly in plastic wrap before refrigerating to lock in moisture.
  • Freeze slices individually for quick reheating on busy mornings.

Advanced Culinary Terms and Techniques

  • Blind Baking: Partially baking the crust to prevent it from becoming soggy.
  • Egg Wash: A mixture of beaten egg and water or milk brushed on the crust for a golden finish.

Healthy Ingredient Alternatives

  • Replace Italian sausage with turkey sausage for a leaner option.
  • Use whole wheat or gluten-free pie crust for dietary preferences.
  • Swap ricotta with Greek yogurt for reduced fat and added protein.

More Serving Ideas

  • Add a dollop of marinara sauce on the side for dipping.
  • Serve with sparkling wine or a mimosa for a luxurious brunch experience.

Common Issues and Solutions

  • Soggy Crust: Blind bake the bottom crust for 5–7 minutes before adding the filling.
  • Undercooked Center: Cover the torte with foil and bake longer if the filling isn’t fully set.

Variations to Try

  • Vegetarian Torte: Omit the sausage and add sautéed mushrooms or artichoke hearts.
  • Seafood Torte: Incorporate shrimp or crab for a coastal twist.
  • Caprese Torte: Use fresh mozzarella, basil, and tomato slices for a lighter version.

Nutritional Information and Health Benefits

  • Calories: ~350 per slice
  • Protein: Rich in high-quality proteins from cheese and eggs.
  • Vitamins: Spinach and peppers provide a boost of vitamins A and C.

The Art of Pairing Italian Brunch Torte

Serve with a bold Italian coffee or a crisp white wine like Pinot Grigio for an authentic experience.


Weather and Recipe Outcome

This torte is perfect for spring and fall gatherings, offering warmth and richness to complement the season.


Other Savory Pie Recipes to Explore

  • Spinach and Feta Quiche
  • Ham and Cheese Crostata
  • Rustic Vegetable Tart

Focus on Tools and Equipment

Invest in a quality springform pan and pastry brush for best results. A food processor can also help in preparing the crust quickly.


Frequently Asked Questions (with answers)

Q: Can I make this ahead of time?
A: Yes, prepare the torte the night before and bake it fresh the next morning.

Q: Can I freeze it?
A: Yes, wrap it tightly in aluminum foil and freeze for up to 2 months.

Q: What if I don’t have a springform pan?
A: A deep-dish pie pan works well as an alternative.


Conclusion

The Italian Brunch Torte is a versatile and delicious dish that brings a touch of elegance to any meal. Whether served at a festive brunch or a casual family gathering, it’s a recipe that’s sure to impress. Give it a try and savor the rich layers of flavor in every bite!

Easy Banana Muffins Recipe

Easy banana muffins

Introduction
Banana muffins are a timeless treat that combines the natural sweetness of ripe bananas with the comforting texture of a perfectly baked muffin. Ideal for breakfast, snacks, or even dessert, this recipe is versatile and easy to make. Whether you’re a baking novice or a seasoned pro, banana muffins are a must-have in your culinary repertoire.


The Story Behind Banana Muffins

The banana muffin recipe was born out of necessity during the Great Depression when food waste was a luxury no one could afford. Overripe bananas, which were often discarded, became the star ingredient in baking due to their natural sweetness and moisture. Over time, this humble treat evolved into a household favorite, offering endless possibilities for customization.


The Benefits of Making Your Own Banana Muffins

  1. Cost-Effective: Homemade banana muffins are much cheaper than store-bought ones.
  2. Customizable: Add nuts, chocolate chips, or dried fruits to suit your taste.
  3. Healthier: Control the sugar, fat, and ingredients to make a wholesome snack.
  4. Freshness: Enjoy warm, freshly baked muffins straight from the oven.

Essential Ingredients for the Perfect Banana Muffins

Dry Ingredients:

  • 1 ¾ cups (220g) all-purpose flour
  • 1 teaspoon baking soda
  • ½ teaspoon salt

Wet Ingredients:

  • 2–3 ripe bananas, mashed (about 1 cup)
  • ¾ cup (150g) granulated sugar
  • 1 large egg, room temperature
  • ⅓ cup (80ml) vegetable oil or melted butter
  • 1 teaspoon vanilla extract

Optional Add-Ins:

  • ½ cup chocolate chips
  • ½ cup chopped walnuts or pecans
  • ¼ cup dried cranberries

Cultural History of Ingredients

  • Bananas: Native to Southeast Asia, bananas became a global staple due to their portability and nutritional benefits.
  • Baking Soda: A common leavening agent since the 19th century, it ensures fluffy muffins.
  • Vanilla Extract: A product of Mexico, vanilla is now a key ingredient in many baked goods.

Equipment You’ll Need

  • Mixing bowls (1 large, 1 medium)
  • Muffin tin (12-cup capacity)
  • Whisk or electric mixer
  • Measuring cups and spoons
  • Ice cream scoop (for even batter distribution)
  • Wire rack for cooling

Step-by-Step Instructions for Banana Muffins

Step 1: Preheat and Prepare

  1. Preheat your oven to 350°F (175°C).
  2. Line a muffin tin with paper liners or lightly grease with cooking spray.

Step 2: Combine Dry Ingredients

  1. In a medium bowl, whisk together the flour, baking soda, and salt. Set aside.

Step 3: Mix Wet Ingredients

  1. In a large bowl, mash the bananas until smooth.
  2. Add sugar, egg, oil, and vanilla extract. Whisk until well combined.

Step 4: Incorporate Dry Ingredients

  1. Gradually add the dry ingredients to the wet mixture. Stir until just combined. Do not overmix.

Step 5: Add Optional Ingredients

  1. Fold in chocolate chips, nuts, or dried fruits if using.

Step 6: Fill the Muffin Tin

  1. Use an ice cream scoop to evenly distribute the batter among the muffin cups. Fill each about ¾ full.

Step 7: Bake and Cool

  1. Bake for 20–25 minutes or until a toothpick inserted in the center comes out clean.
  2. Let the muffins cool in the tin for 5 minutes before transferring them to a wire rack to cool complete.

Suggestions for Serving and Storing

  • Serving: Pair with a cup of coffee or tea for a delightful breakfast.
  • Storing: Keep muffins in an airtight container at room temperature for up to 3 days.
  • Freezing: Wrap individually in plastic wrap and store in a freezer-safe bag for up to 3 months.

Chef Simon’s Tips for Banana Muffins

  1. Riper Bananas = Better Flavor: The browner the banana, the sweeter the muffin.
  2. Don’t Overmix: Overmixing the batter can lead to dense muffins.
  3. Use Room Temperature Ingredients: This ensures even mixing and better texture.
  4. Add a Topping: Sprinkle raw sugar or oats on top of the batter before baking for a decorative touch.

Emotional and Psychological Impact of Food

Banana muffins evoke a sense of nostalgia and comfort, reminding many of childhood moments or cozy mornings. The aroma of bananas and vanilla wafting through the kitchen can uplift your mood and create a warm, inviting atmosphere.


Mindful Cooking Techniques

  • Focus on the texture and aroma as you mash the bananas.
  • Stir the batter gently and appreciate the process of creating something from scratch.
  • Savor the satisfaction of sharing freshly baked muffins with loved ones.

Tips for Keeping the Recipe Fresh Longer

  • Wrap muffins tightly in plastic wrap or store in an airtight container.
  • Place a slice of bread in the container to keep muffins moist.
  • Avoid refrigerating as it can dry out the muffins.

Advanced Culinary Terms and Techniques

  • Creaming Method: While not used here, this involves beating sugar and fat together for a lighter texture.
  • Folding: Gently incorporating add-ins to avoid deflating the batter.
  • Blooming Flavors: Allow the batter to rest for 5–10 minutes before baking for enhanced flavor.

Healthy Ingredient Alternatives

  • Replace all-purpose flour with whole wheat or almond flour.
  • Swap sugar with honey, maple syrup, or coconut sugar.
  • Use Greek yogurt or applesauce instead of oil for a lower-fat option.

More Serving Ideas

  • Spread with butter, cream cheese, or nut butter for added richness.
  • Serve warm with a drizzle of honey or a sprinkle of cinnamon sugar.
  • Pair with fresh fruit and yogurt for a complete breakfast.

Common Issues and Solutions

  • Dry Muffins: Ensure your bananas are ripe and measure ingredients accurately.
  • Dense Muffins: Avoid overmixing the batter.
  • Uneven Baking: Rotate the muffin tin halfway through baking for even heat distribution.

Variations to Try

  1. Chocolate Banana Muffins: Add 2 tablespoons of cocoa powder to the batter.
  2. Banana Nut Muffins: Increase the amount of chopped nuts for a crunchy texture.
  3. Blueberry Banana Muffins: Fold in fresh or frozen blueberries for a fruity twist.
  4. Vegan Banana Muffins: Use flaxseed meal and water as an egg substitute, and coconut oil instead of butter.

Nutritional Information and Health Benefits

  • Calories: ~200 per muffin (without add-ins)
  • Potassium: Bananas provide heart-healthy potassium.
  • Fiber: Whole grains and bananas add dietary fiber, aiding digestion.

The Art of Pairing Banana Muffins

  • Beverages: Coffee, tea, or a smoothie complement the muffins’ flavors.
  • Spreads: Honey, peanut butter, or chocolate hazelnut spread elevate the taste.

Weather and Recipe Outcome

Cool, rainy days are perfect for baking banana muffins, as their warm, inviting aroma fills your home. However, these muffins are just as delightful in sunny weather when paired with a refreshing iced tea.


Other Muffin Recipes to Explore

  • Blueberry Muffins
  • Pumpkin Spice Muffins
  • Lemon Poppy Seed Muffins
  • Double Chocolate Muffins

Focus on Tools and Equipment

Invest in non-stick muffin tins and silicone liners for effortless cleanup. A hand mixer can speed up the mixing process but is optional for this simple recipe.


Frequently Asked Questions (with answers)

Q: Can I use frozen bananas?
A: Yes, thaw and drain excess liquid before mashing.

Q: How can I make my muffins fluffier?
A: Use fresh baking soda and avoid overmixing the batter.

Q: Can I double the recipe?
A: Absolutely! Adjust baking time slightly and ensure even distribution of batter.


Conclusion

Banana muffins are a classic recipe that never fails to impress. From their ease of preparation to their comforting flavors, they’re a versatile treat that brings joy to every bite. Whether you’re baking for yourself, your family, or guests, these muffins are a guaranteed hit. So, grab those ripe bananas and get baking—you’ll be glad you did!

Perfect Belgian Waffle Recipe: Light, Crispy, and Delicious

Belgian Waffle Recipe

Introduction

Belgian waffles are a breakfast favorite known for their light, fluffy texture and crisp golden exterior. Whether served with fresh fruit, syrup, whipped cream, or savory toppings, these waffles are a treat for any time of the day. This recipe captures the classic taste of Belgian waffles, perfect for a weekend brunch or a delightful breakfast-for-dinner experience.


The Story Behind Belgian Waffles

Belgian waffles trace their origins to Belgium, where they were introduced as “Brussels waffles” at the 1964 World’s Fair in New York. Unlike traditional waffles, they are known for their larger size, deeper pockets, and a lighter batter that often includes yeast or beaten egg whites. This dish quickly became a sensation, symbolizing indulgence and culinary creativity.


The Benefits of Making Your Own Belgian Waffles

  • Freshness: Enjoy waffles that are freshly made, with no preservatives.
  • Customization: Adjust sweetness, toppings, and even batter ingredients to suit your taste.
  • Cost-Effective: Make multiple servings at home for the price of one restaurant waffle.
  • Family-Friendly: A fun and interactive meal everyone can enjoy making and eating.

Essential Ingredients for the Perfect Belgian Waffles

Ingredients

  • All-Purpose Flour: 2 cups
  • Granulated Sugar: 3 tbsp
  • Baking Powder: 1 tbsp
  • Salt: ½ tsp
  • Eggs: 2 large, separated
  • Whole Milk: 1¾ cups
  • Unsalted Butter: ½ cup, melted
  • Vanilla Extract: 1 tsp

Cultural History of Ingredients

  • Flour: A staple across cultures, forming the base of many baked goods.
  • Eggs: Provide structure and richness, widely used in traditional Belgian batter recipes.
  • Butter: Adds richness and helps create the perfect golden crust.
  • Vanilla Extract: Introduced to Europe in the 17th century, it’s now a key flavor enhancer.

Equipment You’ll Need

  • Waffle iron (Belgian-style with deep pockets)
  • Mixing bowls (2: one for dry ingredients, one for wet ingredients)
  • Hand or stand mixer
  • Whisk or spatula
  • Measuring cups and spoons

Step-by-Step Instructions for Belgian Waffles

  1. Preheat Waffle Iron: Turn on your waffle iron and allow it to heat while you prepare the batter.
  2. Mix Dry Ingredients: In a large bowl, whisk together the flour, sugar, baking powder, and salt.
  3. Prepare Wet Ingredients: In a separate bowl, whisk the egg yolks, milk, melted butter, and vanilla extract until combined.
  4. Combine: Gradually mix the wet ingredients into the dry ingredients. Stir until smooth.
  5. Whip Egg Whites: Using a mixer, beat the egg whites until stiff peaks form. Gently fold the whipped egg whites into the batter. This step ensures fluffy waffles.
  6. Cook Waffles: Lightly grease the waffle iron with butter or cooking spray. Pour the batter into the iron, spreading it evenly. Cook according to the waffle iron’s instructions (about 4-5 minutes per waffle) until golden and crisp.
  7. Serve: Transfer the cooked waffles to a warm oven (200°F) to keep them warm while cooking the rest.

Suggestions for Serving and Storing

  • Serve With: Fresh berries, maple syrup, whipped cream, powdered sugar, or savory toppings like fried chicken and gravy.
  • Store: Refrigerate for up to 2 days or freeze for up to 3 months. Reheat in a toaster or oven for best results.

Chef Simon’s Tips for Belgian Waffles

  • Preheat the Iron: A properly preheated waffle iron ensures crispy edges.
  • Don’t Overmix: Overmixing the batter can make the waffles dense.
  • Add Sparkling Water: Substitute part of the milk with sparkling water for extra lightness.

Emotional and Psychological Impact of Food

Belgian waffles are a food of celebration, evoking feelings of comfort and joy. Their versatility allows for creativity, turning a simple meal into a delightful experience, whether shared with family or enjoyed as a personal indulgence.


Mindful Cooking Techniques

  • Take your time whisking and folding the batter, appreciating the process.
  • Savor the aroma as the waffles cook, enhancing the sensory experience.

Tips for Keeping the Recipe Fresh Longer

  • Store batter in an airtight container in the fridge for up to 24 hours for make-ahead convenience.
  • Freeze waffles in single layers before transferring them to a container to prevent sticking.

Advanced Culinary Terms and Techniques

  • Folding: A technique where whipped egg whites are gently incorporated into the batter to maintain airiness.
  • Mise en Place: Arrange all ingredients and tools before starting to streamline the cooking process.

Healthy Ingredient Alternatives

  • Substitute half the flour with whole wheat flour for added fiber.
  • Use almond or oat milk instead of whole milk for a dairy-free version.
  • Replace sugar with honey or maple syrup for natural sweetness.

More Serving Ideas

  • Top with caramelized bananas and chocolate sauce for a decadent treat.
  • Create a savory waffle sandwich with scrambled eggs, bacon, and cheese.
  • Add a dollop of Greek yogurt and granola for a nutritious breakfast option.

Common Issues and Solutions

  • Soggy Waffles: Ensure the waffle iron is preheated and avoid stacking cooked waffles.
  • Batter Sticking: Grease the waffle iron thoroughly and clean it regularly.
  • Uneven Cooking: Spread the batter evenly before closing the iron.

Variations to Try

  • Chocolate Belgian Waffles: Add 2 tbsp cocoa powder to the dry ingredients.
  • Lemon Poppyseed Waffles: Stir in 1 tsp lemon zest and 1 tbsp poppy seeds.
  • Savory Herb Waffles: Mix in grated Parmesan, chopped parsley, and a pinch of garlic powder.

Nutritional Information and Health Benefits

(Per Serving, 4 Servings)

  • Calories: ~280
  • Protein: ~6g
  • Carbs: ~35g
  • Fat: ~12g

The Art of Pairing Belgian Waffles

  • Sweet Pairing: Serve with orange juice, coffee, or hot chocolate.
  • Savory Pairing: Pair with fried chicken and a cold iced tea or sparkling water.

Weather and Recipe Outcome

Belgian waffles are versatile, providing warmth and comfort on chilly mornings while being light enough to enjoy in warmer weather.


Other Waffle Recipes to Explore

  • Buttermilk Waffles: Classic, tangy, and fluffy.
  • Pumpkin Spice Waffles: Perfect for fall mornings.
  • Gluten-Free Waffles: A great option for those with dietary restrictions.

Focus on Tools and Equipment

  • A Belgian waffle iron ensures the iconic deep pockets.
  • A silicone spatula helps fold egg whites without deflating them.

Frequently Asked Questions (FAQs)

1. Can I make Belgian waffles ahead of time?
Yes, prepare and freeze them. Reheat in a toaster or oven for crispiness.

2. Can I make them gluten-free?
Yes, substitute the flour with a gluten-free all-purpose mix.

3. How do I avoid soggy waffles?
Preheat the iron thoroughly and place cooked waffles on a wire rack instead of stacking them.

4. Can I add mix-ins like chocolate chips?
Yes, gently fold them into the batter for an added treat.

5. What’s the difference between Belgian and regular waffles?
Belgian waffles are larger, lighter, and have deeper pockets compared to regular waffles.


Conclusion

Belgian waffles are more than just a breakfast dish—they’re an experience. This recipe offers the perfect blend of crispiness and fluffiness, paired with endless topping options to suit your mood. Whether you’re hosting brunch or treating yourself, these waffles are sure to impress.

Indulgent Giant Nutella Crackle Cake Recipe: Rich, Decadent, and Irresistible

Giant Nutella crackle cake

Introduction

The Giant Nutella Crackle Cake is a decadent, indulgent dessert that’s sure to please any chocolate lover. Imagine a cake with layers of soft, moist sponge and a rich, gooey Nutella filling, all topped off with a crackling sugar crust. This cake is perfect for special occasions, family gatherings, or simply as a treat when you’re in the mood for something irresistible. Whether you’re an experienced baker or a beginner, this recipe will guide you through creating a cake that’s as beautiful as it is delicious.


The Story Behind Giant Nutella Crackle Cake

Nutella has always been a beloved spread, enjoyed by many for its creamy, hazelnut-infused chocolate flavor. The idea for the Giant Nutella Crackle Cake comes from the irresistible combination of Nutella’s creamy texture and the joy of a traditional cake with a twist. By adding a crackling sugar crust, this cake transforms Nutella into a beautiful, indulgent dessert, creating a contrast between the cake’s softness and the delightful crunch of the sugar coating.


The Benefits of Making Your Own Giant Nutella Crackle Cake

Making your own Nutella Crackle Cake means you have complete control over the ingredients, allowing you to choose high-quality chocolate and Nutella, ensuring an even richer flavor. Homemade cakes also offer the flexibility to modify the recipe to suit your tastes, whether you prefer more Nutella filling or a thicker sugar crust. Baking at home brings a sense of accomplishment and the ability to share a made-with-love dessert with friends and family, making it even more special.


Essential Ingredients for the Perfect Giant Nutella Crackle Cake

To create the perfect Nutella Crackle Cake, here are the ingredients you’ll need:

  • For the Cake:
    • 1 ½ cups all-purpose flour
    • 1 cup granulated sugar
    • ½ cup cocoa powder
    • 1 tsp baking powder
    • ½ tsp baking soda
    • ¼ tsp salt
    • 2 large eggs
    • 1 cup milk
    • ½ cup vegetable oil
    • 1 tsp vanilla extract
    • 1 cup boiling water
  • For the Nutella Filling:
    • 1 cup Nutella spread
    • ½ cup heavy cream
  • For the Crackle Sugar Crust:
    • ½ cup granulated sugar
    • ¼ cup water

Cultural History of Ingredients

  • Nutella: Nutella was first created in Italy in the 1940s by Pietro Ferrero. It started as a hazelnut paste, but it quickly evolved into the creamy chocolate-hazelnut spread that we know and love today. Nutella has become a staple in many kitchens worldwide, transcending its Italian roots and inspiring countless recipes, including this cake.
  • Cocoa Powder: Cocoa powder has been used in baking for centuries, dating back to the 18th century when chocolate was first introduced in Europe. It’s a key ingredient in many rich desserts, adding deep, earthy flavor to cakes, brownies, and cookies.
  • Sugar: Sugar, derived from sugar cane or sugar beets, has been an essential ingredient in baking since the 19th century. It’s responsible for sweetening cakes and creating that delightful crackle effect in this recipe.

Equipment You’ll Need

  • Mixing Bowls: For preparing the dry ingredients, wet ingredients, and Nutella filling.
  • Whisk: To combine ingredients smoothly.
  • Electric Mixer: Ideal for achieving a light, airy cake batter.
  • 9-inch Round Cake Pan: To bake the cake.
  • Spatula: For spreading the Nutella filling and smoothing the batter.
  • Saucepan: To prepare the crackle sugar crust.
  • Cooling Rack: To let the cake cool after baking.

Step-by-Step Instructions for Giant Nutella Crackle Cake

  1. Preheat the Oven: Preheat your oven to 350°F (175°C) and grease and line a 9-inch round cake pan with parchment paper.
  2. Prepare the Cake Batter: In a large bowl, sift together the flour, cocoa powder, baking powder, baking soda, and salt. In another bowl, whisk together the eggs, milk, vegetable oil, and vanilla extract. Gradually add the wet ingredients to the dry ingredients and mix until smooth. Stir in the boiling water until the batter is well combined (the batter will be thin).
  3. Bake the Cake: Pour the batter into the prepared cake pan and bake for 30–35 minutes, or until a toothpick inserted into the center of the cake comes out clean. Remove from the oven and let the cake cool completely in the pan.
  4. Prepare the Nutella Filling: In a small saucepan, heat the heavy cream over medium heat until it just begins to simmer. Remove from heat and whisk in the Nutella until smooth and fully combined. Let it cool slightly.
  5. Assemble the Cake: Once the cake has cooled, carefully slice it in half horizontally. Spread the Nutella filling evenly on the bottom layer, then place the top layer of the cake back on.
  6. Make the Crackle Sugar Crust: In a saucepan, combine the granulated sugar and water. Heat over medium heat until the sugar dissolves and the mixture starts to bubble. Let it cook for 3-4 minutes until it thickens slightly. Drizzle the syrup over the top of the cake, letting it spread and form a crackling texture as it cools.
  7. Cool and Serve: Allow the cake to cool completely so the crackle sugar crust forms properly. Slice and serve!

Suggestions for Serving and Storing

  • Serving Suggestions: Serve this cake with a scoop of vanilla ice cream or a dollop of whipped cream for an extra indulgence.
  • Storing: This cake can be stored in an airtight container at room temperature for up to 3 days. If you need to keep it longer, refrigerate it and allow it to come to room temperature before serving.

Chef Simon’s Tips for Giant Nutella Crackle Cake

  • Tip 1: Be sure to use high-quality cocoa powder and Nutella for the best flavor.
  • Tip 2: For an extra touch, you can sprinkle chopped hazelnuts on top of the cake before serving.
  • Tip 3: To prevent the cake from sticking to the pan, be sure to grease and line it with parchment paper.
  • Tip 4: If you want the crackle to be even more pronounced, let the sugar syrup cool for a few minutes before drizzling it over the cake.

Emotional and Psychological Impact of Food

The Nutella Crackle Cake not only satisfies the sweet tooth but also evokes feelings of nostalgia and comfort. Nutella is a beloved treat for many, and its rich, creamy texture can bring joy and satisfaction. Sharing this cake with loved ones during a gathering can create happy memories, reinforcing bonds and creating a sense of connection.


Mindful Cooking Techniques

While preparing the Giant Nutella Crackle Cake, take your time to enjoy the process. Sift the dry ingredients carefully, and whisk the batter gently to avoid overmixing. When creating the crackle sugar crust, focus on the transformation of the syrup as it hardens. These moments of mindfulness can enhance your connection to the food and create a more satisfying cooking experience.


Tips for Keeping the Recipe Fresh Longer

To preserve the freshness of the cake, wrap it tightly in plastic wrap and store it in an airtight container. The cake will remain moist for up to 3 days. If you plan on freezing it, wrap the cake well in plastic wrap and foil, and it can be frozen for up to a month.


Advanced Culinary Terms and Techniques

  • Crackling Sugar Crust: The process of creating a hardened sugar topping that adds texture and visual appeal to the cake.
  • Sifting: The act of passing dry ingredients through a fine mesh to remove lumps and aerate the mixture.
  • Whisking: The technique used to incorporate air into ingredients, making the batter light and fluffy.

Healthy Ingredient Alternatives

  • Lower Sugar Option: To reduce the sugar content, you can substitute some of the granulated sugar with stevia or another sugar substitute.
  • Dairy-Free Option: Use a dairy-free chocolate spread and substitute the heavy cream with coconut cream or almond milk to make this cake dairy-free.
  • Whole Wheat Flour: For a slightly healthier option, you can swap the all-purpose flour for whole wheat flour, though this will alter the texture slightly.

More Serving Ideas

  • Chocolate Sauce: Serve the cake with a drizzle of rich chocolate sauce for extra indulgence.
  • Berries: Pair the cake with fresh berries like strawberries or raspberries for a fresh, tangy contrast to the sweetness.
  • Whipped Cream: A dollop of freshly whipped cream on top adds a creamy and light contrast to the rich cake.

Common Issues and Solutions

  • Problem 1: The cake is too dry.
    • Solution: Be sure not to overbake the cake. Check for doneness by inserting a toothpick and removing it when it comes out with a few moist crumbs.
  • Problem 2: The sugar crust isn’t forming properly.
  • Solution: Make sure the sugar syrup is cooked long enough to thicken slightly. If the syrup is too runny, it won’t form the signature crackling texture. Let it cool for a few minutes before drizzling over the cake for better results.

Variations to Try

  • Nutella and Peanut Butter: Add a layer of creamy peanut butter to the Nutella filling for a sweet and salty twist.
  • Fruit Filling: Incorporate a layer of fresh berries, such as raspberries or strawberries, along with the Nutella for a fruity contrast.
  • Nutella and Banana: Slice bananas and layer them in between the Nutella and cake layers for a delicious combination of flavors.

Nutritional Information and Health Benefits

While the Giant Nutella Crackle Cake is undeniably a treat, it’s important to be mindful of its rich ingredients. Here’s an approximate nutritional breakdown per serving:

  • Calories: 450–500 per slice
  • Fat: 25g
  • Carbohydrates: 50g
  • Protein: 6g
  • Sugar: 35g

Though it’s not a health food, you can enjoy this cake in moderation as part of a balanced diet. The Nutella provides hazelnuts, which are a good source of healthy fats, and the cake offers a dose of carbohydrates to fuel you through the day.


The Art of Pairing Giant Nutella Crackle Cake

This cake pairs wonderfully with a cup of rich coffee or a glass of dessert wine, such as a sweet Riesling or Port. The bitterness of the coffee and the sweetness of the wine contrast beautifully with the cake’s richness, enhancing the overall flavor experience. For a lighter pairing, try it with some freshly brewed herbal tea or a chilled glass of milk.


Weather and Recipe Outcome

The outcome of this cake is not greatly affected by the weather, but it’s always better to bake in a cool, dry environment for more consistent results. Humidity can cause the sugar syrup to behave unpredictably, so if it’s particularly humid, you may need to adjust the cooking time for the syrup or the cake. Baking on a dry, sunny day often yields the best results for a crisp, crackling sugar crust.


Other Cake Recipes to Explore

If you’re a fan of rich, decadent cakes like the Giant Nutella Crackle Cake, here are a few other cake recipes you might enjoy:

  • Chocolate Lava Cake: A warm, gooey chocolate dessert with a molten center.
  • Red Velvet Cake: A moist, velvety cake with a hint of cocoa and cream cheese frosting.
  • Lemon Drizzle Cake: A zesty and fresh cake with a sweet, tangy lemon glaze.

Focus on Tools and Equipment

To achieve the best results for this recipe, you’ll need the right equipment. A high-quality electric mixer is ideal for whipping the cake batter and ensuring it’s light and fluffy. A good saucepan is crucial for creating the crackling sugar syrup, while a reliable 9-inch round cake pan ensures even baking. Don’t forget a cooling rack to help the cake cool evenly and prevent sogginess.


Frequently Asked Questions (with answers)

Q1: Can I use a different type of nut spread?
A1: Yes, you can substitute Nutella with other nut spreads like almond butter or cashew butter, but keep in mind that the flavor will differ from the original.

Q2: Can I freeze this cake?
A2: Yes, this cake can be frozen! Just wrap it tightly in plastic wrap and foil, and it will stay fresh for up to a month. Let it thaw at room temperature before serving.

Q3: Can I make the cake gluten-free?
A3: Yes, you can use a gluten-free all-purpose flour blend to make this cake gluten-free. Just be sure the other ingredients are also gluten-free.

Q4: How can I make the sugar crust more pronounced?
A4: Allow the sugar syrup to cool for a minute or two before drizzling it over the cake. This will help it form a thicker, more defined crackle.


Conclusion

The Giant Nutella Crackle Cake is a show-stopping dessert that’s as visually stunning as it is delicious. With its soft, rich layers of cake and Nutella filling, complemented by the crackling sugar crust, it’s a treat that will delight all of your senses. Whether you’re baking for a special occasion or just indulging in a sweet craving, this cake is sure to satisfy. Follow the steps, and with Chef Simon’s tips, you’ll have a dessert that’s guaranteed to impress. Enjoy the process, share with loved ones, and savor each delicious bite!

Decadent Crab Brûlée Recipe: Creamy and Luxurious

Crab brulee recipe

Introduction

Crab brûlée is a luxurious, savory twist on the classic French dessert, crème brûlée. It combines the sweet, delicate flavor of crab with the rich, creamy custard, creating a dish that is both elegant and indulgent. Topped with a crisp, caramelized sugar crust, crab brûlée brings the best of both worlds—savory and sweet—into one perfect bite. Ideal for impressing guests at a dinner party or for a special occasion, this dish is as sophisticated as it is delicious.


The Story Behind Crab Brûlée

While crème brûlée is a traditional French dessert that dates back to the 17th century, crab brûlée is a more recent innovation. This modern take on the classic dessert was created by chefs looking for new ways to highlight the delicate flavors of seafood, particularly crab, in a rich and creamy preparation. By swapping the sugar crust for a savory twist and adding crab meat to the custard, crab brûlée became a refined dish perfect for high-end restaurants and home cooks looking to impress.


The Benefits of Making Your Own Crab Brûlée

  • Control Over Ingredients: You can choose the freshest crab and the right seasoning for your taste.
  • Impressive Presentation: Serve this dish in individual ramekins for a restaurant-quality experience at home.
  • Customization: Feel free to adjust the seasoning or use a different type of seafood, such as lobster, if desired.
  • Freshness: Homemade crab brûlée ensures that the flavors of the crab shine through, without relying on pre-made ingredients.
  • Gourmet Experience: Perfect for fine dining at home, this dish brings a touch of luxury to your table.

Essential Ingredients for the Perfect Crab Brûlée

  • Crab Meat: 1 lb of fresh, cooked crab meat (preferably lump crab for texture).
  • Egg Yolks: 4 large egg yolks, which provide richness to the custard base.
  • Heavy Cream: 1 cup of heavy cream for the creamy texture.
  • Butter: 2 tablespoons of unsalted butter to add richness.
  • Garlic: 2 cloves of garlic, finely minced, to enhance the flavor profile.
  • Shallots: 1 shallot, finely chopped, for a subtle, sweet flavor.
  • Fresh Herbs: 1 tablespoon of fresh parsley, chopped, to add brightness and color.
  • Cayenne Pepper: A pinch of cayenne for a touch of heat.
  • Grated Parmesan Cheese: ¼ cup for added depth and umami flavor.
  • Lemon Juice: 1 tablespoon for a bright contrast to the richness of the custard.
  • Salt and Pepper: To taste, for seasoning.
  • Sugar: A small amount of sugar for the top caramelization, similar to the traditional brûlée.

Cultural History of Ingredients

  • Crab Meat: Crab has long been a prized ingredient in coastal cuisines, especially in the United States and Europe. It is celebrated for its sweet, delicate flavor and tender texture.
  • Egg Yolks and Cream: The combination of egg yolks and cream in a custard is a hallmark of French cuisine. This base is used in a wide range of dishes, both sweet and savory.
  • Shallots and Garlic: Both ingredients have their roots in Mediterranean cooking and are used to enhance the savory quality of dishes, particularly seafood.
  • Cayenne Pepper: A common spice in many global cuisines, cayenne adds a gentle heat that balances the richness of the cream.

Equipment You’ll Need

  • Ramekins (individual serving dishes)
  • Mixing bowls
  • Whisk
  • Sauté pan
  • Spoon or spatula for folding in crab meat
  • Kitchen torch for caramelizing the sugar
  • Small saucepan for heating the cream
  • Sifter or fine mesh strainer (optional, for straining the custard)

Step-by-Step Instructions for Crab Brûlée

Ingredients

  • 1 lb fresh, cooked crab meat (lump crab preferred)
  • 4 large egg yolks
  • 1 cup heavy cream
  • 2 tablespoons unsalted butter
  • 2 cloves garlic, minced
  • 1 shallot, finely chopped
  • 1 tablespoon fresh parsley, chopped
  • 1 pinch of cayenne pepper
  • ¼ cup grated Parmesan cheese
  • 1 tablespoon lemon juice
  • Salt and pepper to taste
  • 1 tablespoon sugar (for the brûlée topping)

Instructions

  1. Prepare the Crab Meat:
    • Gently pick through the crab meat to remove any shells or cartilage.
    • Set the crab meat aside and refrigerate until ready to use.
  2. Make the Custard:
    • In a small saucepan, heat the heavy cream over medium heat until it’s just about to simmer. Be careful not to let it boil.
    • In a mixing bowl, whisk together the egg yolks and a pinch of salt.
    • Slowly pour the hot cream into the egg yolks while whisking continuously to temper the eggs (this prevents them from curdling).
    • Once the mixture is well combined, return it to the saucepan and cook over low heat, stirring constantly, until it thickens slightly. It should coat the back of a spoon.
    • Remove the custard from the heat, then stir in the melted butter, minced garlic, shallot, parsley, cayenne pepper, Parmesan cheese, and lemon juice. Adjust seasoning with salt and pepper to taste.
  3. Assemble the Crab Brûlée:
    • Gently fold the crab meat into the custard mixture.
    • Spoon the mixture into individual ramekins, filling each to about ¾ full.
  4. Bake the Crab Brûlée:
    • Preheat the oven to 325°F (160°C).
    • Place the ramekins in a shallow baking dish and fill the baking dish with hot water until it reaches halfway up the sides of the ramekins (this creates a water bath, which helps cook the custard gently).
    • Bake for 25-30 minutes, or until the custard is set but still slightly wobbly in the center.
  5. Caramelize the Sugar:
    • Once the crab brûlée is baked, let it cool slightly.
    • Sprinkle a thin, even layer of sugar on top of each ramekin.
    • Using a kitchen torch, caramelize the sugar until it’s golden brown and bubbly. If you don’t have a torch, you can place the ramekins under a broiler for a few minutes, watching carefully to avoid burning.
  6. Serve:
    • Let the brûlée cool for a few minutes before serving. Garnish with a sprig of fresh parsley if desired.

Suggestions for Serving and Storing

  • Serving: Serve warm with a fresh salad or as part of a seafood-themed dinner. It pairs beautifully with a crisp white wine like Sauvignon Blanc or Chardonnay.
  • Storing: Store any leftover crab brûlée in the refrigerator for up to 2 days. Reheat gently in the oven before caramelizing the sugar for the best texture.

Chef Simon’s Tips for Crab Brûlée

  • Fresh Crab: Fresh crab meat is crucial for this recipe. Avoid canned crab if possible, as it can have a more pronounced fishy taste.
  • Careful Tempering: Make sure to temper the eggs properly to prevent curdling the custard base.
  • Torching Technique: Use a light, even motion with the kitchen torch to avoid burning the sugar too quickly. Aim for a golden, crisp crust.
  • Experiment with Flavor: Feel free to add other seasonings like smoked paprika or tarragon to customize the dish further.

Emotional and Psychological Impact of Food

Food has the power to evoke a range of emotions, from joy and comfort to nostalgia. Crab brûlée, with its rich, creamy texture and delicate seafood flavor, can make any occasion feel special. Sharing this dish with loved ones creates a moment of connection and indulgence.


Mindful Cooking Techniques

  • Focus on the process, especially when tempering the eggs and assembling the custard.
  • Take your time when making the sugar crust, as it’s the finishing touch that elevates this dish.

Tips for Keeping the Recipe Fresh Longer

  • Keep the crab brûlée refrigerated and covered. It’s best to caramelize the sugar just before serving to maintain its crispness.

Advanced Culinary Terms and Techniques

  • Tempering: The process of slowly adding hot liquid to eggs to raise their temperature without scrambling them.
  • Bain-Marie (Water Bath): A cooking technique where food is placed in a container set within another container of hot water, allowing for gentle, even cooking.
  • Torching: Using a flame to caramelize sugar and form a crispy, golden topping.

Healthy Ingredient Alternatives

  • Low-fat Cream: Use half-and-half or a low-fat cream alternative for a lighter version.
  • Vegan Options: Replace the eggs and cream with plant-based alternatives and use a vegan cheese.

More Serving Ideas

  • Serve alongside a fresh crab salad or a citrus vinaigrette to cut through the richness.
  • Pair with roasted vegetables or lightly grilled asparagus.

Common Issues and Solutions

  • Overcooked Custard: If the custard curdles or becomes too thick, lower the heat and continue stirring gently. You can also strain the mixture before baking to remove any lumps
  • Soggy Sugar Topping: If the sugar topping doesn’t crisp up properly, it could be due to excess moisture on the surface of the custard. Make sure the ramekins are fully cooled before sprinkling the sugar and caramelizing. Also, avoid over-wetting the sugar when using a torch.
  • Undercooked Custard: If the custard is too runny, ensure it is baked long enough. The custard should be firm to the touch but still slightly jiggly in the center. If using a water bath, ensure the water level reaches halfway up the ramekins to promote even cooking.
  • Egg Scrambling: When adding the hot cream to the egg yolks, do it slowly and whisk constantly to avoid the eggs scrambling. A gentle, steady hand will prevent this issue.

Variations to Try

  1. Lobster Brûlée: Swap out the crab for fresh lobster meat for an even more luxurious version of this dish. Lobster pairs beautifully with the custard base and adds a rich sweetness.
  2. Spicy Crab Brûlée: Add a dash of hot sauce or chili flakes to the custard mixture for a spicy kick. A pinch of smoked paprika also enhances the flavor and gives it a lovely smoky profile.
  3. Herb Infused Custard: For a more aromatic version, infuse the cream with fresh herbs like thyme, basil, or rosemary before adding it to the eggs. This adds a depth of flavor that complements the crab beautifully.
  4. Vegetarian Version: If you’re looking for a vegetarian option, replace the crab with roasted mushrooms or artichokes, which will provide a similar umami flavor.
  5. Truffle Brûlée: Add a few drops of truffle oil or finely chopped truffle to the custard for an extravagant touch.

Nutritional Information and Health Benefits

Although this dish is rich and indulgent, it provides a significant source of protein and healthy fats from the crab and cream. Here’s an approximate breakdown:

  • Calories: 350-400 per serving (depending on the exact ingredients used)
  • Protein: 25-30 grams (from the crab meat)
  • Fat: 25-30 grams (from the cream and butter)
  • Carbohydrates: 5-7 grams
  • Fiber: 0-1 grams
  • Vitamins and Minerals: This dish provides a good amount of Vitamin B12, calcium, and iron, especially from the crab and Parmesan cheese. The parsley adds a dose of Vitamin C as well.

The Art of Pairing Crab Brûlée

  • Wine Pairings: Pair crab brûlée with a light, crisp white wine such as a Sauvignon Blanc, Chardonnay, or Champagne. These wines complement the delicate flavors of the crab without overpowering the dish.
  • Side Dish Pairings: A light salad with a citrus vinaigrette works well to cut through the richness of the crab brûlée. Alternatively, serve with roasted vegetables or a fresh seafood platter.
  • Bread Pairings: Serve alongside a crusty baguette or light, buttery biscuits to soak up the rich custard.

Weather and Recipe Outcome

  • Warm Weather: On a warm day, this dish makes an excellent light entrée or appetizer when served in small portions. Serve it with a chilled glass of wine to balance the richness of the custard.
  • Cold Weather: Crab brûlée is an indulgent dish that works well in the cooler months when you’re craving something rich and satisfying. It pairs wonderfully with a warm soup or roasted vegetables for a comforting, upscale meal.

Other Seafood Recipes to Explore

If you enjoy crab brûlée, you might also love these seafood-based dishes that highlight fresh, delicate flavors:

  1. Lobster Mac and Cheese – A rich, creamy take on the classic comfort food, enhanced with the luxurious flavor of lobster.
  2. Scallops in Lemon Butter Sauce – A light and refreshing dish that pairs perfectly with crab brûlée as part of a seafood feast.
  3. Garlic Butter Shrimp – Quick, easy, and packed with flavor, this dish features shrimp cooked in a savory garlic butter sauce.
  4. Seafood Paella – A Spanish classic brimming with fresh seafood and saffron-infused rice, ideal for a larger gathering.

Focus on Tools and Equipment

  • Ramekins: The small, individual dishes are crucial for baking and serving crab brûlée. Opt for sturdy, oven-safe ramekins to ensure even cooking.
  • Kitchen Torch: For achieving the perfect caramelized sugar topping, a kitchen torch is an essential tool. If you don’t have one, use a broiler, but be cautious to avoid burning the sugar.
  • Strainer: Straining the custard mixture before baking ensures a smooth texture, so it’s worth using a fine mesh sieve to remove any lumps or bits of egg.
  • Water Bath (Bain-Marie): This technique is essential for cooking the custard evenly. Make sure your baking dish is large enough to fit the ramekins with enough room for water to surround them.

Frequently Asked Questions (With Answers)

  1. Can I use canned crab meat for this recipe? While fresh crab meat yields the best flavor and texture, canned crab meat can be used in a pinch. Be sure to drain and rinse it well before use to reduce the “canned” flavor.
  2. Can I make crab brûlée ahead of time? Yes, you can prepare the custard and bake it ahead of time, but it’s best to add the sugar topping and caramelize it just before serving to keep the crust crisp.
  3. What if I don’t have a kitchen torch? You can use a broiler in your oven to caramelize the sugar. Just be sure to watch it closely to prevent burning.
  4. Can I freeze crab brûlée? Freezing crab brûlée is not recommended, as the texture of the custard may change upon thawing. It’s best served fresh, but leftovers can be stored in the fridge for 1-2 days.
  5. Can I substitute the crab with another seafood? Yes! This recipe works wonderfully with lobster, shrimp, or even scallops for a different seafood experience.

Conclusion

Crab brûlée is a unique, elegant dish that brings together the rich flavors of crab and the delicate sweetness of a crème brûlée. With its velvety custard and crispy sugar topping, this dish is perfect for impressing guests at a dinner party or indulging in a special meal. By following the steps outlined in this recipe, you’ll create a savory masterpiece that combines the best of fine dining with the warmth of home cooking. Whether served for a holiday gathering or as a sophisticated weeknight treat, crab brûlée is sure to become a beloved addition to your recipe collection.