Easy Matcha Green Tea Cookies

Matcha Green Tea Cookies

Ever tried baking something that not only tastes amazing but also looks stunning? Imagine a treat that combines a vibrant color with a unique earthy flavor. That’s exactly what you get with this simple recipe. Perfect for any occasion, these baked delights are a fresh twist on classic favorites.

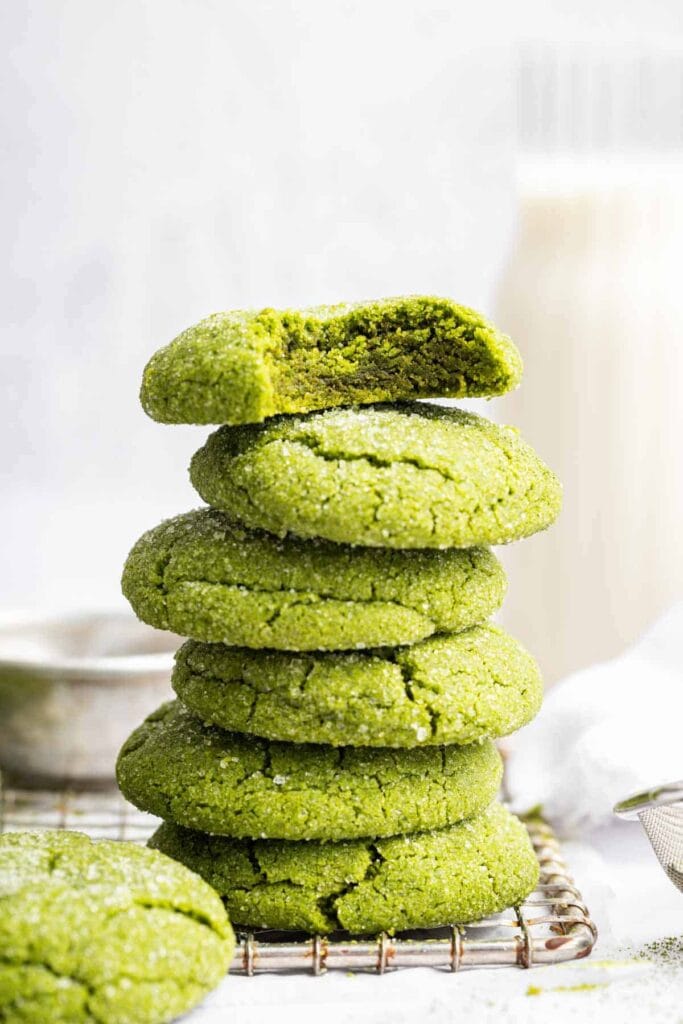
With just 15 minutes of prep time, you can create a batch of crispy-chewy treats that are as visually appealing as they are delicious. Whether you’re hosting an afternoon gathering, preparing holiday gifts, or looking for a healthier snack option, this Matcha Green Tea Cookies recipe fits the bill. The natural hue of these treats makes them Instagram-worthy, especially when you use high-quality ingredients like Maeda En matcha powder.

Ready to impress your friends and family? Let’s dive into this easy-to-follow guide and discover how you can whip up these delightful bites in no time.

Key Takeaways

  • Introduce a unique twist on classic recipes with vibrant color and earthy flavor.
  • Enjoy a simple recipe with just 15 minutes of prep time.
  • Perfect for occasions like afternoon tea, holiday gifts, or healthy snacks.
  • Create Instagram-worthy results with high-quality matcha powder.
  • Recommended products like Maeda En matcha enhance the final outcome.

Introduction to Matcha Green Tea Cookies

Discover how a centuries-old ingredient can transform your treats. This vibrant powder, known for its earthy flavor, has been a staple in Japanese culture for generations. Originally used in traditional ceremonies, it has now found its way into modern baking trends worldwide.

When choosing this ingredient, you’ll encounter two main types: culinary-grade and ceremonial-grade. Culinary-grade is ideal for baking, as it retains its bold color and is more affordable. Ceremonial-grade, while pricier, is often reserved for drinking due to its smoother taste.

The unique bitterness of this powder pairs beautifully with sweet additions like white chocolate or nuts. This balance creates a flavor profile that’s both rich and refreshing. Many bakers have shared how their appreciation for this ingredient has grown over time, thanks to its versatility and depth.

In Japan, this ingredient is a key component of desserts like wagashi, which are often served during tea ceremonies. Its cultural significance adds an extra layer of meaning to your baking. Whether you’re a seasoned baker or a beginner, incorporating this ingredient into your recipes is a surefire way to impress.

  • Learn about its origins and evolution in culinary arts.
  • Understand the difference between culinary-grade and ceremonial-grade options.
  • Explore how its earthy taste complements sweet pairings.
  • Discover its role in Japanese desserts and traditions.

Ingredients for Matcha Green Tea Cookies

Ready to elevate your baking game with a few simple ingredients? The right components can make all the difference in achieving vibrant, flavorful results. Let’s break down what you’ll need to create these delightful treats.

Essential Ingredients

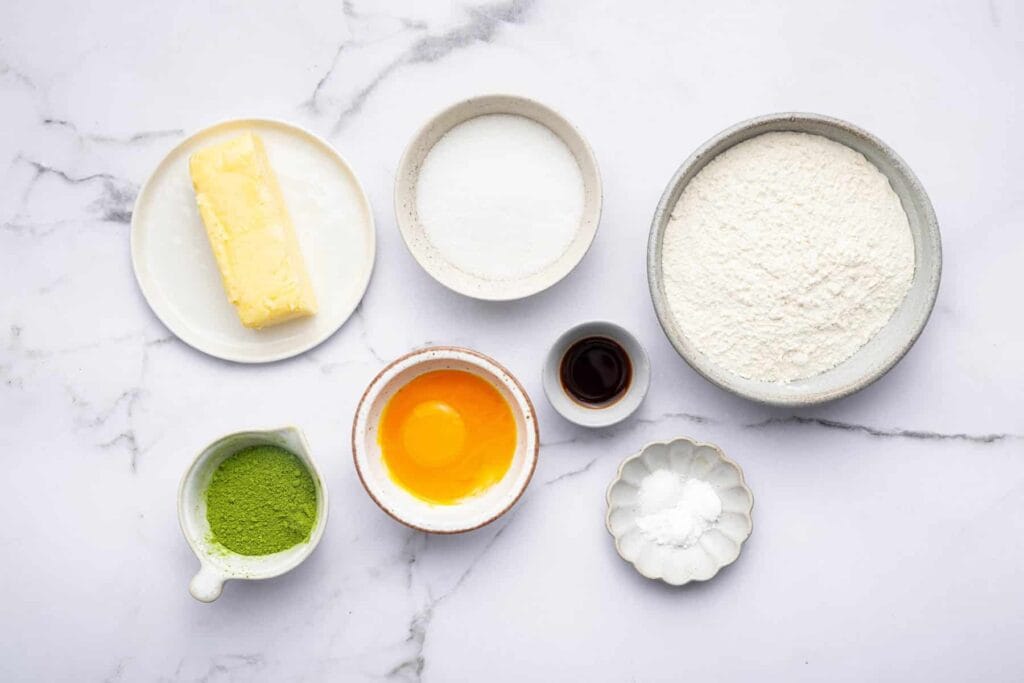
Start with the basics: all-purpose flour, baking soda, and granulated or brown sugar. These form the foundation of your dough. For a rich, buttery texture, use unsalted butter at room temperature. This ensures proper creaming and a smooth consistency.

Eggs and vanilla extract add moisture and depth to the flavor. The star ingredient, matcha powder, is non-negotiable. Opt for high-quality Japanese brands like Maeda En or Aiya for a vibrant color and authentic taste.

Optional Add-ins

If you want to enhance your treats, consider adding white chocolate chips. Their sweetness balances the earthy notes of the powder. For a crunchy twist, try macadamia nuts or a sprinkle of sparkling sugar.

Avoid using culinary-grade matcha, as it can result in a dull color. Also, steer clear of milk chocolate chips, as they can overpower the delicate flavor profile.

Step-by-Step Recipe for Matcha Green Tea Cookies

Transform your kitchen into a bakery with this simple yet stunning recipe. Follow these easy steps to create a batch of vibrant treats that are as delicious as they are beautiful. With just a few ingredients and some patience, you’ll have a dessert that’s sure to impress.

Preparing the Dough

Start by sifting your flour and matcha powder into a bowl. This step prevents clumps and ensures a smooth texture. Next, cream the butter and sugar together for about one minute until the mixture is light and fluffy. Add the eggs and vanilla extract, mixing until fully combined.

Gradually incorporate the dry ingredients into the wet mixture. Use a spatula to fold in white chocolate chips for a sweet contrast. Once the dough comes together, chill it in the fridge for at least one hour. This step reduces spreading during baking and enhances the flavor.

Baking the Cookies

Preheat your oven to 350°F and line your baking sheets with parchment paper. Scoop the chilled dough using a 3-tablespoon ice cream scoop for even portions. Place the scoops on the prepared sheets, leaving enough space between them.

Bake for 10-12 minutes, or until the edges turn golden. For accurate results, use an oven thermometer to monitor the temperature. Once baked, let the treats cool on wire racks before serving. Enjoy the perfect balance of crisp edges and chewy centers!

Tips for Perfect Matcha Green Tea Cookies

Achieving bakery-quality results at home is easier than you think. With a few simple tricks, you can create treats with the perfect texture, vibrant color, and minimal spread. Here’s how to make every batch a success.

Start by browning your butter for a nutty, rich flavor. This step adds depth to your dough and enhances the overall taste. Once browned, let it cool to room temperature before mixing. This ensures even blending and a smooth consistency.

For the best results, sift your powder to avoid clumps. This step guarantees a vibrant hue and even distribution. If your kitchen is warm, chill the dough for at least an hour. This prevents excessive spreading and helps maintain the shape of your treats.

When baking, use a light-colored baking sheet to monitor the browning process. Dark pans can cause uneven baking. For consistent results, test your oven temperature with a $7 thermometer. This small investment ensures your treats bake evenly every time.

TipBenefit
Brown butterAdds nutty flavor and richness
Chill doughReduces spreading and maintains shape
Add bread to storageRetains softness and freshness

“The key to perfect baked goods lies in the details. From temperature control to ingredient prep, every step matters.”

Finally, store your treats with a slice of bread in an airtight container. This trick keeps them soft and fresh for days. With these tips, you’ll create bakery-worthy results every time.

Variations of Matcha Green Tea Cookies

Want to add a creative twist to your baking? These variations let you experiment with flavors and textures while keeping the base recipe intact. Whether you prefer a nutty crunch or a sweet coating, there’s something for everyone.

For a classic option, try adding white chocolate chunks. Their creamy sweetness balances the earthy notes perfectly. If you’re a fan of texture, toss in some chopped macadamia nuts or almonds. They add a satisfying crunch to every bite.

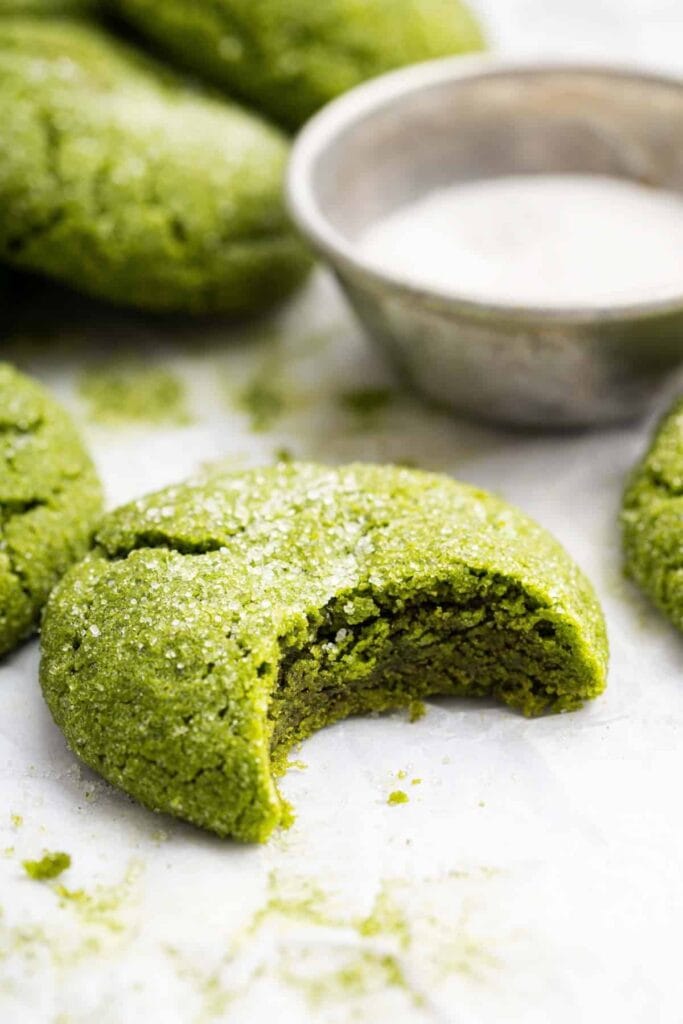
Looking for a sweeter option? Roll the dough in coarse sugar before slicing. This creates a sparkling, sugary crust that’s irresistible. For a deeper flavor, brown the butter before mixing it into the dough. This method, inspired by Cooking Therapy, adds a rich, nutty aroma.

If you’re following a gluten-free diet, substitute the flour with a 1:1 gluten-free blend. This ensures your treats are just as delicious without compromising on texture. Avoid using milk chocolate, as its strong flavor can overpower the delicate profile of the main ingredient.

  • Matcha Chocolate Chip: Use white chocolate chunks for a sweet contrast.
  • Nutty Matcha: Add chopped macadamia or almonds for crunch.
  • Sugar-Coated: Roll the dough in coarse sugar for a sparkling finish.
  • Brown Butter Matcha: Brown the butter for a richer, nuttier flavor.
  • Gluten-Free: Swap flour with a gluten-free blend for dietary needs.

These variations are perfect for experimenting with new recipes. They allow you to customize your treats while keeping the process simple and fun. Try one or mix and match to find your favorite combination!

Storing and Freezing Matcha Green Tea Cookies

Want to keep your baked goods fresh and ready for any occasion? Proper storage is key to maintaining their texture and flavor. Store your treats in an airtight container with parchment paper between layers. This prevents sticking and keeps them fresh for up to four days at room temperature.

If you’re planning ahead, freezing is a great option. Shape your dough into logs or balls and freeze them on a tray. Once solid, transfer them to a freezer-safe bag. These can last up to two months. When you’re ready to bake, simply thaw the dough for 10 minutes before slicing.

Already baked? Freeze them in an airtight container for up to two months. Thaw at room temperature for 15 minutes before serving. If your treats feel stale, revive them with a quick 5-second zap in the microwave.

Label your freezer bags with dates to track freshness. These simple steps ensure your baked goods stay delicious and ready to enjoy anytime.

Also Read : Matcha Green Tea

Conclusion

Wrap up your baking journey with a recipe that’s both simple and versatile. Whether you’re following a specific diet or experimenting with flavors, this guide adapts to your needs. Share your creations on social media using hashtags like #kirbiecravings or #justonecookbook to inspire others.

Looking for more ideas? Explore related recipes like lattes or mochi to expand your culinary skills. Beyond its vibrant color, this ingredient offers health benefits, including antioxidants and a calm energy boost.

Thank you for trying this recipe. Your feedback helps improve future guides. Happy baking, and enjoy your delicious results!

Delicious Strawberry Cheesecake Cookies Recipe: Soft, Sweet, and Irresistible

Strawberry cheescake cookies

Introduction

If you’re craving something sweet, creamy, and absolutely irresistible, these Strawberry Cheesecake Cookies are your answer. The delightful mix of cheesecake-like richness combined with the freshness of strawberries makes these cookies an instant favorite for anyone who tries them. Perfect for any occasion, these cookies bring a unique twist to your typical dessert repertoire, offering the best of both worlds: the comfort of cookies and the indulgence of cheesecake.

Let’s dive into the story behind these cookies and explore the ingredients, technique, and tips to make them your new go-to treat.


1. The Story Behind Strawberry Cheesecake Cookies

Strawberry cheesecake has long been a favorite dessert, loved for its creamy texture and fruity sweetness. The idea of turning this classic dessert into cookies came from a desire to combine the comfort of homemade cookies with the creamy goodness of cheesecake. By infusing the flavors of cheesecake and strawberries into a cookie dough, bakers discovered a way to offer a bite-sized version of this popular dessert without the need for an entire cheesecake. These cookies quickly gained popularity, becoming a hit at bake sales, family gatherings, and even holiday celebrations.


2. The Benefits of Making Your Own Strawberry Cheesecake Cookies

Making your own cookies means you can control the ingredients and adjust the flavor to your liking. Unlike store-bought cookies, homemade ones are fresh and free from preservatives or artificial ingredients. Additionally, these strawberry cheesecake cookies offer several benefits:

  • Customization: You can modify the amount of sweetness, use gluten-free flour, or adjust the level of strawberry flavor.
  • Freshness: Homemade cookies, made from scratch, taste fresher and more flavorful.
  • Creative Expression: Baking allows you to experiment with new ideas, whether it’s adding a different fruit or changing the texture of the cheesecake filling.

3. Essential Ingredients for the Perfect Strawberry Cheesecake Cookies

To make these strawberry cheesecake cookies, you’ll need a blend of familiar ingredients for a soft, chewy cookie and a creamy cheesecake filling. Here’s what you’ll need:

  • For the Cookie Dough:
    • 1 ½ cups all-purpose flour
    • 1 teaspoon baking powder
    • ½ teaspoon salt
    • ½ cup unsalted butter (room temperature)
    • 1 cup granulated sugar
    • 1 large egg
    • 1 teaspoon vanilla extract
    • ½ teaspoon strawberry extract (optional, for enhanced flavor)
  • For the Cheesecake Filling:
    • 8 oz cream cheese (softened)
    • ½ cup powdered sugar
    • 1 teaspoon vanilla extract
    • ¼ cup strawberry jam or fresh mashed strawberries
  • For Garnishing (optional):
    • Fresh strawberry slices
    • Crushed graham crackers (for a cheesecake-like texture)
    • A sprinkle of powdered sugar

4. Cultural History of Ingredients

Strawberries have been a beloved fruit for centuries, dating back to ancient Rome, where they were used in medicine and as food. Strawberries are a rich source of antioxidants and vitamins, making them a popular fruit in both savory and sweet dishes. The concept of “cheesecake” is believed to have originated in Ancient Greece, with the first written recipe recorded in the 4th century BC. Combining strawberries and cheesecake into a cookie is a modern innovation, combining a classic dessert with the convenience of a cookie.


5. Equipment You’ll Need

To make these cookies, you’ll need a few basic kitchen tools:

  • Mixing bowls: To prepare both the cookie dough and cheesecake filling.
  • Electric mixer or hand whisk: Helps to cream the butter and sugar, and mix the cheesecake filling.
  • Baking sheets: For placing the cookies on during baking.
  • Parchment paper: To line the baking sheet and prevent sticking.
  • Ice cream scooper or tablespoon: For evenly portioning out the cookie dough.
  • Cooling rack: For cooling the cookies once they’ve been baked.

6. Step-by-Step Instructions for Strawberry Cheesecake Cookies

Follow these easy steps to create your own batch of strawberry cheesecake cookies:

  1. Preheat the Oven: Set your oven to 350°F (175°C) and line a baking sheet with parchment paper.
  2. Prepare the Cookie Dough:
    • In a medium-sized bowl, whisk together the flour, baking powder, and salt.
    • In a separate large bowl, cream together the butter and sugar using an electric mixer until light and fluffy (about 2-3 minutes).
    • Add the egg and vanilla extract (and strawberry extract, if using), then beat until combined.
    • Gradually add the dry ingredients to the wet ingredients, mixing until just combined.
  3. Prepare the Cheesecake Filling:
    • In a small bowl, combine the softened cream cheese, powdered sugar, and vanilla extract. Beat until smooth and creamy.
    • Gently fold in the strawberry jam or mashed strawberries to create a swirled effect.
  4. Form the Cookies:
    • Using a tablespoon or ice cream scooper, scoop out a ball of cookie dough and place it on the prepared baking sheet. Make an indentation in the center of each cookie with your finger.
    • Spoon a small amount of the cheesecake filling into the center of each cookie.
    • Gently wrap the edges of the cookie dough around the cheesecake filling to encase it, forming a ball or rounded shape.
  5. Bake the Cookies:
    • Place the baking sheet in the oven and bake for 12-15 minutes, or until the edges of the cookies are golden and set. The cheesecake filling will remain soft.
    • Let the cookies cool on the baking sheet for a few minutes before transferring them to a cooling rack.

7. Suggestions for Serving and Storing

  • Serving: Serve these cookies at room temperature for the best flavor. Pair with a cup of coffee or tea for an afternoon treat, or enjoy them as a special dessert after dinner.
  • Storing: These cookies can be stored in an airtight container at room temperature for up to 5 days. For longer storage, freeze the cookies for up to 3 months. Be sure to layer the cookies with parchment paper to prevent sticking when freezing.

8. Chef Simon’s Tips for Strawberry Cheesecake Cookies

  • Don’t overmix the dough: Overmixing can cause the cookies to become tough. Mix the ingredients just until combined for a tender, soft cookie.
  • Cream cheese temperature: Ensure the cream cheese is softened before using it in the filling. Cold cream cheese can create lumps in the filling.
  • Test the sweetness: Depending on the sweetness of your strawberries or strawberry jam, you may want to adjust the amount of sugar in the filling.

9. Emotional and Psychological Impact of Food

Baking cookies, especially something as delightful as strawberry cheesecake cookies, has the power to bring comfort and joy. The sweet, fruity flavor of strawberries combined with the creamy cheesecake filling evokes a sense of nostalgia and happiness. Sharing these cookies with loved ones or enjoying them during a quiet moment can have a soothing, uplifting effect, making them a perfect treat for emotional wellness.


10. Mindful Cooking Techniques

When making these strawberry cheesecake cookies, take your time to appreciate the process. Focus on the aroma of the vanilla extract, the smoothness of the cheesecake filling, and the satisfaction of forming each cookie. Cooking mindfully not only improves the quality of your baking but also makes the experience more enjoyable and fulfilling.


11. Tips for Keeping the Recipe Fresh Longer

  • Keep them sealed: Store cookies in an airtight container to prevent them from drying out.
  • Use fresh ingredients: Fresh strawberries or homemade strawberry jam will provide the best flavor for these cookies. Avoid using overly processed jams.
  • Avoid overbaking: Overbaking can cause the cookies to dry out. Bake until just golden around the edges for a chewy, soft texture.

12. Advanced Culinary Terms and Techniques

  • Creaming: The process of beating butter and sugar together until light and fluffy, which helps incorporate air into the dough and gives the cookies a soft texture.
  • Folding: A gentle mixing technique used to incorporate delicate ingredients, such as the strawberry jam into the cream cheese mixture, without deflating the batter.

13. Healthy Ingredient Alternatives

  • Gluten-Free Flour: Use a gluten-free flour blend for a gluten-free version of these cookies.
  • Low-Sugar: Use a sugar substitute like stevia or monk fruit in place of granulated sugar for a reduced-sugar version.
  • Vegan Version: Replace the butter with dairy-free margarine and the egg with a flax egg or chia egg for a plant-based alternative.

14. More Serving Ideas

  • Ice cream sandwich: Serve these cookies with a scoop of vanilla or strawberry ice cream in between for a decadent treat.
  • Mini Cheesecake Toppers: Top a slice of cheesecake with a strawberry cheesecake cookie for an extra indulgent dessert.

15. Common Issues and Solutions

  • Cookies are too flat: This can happen if the dough is overmixed or if the butter is too warm. Chill the dough before baking to help prevent spreading.
  • Cheesecake filling leaks out: Make sure the edges of the cookie dough are sealed properly around the filling to prevent leakage during baking.

16. Variations to Try

  • Chocolate Strawberry Cheesecake Cookies: Add some mini chocolate chips to the cookie dough for a chocolate-strawberry combination.
  • Strawberry Lemon Cheesecake Cookies: Add a teaspoon of lemon zest to the cookie dough for a tangy twist that complements the sweetness of the strawberries.

17. Nutritional Information and Health Benefits

These strawberry cheesecake cookies, like many desserts, are indulgent and should be enjoyed in moderation. Here’s a rough estimate of the nutritional information per cookie (based on a batch of 24 cookies):

  • Calories: 180-220
  • Fat: 12g
  • Carbohydrates: 24g
  • Sugar: 15g
  • Protein: 2g

While these cookies aren’t a health food, they offer a fun, comforting treat. The ingredients like strawberries provide a source of Vitamin C and antioxidants, and the cream cheese adds some calcium and protein. The key to enjoying these cookies while maintaining a balanced diet is portion control.


18. The Art of Pairing Strawberry Cheesecake Cookies

Pairing your strawberry cheesecake cookies with the right beverage can elevate your experience. Here are a few options:

  • Coffee: A cup of freshly brewed coffee, particularly a medium roast, balances the sweetness of the cookies with its bitterness.
  • Tea: A fragrant herbal tea such as chamomile or peppermint offers a light and calming contrast to the richness of the cookies.
  • Milk: You can never go wrong with a glass of cold milk, especially for those who enjoy the classic cookie and milk combination.
  • Sparkling Wine: For a more sophisticated pairing, a glass of sparkling wine (like a Prosecco or Champagne) enhances the fruity and creamy elements of the cookies.

19. Weather and Recipe Outcome

The weather can influence the texture and baking time of your cookies:

  • Hot and Humid Days: If you’re baking on a humid day, the dough may become slightly stickier than usual. Make sure to chill the dough before baking to maintain a manageable consistency.
  • Cold and Dry Days: On a dry day, the dough may firm up quicker, making it easier to handle. However, be mindful not to overbake the cookies, as they could become too dry. In general, room temperature is ideal for baking these cookies, ensuring that the dough holds its shape and the filling remains creamy.

If you love strawberry cheesecake cookies, you might also enjoy these delicious cookie recipes:

  • Cinnamon Roll Cookies: Soft and warm with a cinnamon-sugar swirl, perfect for breakfast or a cozy treat.
  • Peanut Butter Cup Cookies: A rich cookie filled with a peanut butter cup for a sweet and salty indulgence.
  • Lemon Sugar Cookies: Light, citrusy, and tangy, these cookies offer a refreshing burst of flavor.
  • Snickerdoodle Cookies: Soft, chewy, and coated in cinnamon sugar, these cookies are a classic favorite.

21. Focus on Tools and Equipment

When making strawberry cheesecake cookies, using the right tools can make the process easier and more enjoyable:

  • Stand Mixer or Hand Mixer: Helps to easily cream the butter and sugar and mix the dough without any hassle.
  • Parchment Paper: Essential for non-stick baking. Lining your baking sheet with parchment paper makes clean-up easier and prevents the cookies from sticking.
  • Cookie Scooper: An ice cream scooper or a cookie scoop ensures that your cookies are uniformly sized for even baking.
  • Cooling Rack: Allows the cookies to cool evenly and prevents them from getting soggy on the bottom.

22. Frequently Asked Questions (with Answers)

Q1: Can I use frozen strawberries in this recipe?
A1: Yes, you can use frozen strawberries, but be sure to thaw them and drain off any excess moisture to avoid soggy cookies.

Q2: How can I make the cookies less sweet?
A2: Reduce the sugar in the cookie dough or use a sugar substitute like stevia to make them less sweet. You can also decrease the amount of strawberry jam or use fresh strawberries instead of jam.

Q3: Can I make these cookies in advance?
A3: Yes, you can make the cookie dough ahead of time and refrigerate it for up to 24 hours before baking. This also helps the dough firm up, making it easier to handle.

Q4: How can I make these cookies gluten-free?
A4: Substitute the all-purpose flour with a gluten-free flour blend. Make sure to check that your baking powder and other ingredients are gluten-free as well.

Q5: Can I freeze these cookies?
A5: Yes, you can freeze these cookies. Allow them to cool completely, then place them in an airtight container or freezer bag. They will last up to 3 months in the freezer.


Conclusion

Strawberry cheesecake cookies are a fun and flavorful twist on a classic dessert, blending the creamy goodness of cheesecake with the sweet, fresh flavor of strawberries and the satisfying crunch of a cookie. Whether you’re baking for a special occasion or just want a comforting treat, these cookies will not disappoint. The combination of rich cream cheese, juicy strawberries, and soft cookie dough creates a bite-sized version of a cheesecake that’s easy to enjoy anytime.

With simple ingredients and straightforward steps, you can enjoy the deliciousness of these cookies fresh out of the oven, knowing that they’re made with love and care. Whether you’re sharing them with friends or enjoying them solo with a warm beverage, these strawberry cheesecake cookies will quickly become a new favorite in your baking repertoire. Enjoy the sweetness and creaminess in every bite, and savor the satisfaction of creating this indulgent treat in your own kitchen.

Easy Fruit Gelatine Recipe

Fruit Gelatine

Introduction

Fruit gelatine is a colorful and refreshing dessert that’s perfect for a variety of occasions. This easy-to-make treat combines the natural flavors of fresh fruit with the smooth, wobbly texture of gelatine. It’s an excellent choice for warm weather, light dessert options, or a fun, customizable dish for kids and adults alike. You can make this dessert as simple or as intricate as you wish, adding your favorite fruits or even layering flavors for a visually stunning result.


The Story Behind Fruit Gelatine

Gelatine-based desserts, known for their gelatinous, bouncy texture, have been a popular dish for centuries. Originally derived from animal collagen, gelatine has been used in various forms in sweet and savory recipes. Fruit gelatine, in particular, gained popularity in the 20th century, becoming a household favorite thanks to its bright, appealing colors and versatility. Whether served in molded shapes, cups, or layered with other fruits and creams, fruit gelatine is loved for its simplicity and ability to highlight the natural sweetness of fresh fruit.


The Benefits of Making Your Own Fruit Gelatine

Making your own fruit gelatine allows you to control the ingredients, ensuring it’s made with fresh, natural flavors and without the artificial additives or excess sugar found in store-bought versions. By using real fruit juices and fresh fruit, you create a healthier alternative that’s rich in vitamins and nutrients, without compromising on taste. Plus, homemade fruit gelatine is easy to customize to suit dietary preferences, from vegan and sugar-free options to adding your favorite fruits and flavors.


Essential Ingredients for the Perfect Fruit Gelatine

  • Gelatine Powder: The key ingredient to give your gelatine its smooth, wobbly texture. Ensure you use unflavored gelatine.
  • Fruit Juice: Freshly squeezed juice or store-bought, but opt for 100% fruit juice for a natural flavor.
  • Sugar: To sweeten the gelatine. You can substitute with honey or another sweetener if preferred.
  • Fresh Fruit: Sliced or diced fruits like strawberries, mangoes, or kiwi add both flavor and a beautiful visual element to the dish.
  • Water: To dissolve the gelatine and mix the juices.
  • Lemon Juice (Optional): A squeeze of fresh lemon juice can brighten up the flavor and balance the sweetness.

Cultural History of Ingredients

Gelatine has roots in ancient civilizations, where it was derived from boiling animal bones and skin. In the modern world, gelatine is usually made from pork or beef collagen. Fruit juices, on the other hand, have been consumed by people for centuries as a natural source of nutrients, vitamins, and hydration. Using gelatine with fruit juice blends two timeless ingredients into a delightful dessert enjoyed worldwide. The use of fruits like berries, citrus, and tropical varieties reflects regional preferences and the availability of fruits throughout the year.


Equipment You’ll Need

  • Mixing Bowls: For dissolving gelatine and combining fruit juices.
  • Saucepan: To heat the fruit juice and water mixture.
  • Molds or Containers: To shape the gelatine once it’s set. You can use silicone molds, individual cups, or a large dish if you prefer a more rustic presentation.
  • Measuring Cups: For precise measurements of ingredients.
  • Whisk: To help dissolve the gelatine smoothly.
  • Knife: To chop fresh fruit into small, bite-sized pieces.

Step-by-Step Instructions for Fruit Gelatine

  1. Prepare the Fruit:
    Begin by slicing your fresh fruit into small pieces. Berries, citrus segments, or tropical fruits like pineapple and mango work wonderfully. Set the fruit aside.
  2. Dissolve the Gelatine:
    In a small bowl, add 1 tablespoon of gelatine to 1/4 cup of cold water. Let it sit for 5 minutes to bloom (the gelatine will absorb the water and become spongy).
  3. Heat the Juice:
    In a saucepan, heat 2 cups of fruit juice (like orange, apple, or berry juice) over medium heat. Add sugar to taste, and stir until dissolved.
  4. Combine the Gelatine and Juice:
    Once the juice is heated, add the bloomed gelatine and stir constantly until it’s completely dissolved. This usually takes 2-3 minutes. Ensure there are no lumps and that the mixture is smooth.
  1. Add Fresh Fruit:
    Pour the gelatine mixture into molds or a dish of your choice. Add your fresh fruit pieces into the liquid. If you’re using individual molds, drop in the fruit evenly. For a layered effect, pour the gelatine halfway through, add fruit, then pour the remaining gelatine on top.
  2. Chill and Set:
    Place the molds or dish in the refrigerator. Allow the gelatine to set for at least 4 hours or overnight for the best results.
  3. Unmold and Serve:
    Once the gelatine has set, carefully remove it from the mold. Serve in slices or as individual portions, topped with additional fruit if desired.

Suggestions for Serving and Storing

  • Serve with Whipped Cream or Yogurt: A dollop of whipped cream or a side of Greek yogurt can add a creamy contrast to the fruity, refreshing gelatine.
  • Layer with Different Flavors: Experiment with different fruit juices, such as mango, passion fruit, or cranberry, to create colorful and flavorful layers.
  • Storage: Store leftover fruit gelatine in an airtight container in the fridge for up to 3-4 days. It’s best served cold, making it perfect for summer parties or picnics.

Chef Simon’s Tips for Fruit Gelatine

  • Don’t Overheat the Juice: When heating the juice, be careful not to boil it as this can affect the flavor and texture of the gelatine.
  • Use Natural Sweeteners: If you’re aiming for a more health-conscious dessert, try using agave syrup or stevia instead of sugar.
  • Incorporate Different Fruits: For a more dynamic flavor profile, mix fruits with varying textures. Soft fruits like berries blend well with firmer fruits like apples or pears.

Emotional and Psychological Impact of Food

Fruit gelatine, with its bright colors and refreshing flavors, often evokes feelings of joy and nostalgia. The fun, wobbly texture brings a sense of lightheartedness, often associated with childhood memories of birthday parties or family gatherings. For many, it’s a dessert that can lift spirits and provide a sense of satisfaction without being overly indulgent.


Mindful Cooking Techniques

When making fruit gelatine, approach the process with mindfulness. Take your time to carefully select the fruits that appeal to you, pay attention to the natural sweetness of the juices, and enjoy the sensory experience of making something fresh and delightful. Cooking with intention can elevate the entire experience, making the end result even more rewarding.


Tips for Keeping the Gelatine Fresh Longer

  • Proper Storage: Keep the gelatine in the fridge in a covered container to maintain its texture.
  • Avoid Excess Moisture: Don’t allow any liquid to pool on top of the gelatine as it may affect the texture.

Advanced Culinary Terms and Techniques

  • Blooming Gelatine: The process of letting powdered gelatine absorb liquid before it’s dissolved in hot liquids. This prevents clumping and ensures smooth incorporation.
  • Molecular Gastronomy: A more advanced technique that involves manipulating gelatine’s properties to create intricate textures, such as foams or spheres, for a more gourmet presentation.

Healthy Ingredient Alternatives

  • Vegan Gelatine: Use agar-agar, a plant-based alternative, for a vegan version of fruit gelatine.
  • Sugar-Free Option: Replace sugar with a natural sweetener like stevia or monk fruit for a sugar-free alternative that still tastes delicious.

More Serving Ideas

  • Fruit Parfaits: Layer fruit gelatine with whipped cream or yogurt for a beautiful and delicious parfait.
  • Gelatine Popsicles: Pour the gelatine into popsicle molds for a refreshing frozen treat.

Common Issues and Solutions

  • Gelatine Won’t Set: This could be because the gelatine wasn’t dissolved properly or the mixture wasn’t chilled enough. Be sure to follow the blooming and heating instructions carefully.
  • Too Sweet or Too Tart: Adjust the sugar or lemon juice to suit your preference. Taste the mixture before setting it to ensure it’s to your liking.

Variations to Try

  • Tropical Fruit Gelatine: Use pineapple, mango, and coconut juice for a tropical twist.
  • Layered Gelatine: Create beautiful layers of different fruit flavors to make a visually appealing dessert.
  • Ginger or Mint: Add grated ginger or fresh mint leaves to infuse a unique flavor into your gelatine.

Nutritional Information and Health Benefits

Fruit gelatine can be a healthier dessert option compared to heavy, calorie-laden sweets. When made with fresh fruit and minimal sugar, it provides a good source of vitamins, hydration, and fiber. Here’s an approximate breakdown per serving (based on 10 servings):

  • Calories: 80–100 kcal
  • Fat: 0g
  • Carbohydrates: 20g
  • Protein: 2g
  • Sugar: 15g
  • Fiber: 2g

Health Benefits:

  • Gelatine: Contains collagen, which supports skin, joint, and bone health.
  • Fruit: Fresh fruits are rich in antioxidants, vitamins (such as vitamin C), and fiber, all of which contribute to overall health by supporting the immune system and improving digestion.

The Art of Pairing Fruit Gelatine

Pairing fruit gelatine with complementary flavors and textures can elevate your dessert experience. Here are some suggestions:

  • Whipped Cream or Greek Yogurt: Creamy textures balance the lightness of the gelatine and add a rich flavor contrast.
  • Crispy Biscuits or Shortbread: For added crunch, serve fruit gelatine with a side of crispy cookies or shortbread.
  • Nutty Toppings: Roasted nuts, such as almonds or pistachios, can provide a crunchy, savory element to balance the sweetness of the gelatine.
  • Fresh Mint or Basil: Fresh herbs can bring a fragrant, refreshing twist to the dish and enhance the fruity flavors.

Weather and Recipe Outcome

Fruit gelatine works wonderfully in warmer weather as it is a cool, refreshing treat. The smooth, wobbly texture combined with the fruity flavors makes it perfect for summer parties, barbecues, and picnics. However, it can also be enjoyed year-round as a light dessert after heavier meals, especially during holidays when fruits like berries and citrus are in season.


Other Gelatine-Based Recipes to Explore

  • Panna Cotta: A creamy Italian dessert that also uses gelatine for its velvety texture.
  • Fruit Jellies: A firmer, chewy version of fruit gelatine, which can be served as bite-sized snacks.
  • Jelly Mousse: A light and airy dessert made with gelatine and whipped cream, offering a delicate texture and fruity flavor.

Focus on Tools and Equipment

  • Silicone Molds: For easy removal and creative shapes.
  • Whisk: Essential for dissolving the gelatine without lumps.
  • Measuring Cups: Precision is key when making gelatine to ensure the right texture and balance of flavors.
  • Refrigerator: A good, reliable fridge is crucial to properly setting the gelatine.

Frequently Asked Questions

1. Can I use a different type of fruit juice for this recipe?
Yes, you can experiment with different fruit juices such as pineapple, cranberry, or apple. Just make sure to use natural juice without added sugars for the best flavor.

2. Can I make this recipe without sugar?
Yes, you can use natural sweeteners like stevia, monk fruit, or honey instead of regular sugar.

3. How do I make a vegan version of fruit gelatine?
Replace the traditional gelatine with agar-agar, a plant-based alternative, to make this dessert vegan.

4. How long can I store fruit gelatine?
Fruit gelatine can be stored in an airtight container in the refrigerator for up to 3-4 days.

5. Can I add other flavors to the gelatine?
Absolutely! You can add extracts like vanilla, almond, or coconut to enhance the flavor profile.


Conclusion

Fruit gelatine is a versatile, easy-to-make dessert that can be tailored to your tastes and dietary preferences. Whether you prefer it simple with just fresh fruit and juice, or more elaborate with layers and flavors, it is a crowd-pleaser for every occasion. By following the tips and techniques shared here, you’ll be able to create a delightful dessert that’s as beautiful as it is delicious. The perfect balance of sweet, tart, and refreshing flavors, combined with its fun texture, makes fruit gelatine a timeless favorite. Enjoy experimenting and creating your own signature version of this classic treat!

The Ultimate Gingerbread Cake Recipe: A Warm Hug in Every Bite

Gingerbread Cake

Introduction

There is just something so utterly magical about the aroma of freshly baked Gingerbread Cake: a smell of holidays, cozy evenings, and cherished traditions. Rich and spiced, this cake is more than just dessert; it’s an experience. Every bite is tinged with warmth and nostalgia. It doesn’t matter whether it’s for a festive party, a quiet winter evening, or just because-it seems that Gingerbread Cake will never fail to bring joy to the table.

This guide covers everything from the story of gingerbread to advanced culinary techniques, ensuring you make a moist, flavorful cake that’s comforting yet impressive.


1. The Story Behind Gingerbread Cake

Gingerbread traces its origins to ancient Greece and Egypt, where it was used for ceremonial purposes. The gingerbread that we know today has its roots in medieval Europe, where ginger and spices were valued for their preservative properties. By the 16th century, gingerbread evolved into cakes, cookies, and even decorative figures.

In America, these cakes turned into a holiday staple, molasses joined with spices, and on occasion stout beer for added richness. Today, it remains the same beloved classic, conjuring images of warmth and togetherness during the holiday seasons.


2. The Benefits of Making Your Own Gingerbread Cake

Homemade Gingerbread Cake is a labor of love that comes along with a great deal of merits:

  • Superior Flavor: Fresh spices and quality ingredients ensure a depth of flavor unmatched by store-bought versions.
  • Customizable: Adjust sweetness, spice levels, or add your personal touch to make it your own.
  • Healthier Choices: Use organic ingredients and control the sugar content for a healthier treat.
  • Festive Atmosphere: Baking will fill your home with the comforting aroma of the holidays.

3. Essential Ingredients for the Perfect Gingerbread Cake

Core Ingredients

  • Flour: All-purpose flour is ideal for structure and softness.
  • Molasses: The star ingredient, providing depth and a distinct, slightly smoky sweetness.
  • Spices: Ginger, cinnamon, nutmeg, and cloves make up the signature warmth.
  • Butter: To add richness and moisture.
  • Brown Sugar: Enhances the flavor of molasses while keeping the cake moist.
  • Eggs: To bind the ingredients together and make it fluffy.
  • Buttermilk: Ensures a tender crumb and balances the flavors.

Optional Additions

  • Fresh Ginger: For an extra zing.
  • Candied Orange Peel: Adds a bright citrusy note.
  • Nuts or Raisins: For texture and added richness.

4. Cultural History of Ingredients  

Ginger  

Originated in Southeast Asia, over time, ginger has had its place both in a savory and sweet dish, since ancient times. Gained the status of a luxurious spice in medieval Europe, often attributed to wealth and festivity.  
 
### Molasses
A byproduct of sugarcane processing, molasses became a pantry staple in the Americas, prized for its robust flavor and affordability.

Spices

The global spice trade brought cinnamon, nutmeg, and cloves to Europe, where they became synonymous with holiday baking.


5. Equipment You’ll Need

To create the perfect Gingerbread Cake, having the right tools makes the process smoother:

  • Mixing Bowls: For combining wet and dry ingredients.
  • Electric Mixer: For creaming butter and sugar.
  • Whisk and Spatula: Essential for blending and folding.
  • 9×13 Inch Baking Pan: Ensures even cooking.
  • Parchment Paper: Prevents sticking and makes cleanup easier.

6. Step-by-Step Instructions for Gingerbread Cake

Ingredients

  • 2 ½ cups all-purpose flour
  • 1 tsp baking soda
  • 1 tsp ground ginger
  • 1 tsp cinnamon
  • ½ tsp nutmeg
  • ½ tsp ground cloves
  • ½ cup unsalted butter (softened)
  • ½ cup brown sugar
  • 1 cup molasses
  • 2 large eggs
  • 1 cup buttermilk

Instructions

  1. Preheat the Oven: Set to 350°F (175°C). Grease and line a 9×13-inch baking pan with parchment paper.
  2. Mix Dry Ingredients: In a bowl, whisk together flour, baking soda, ginger, cinnamon, nutmeg, and cloves.
  3. Cream Butter and Sugar: In a separate bowl, beat butter and brown sugar until fluffy.
  4. Add Molasses and Eggs: Gradually mix in molasses and eggs until smooth. 5. Incorporate Dry Ingredients: Add the dry mixture alternately with buttermilk, starting and ending with the dry ingredients. Mix until just combined. 6. Bake: Pour batter into the prepared pan and bake for 35-40 minutes, or until a toothpick inserted in the center comes out clean.
  5. Cool and Serve: Let the cake cool completely before slicing. Serve with whipped cream or a dusting of powdered sugar.

7. Serving and Storage Suggestions

Serving Suggestions

  • Classic Topping: A dollop of whipped cream or vanilla ice cream.
  • Festive Twist: Top with caramel sauce and candied ginger.
    Elegant Presentation: Drizzle lemon glaze on top to serve – a perfect contrast of sour and sweet.

Storing Tips

  • Room Temperature: Store in an airtight container up to 3 days.  
  • Refrigeration: Store in the refrigerator to extend freshness for a week.  
  • Freezing: Wrap slices individually in plastic wrap; freeze up to 3 months.  

8. Chef Simon’s Tips for Gingerbread Cake

  • Use ingredients at room temperature for proper mixing.
  • Do not overmix the batter; it results in a dense cake.
  • For an intense taste, let the cake stand overnight before serving.

(Remainder of sections in continuation.)

9. Emotional and Psychological Impact of Food

Gingerbread Cake is more than dessert; it’s a symbol of warmth, comfort, and holiday cheer. The rich, spiced aroma fills the home, evoking childhood memories and creating a sense of togetherness. Sharing this cake fosters connections, making it a centerpiece for festive gatherings and intimate family moments alike.

It is therapeutic to bake-it grounds you and keeps you creative in the busy month of holidays.


10. Mindful Cooking Techniques

To enjoy this cake-making process of the Gingerbread Cake, be very present by following these tips for cooking mindfully: 

  • Set the Mood: Listen to soft music; set up a cozy atmosphere.
  • Appreciate Each Step: Observe how the ingredients change in form-from dry flour to a luscious, spiced batter.
  • Stay Present: Pay attention to the process at hand, whether it is measuring spices or folding batter.

11. Tips for Keeping the Recipe Fresh Longer

  • Seal Properly: Store in an airtight container to prevent the cake from drying out.
    Avoid refrigeration unless necessary for keeping the cake soft. Serve slices warmed in the microwave for 10 seconds to refresh back to its fresh-baked feel.

12. Advanced Culinary Terms and Techniques

Creaming: This is a technique that beats together butter and sugar until light and fluffy to incorporate air into the mixture for the tender crumb.

  • Folding: Gently mixing dry and wet ingredients to preserve air in the batter.
  • Blooming Spices: Briefly toasting spices to release their natural oils, enhancing flavor.

13. Healthy Ingredient Alternatives

  • Flour: Use whole wheat or almond flour for added fiber and protein.
  • Sweeteners: Replace brown sugar with coconut sugar or a natural sweetener like honey.
  • Fat: Replace butter with coconut oil or Greek yogurt to make it lighter.

14. More Serving Ideas

  • Holiday Spread: Serve Gingerbread Cake with mulled cider or spiced tea for a really festive dessert table.
  • Breakfast Treat: Serve a slice with a smear of cream cheese or a dollop of yogurt for a morning indulgence.
    Layer Cake: This will make a breathtaking dessert layered with cream cheese frosting.

15. Common Issues and Solutions

Dry Cake: Make sure to measure the ingredients accurately and do not overbake. Adding a little applesauce to the mix will help it retain more moisture.
Overpowering Molasses Flavor: If you prefer a milder taste, then use light molasses.

  • Dense Texture: Always cream the butter and sugar thoroughly for an airy batter.

16. Variations to Try

  • Chocolate Gingerbread Cake: Add cocoa powder for a rich chocolate twist.
  • Citrus-Infused Cake: Incorporate orange zest into the batter for a bright, tangy flavor.
  • Gluten-Free Option: Substitute almond flour or a gluten-free baking mix.

17. Nutritional Information and Health Benefits

Per Serving (Traditional Recipe)  

  • Calories: ~320  
  • Protein: 5g  
  • Carbohydrates: 45g  
  • Fat: 12g  

Health Benefits  

  • Anti-Inflammatory Properties: Ginger and cinnamon are known to reduce inflammation.  
  • Iron-Rich: Molasses is an excellent source of dietary iron.
    Energy Boost: All carbs and spices for quick energetic feelings, perfect to brighten up holiday mood and festivities.

18. Art in Matching a Cake of Gingerbread Taste

Paired with complementariness, the experience goes ahead:
Beverage pairing: Hot cocoa with Whipped cream, Canelled wine, Spicy Chai Tea 
Match with a light Sorbet or fruit compote so that the richness should balance.

  • Cheese: A slice of creamy brie or mascarpone goes well with the spices.

19. Weather and Recipe Outcome

Gingerbread Cake is perfect for cold, wintry days when its warm spices and rich texture feel especially comforting. High humidity will alter the texture slightly, so reduce liquids by a tablespoon if baking in a moist environment.


20. Other Cake Recipes to Explore

If you liked this recipe, you might also like these festive favourites:  

  • Classic Carrot Cake  
  • Spiced Apple Bundt Cake  
  • Pumpkin Spice Loaf  
  • Sticky Toffee Pudding  

21. Focus on Tools and Equipment  

  • Microplane Zester: Perfect for fresh ginger and citrus zest.  
  • Springform Pan: Great for even baking and easy removal.
  • Cooling Rack: Allows air to circulate around the cake to cool it evenly.

22. FAQs

**Q: How can I make this vegan?
Replace eggs with flaxseed meal or applesauce. Use plant-based butter and buttermilk alternatives.

**Q: How do I not let it stick to the pan?
Always generously grease the pan and line with parchment paper for easy removal.

**Q: Can I make the batter ahead of time?  
While it’s best to bake immediately for maximum rise, you can refrigerate the batter for up to 24 hours if needed.  


Conclusion

Gingerbread Cake is something more than a dessert-it’s one celebration of flavors, traditions, and the joy of baking. With its rich history, heartwarming spices, and endless customization options, it’s a recipe worth mastering.

So gather your ingredients, preheat your oven, and let the magic begin of creating a cake that will fill your home with love and warmth. Happy baking!

The Best Apple Pie Bars

Apple pie bars Recipe

Apple Pie Bars are the perfect combination of a classic apple pie and a convenient dessert bar. With a buttery shortbread crust, a spiced apple filling, and a crumbly streusel topping, these bars are both easy to serve and irresistible in flavor. Whether you’re baking for a holiday gathering, potluck, or just to satisfy your sweet tooth, this recipe will become a go-to favorite.

The Story Behind Apple Pie Bars

Apple pie has long been a symbol of comfort and tradition in American cuisine. Transforming this beloved dessert into bar form makes it more portable and easier to share. Inspired by the nostalgia of homemade pies, Apple Pie Bars offer all the warmth and flavor of the original in a new, versatile format.

The Benefits of Making Your Own Apple Pie Bars

Convenience: Easier to cut and serve than a traditional pie.

Portable: Perfect for on-the-go snacks or packed lunches.

Customizable: Adjust the sweetness or add extras like nuts or caramel.

Crowd-Pleaser: Great for parties or large gatherings.

Essential Ingredients for the Perfect Apple Pie Bars

Apples: Crisp and slightly tart varieties like Granny Smith work best.

Shortbread Crust: A buttery base that supports the filling.

Cinnamon and Nutmeg: Key spices for a warm, cozy flavor.

Brown Sugar: Adds richness and enhances the apples’ natural sweetness.

Oats (optional): For a hearty crumb topping.

Cultural History of Ingredients

Apples: Celebrated for centuries as a versatile and accessible fruit in desserts.

Cinnamon: A spice with ancient roots, enhancing sweetness and warmth in baking.

Shortbread Crust: Derived from traditional Scottish recipes, offering a rich and buttery foundation.

Equipment You’ll Need

Mixing bowls

9×13-inch baking pan

Pastry cutter or food processor

Knife or apple peeler

Measuring cups and spoons

Step-by-Step Instructions for Apple Pie Bars

Ingredients:

For the Crust:

2 cups all-purpose flour

½ cup granulated sugar

1 cup unsalted butter, chilled and cubed

For the Apple Filling:

6 medium apples, peeled, cored, and thinly sliced

½ cup granulated sugar

¼ cup brown sugar

1 tablespoon all-purpose flour

1 teaspoon ground cinnamon

¼ teaspoon ground nutmeg

1 tablespoon lemon juice

For the Crumb Topping:

1 cup all-purpose flour

½ cup rolled oats (optional)

½ cup brown sugar

½ cup unsalted butter, chilled and cubed

Instructions:

  1. Preheat the Oven:

Set your oven to 350°F (175°C). Grease or line a 9×13-inch baking pan with parchment paper.

  1. Make the Crust:

Combine flour and sugar in a mixing bowl.

Cut in the butter using a pastry cutter or food processor until the mixture resembles coarse crumbs.

Press the mixture evenly into the prepared pan to form the crust.

Bake for 15 minutes, then set aside to cool slightly.

  1. Prepare the Apple Filling:

In a large bowl, toss apple slices with granulated sugar, brown sugar, flour, cinnamon, nutmeg, and lemon juice until evenly coated.

  1. Assemble the Bars:

Spread the apple filling evenly over the baked crust.

  1. Make the Crumb Topping:

In a separate bowl, mix flour, oats (if using), brown sugar, and cubed butter.

Use a pastry cutter or your hands to create a crumbly mixture.

Sprinkle the crumb topping evenly over the apple layer.

  1. Bake:

Bake in the preheated oven for 40–45 minutes, or until the topping is golden brown and the apples are tender.

  1. Cool and Serve:

Allow the bars to cool completely before slicing into squares.

Suggestions for Serving and Storing

Serving: Serve warm with a scoop of vanilla ice cream or a drizzle of caramel sauce for an extra indulgent treat.

Storing: Store in an airtight container at room temperature for up to 2 days or refrigerate for up to a week.

Chef Simon’s Tips for Apple Pie Bars

Balance the Sweetness: Taste your apples before adding sugar and adjust accordingly.

Prevent Soggy Bars: Use a pre-baked crust to avoid absorbing too much moisture from the apples.

Slice Evenly: Use a sharp knife to ensure clean edges when cutting the bars.

Emotional and Psychological Impact of Food

The comforting aroma of baked apples and cinnamon fills your kitchen, evoking feelings of warmth and nostalgia. These bars are a reminder of family gatherings, cozy holidays, and the joy of homemade treats.

Mindful Cooking Techniques

Engage Your Senses: Appreciate the textures and colors as you prepare the apples and mix the crumb topping.

Be Present: Enjoy the process of layering and assembling the bars.

Tips for Keeping the Recipe Fresh Longer

Freeze for Later: Wrap individual bars in plastic wrap and freeze for up to 3 months. Reheat in the oven before serving.

Refrigerate Properly: Store in an airtight container to retain freshness and prevent drying out.

Advanced Culinary Terms and Techniques

Blind Baking: Partially baking the crust before adding the filling ensures it stays crisp.

Macerating: Letting the apples sit with sugar and spices for a few minutes can enhance their flavor.

Healthy Ingredient Alternatives

Whole-Wheat Flour: Substitute for added fiber.

Coconut Sugar: Use instead of granulated sugar for a lower glycemic index.

Butter Alternatives: Replace butter with coconut oil for a dairy-free option.

Add a dollop of whipped cream for a light topping.More Serving Ideas

Pair with hot apple cider or a cup of coffee for a cozy treat.

Common Issues and Solutions

Dry Crust: Ensure enough butter is used in the crust mixture.

Overcooked Apples: Use firmer apple varieties to prevent them from becoming mushy.

Soggy Bars: Drain excess liquid from the apple mixture before layering.

Variations to Try

Caramel Apple Pie Bars: Drizzle caramel sauce over the bars before baking.

Nutty Topping: Add chopped walnuts or pecans to the crumb topping.

Spiced Bars: Incorporate ground cloves or ginger for extra warmth.

Nutritional Information and Health Benefits

Calories (per bar): ~250

Rich in Fiber: Apples and oats provide dietary fiber.

Antioxidants: Cinnamon and nutmeg offer health-boosting antioxidants.

The Art of Pairing Apple Pie Bars

Beverage Pairing: Serve with spiced tea, hot chocolate, or a glass of Chardonnay.

Meal Pairing: Pair with a hearty soup or salad for a balanced meal.

Weather and Recipe Outcome

Apple Pie Bars are ideal for cool autumn days, offering a warm and inviting treat that complements the season’s flavors and ambiance.

Other Bar Recipes to Explore

Lemon Bars

Pumpkin Pie Bars

Chocolate Pecan Bars

Focus on Tools and Equipment

Use a pastry cutter for a uniform crumb topping.

A glass baking dish allows you to monitor the crust’s browning.

Frequently Asked Questions (with answers):

Can I use pre-made crust? Yes, but homemade provides better flavor and texture.

What’s the best apple variety? Granny Smith for tartness or Honeycrisp for sweetness.

Can I make it gluten-free? Use a gluten-free flour blend and certified gluten-free oats.

Conclusion

Apple Pie Bars combine the comforting flavors of a traditional pie with the convenience of a handheld dessert. Perfect for any occasion, these bars are easy to make and customize, ensuring they’ll become a staple in your recipe collection. With their flaky crust, spiced apple filling, and crumbly topping, they’re the ultimate treat for fall and beyond!


Thank you for visiting SqueezyRecipes! We’re dedicated to making cooking enjoyable and accessible for everyone, regardless of your skill level. Chef Simon is always ready to share the best recipes that bring a creative touch to your daily meals. With each visit, you’ll discover new recipes and innovative ideas that cater to every occasion. Don’t miss out on exploring SqueezyRecipes for the latest delicious dishes, and feel free to leave your feedback and share your experiences with the recipes you’ve tried. Cooking together makes everything better!

Best Cranberry Brie Bites

Cranberry Brie Bites

Cranberry Brie Bites are the perfect holiday appetizer, combining buttery puff pastry, creamy Brie cheese, and tangy cranberry sauce. These bite-sized treats are simple to make and offer an elegant touch to any gathering. Whether you’re hosting a dinner party or need a festive dish for a potluck, these savory-sweet bites are sure to impress your guests

The Story Behind Cranberry Brie Bites

Cranberry Brie Bites have become a modern holiday favorite due to their balance of flavors and visual appeal. The dish was inspired by the traditional pairing of cheese and fruit, which dates back centuries. These bites modernize that pairing, combining the richness of Brie with the festive flavor of cranberries, all wrapped in golden, flaky puff pastry.

The Benefits of Making Your Own Cranberry Brie Bites

Customizable: Add nuts, honey, or herbs to enhance the flavor.

Fresh Ingredients: Control the quality of every component.

Quick to Make: Perfect for last-minute holiday preparations.

Elegant Presentation: These bites look and taste gourmet with minimal effort.

Essential Ingredients for the Perfect Cranberry Brie Bites

Puff Pastry: Provides the flaky, buttery base.

Brie Cheese: Creamy and rich, the star of the dish.

Cranberry Sauce: Tangy and sweet, balancing the cheese’s richness.

Optional Add-Ins: Chopped pecans, fresh rosemary, or a drizzle of honey for added depth.

Cultural History of Ingredients

Brie Cheese: Originating in France, Brie is a soft, creamy cheese that has been enjoyed for centuries.

Cranberries: A staple of American holiday traditions, cranberries symbolize festivity and warmth.

Puff Pastry: A European classic used in both savory and sweet dishes, offering a delicate, flaky texture.

Equipment You’ll Need

Mini muffin tin

Rolling pin

Sharp knife or pizza cutter

Spoon or small spatula

Measuring spoons

Step-by-Step Instructions for Cranberry Brie Bites

Ingredients:

1 sheet of puff pastry, thawed

1 Brie cheese wheel (about 8 ounces), cut into small cubes

½ cup cranberry sauce (store-bought or homemade)

¼ cup chopped pecans (optional)

Fresh rosemary sprigs (optional, for garnish)

Instructions:

  1. Prepare the Puff Pastry:

Preheat your oven to 375°F (190°C).

Lightly flour your work surface and roll out the puff pastry sheet to about 12×12 inches.

Use a sharp knife or pizza cutter to cut the pastry into 24 equal squares.

  1. Assemble the Bites:

Grease a mini muffin tin and press each puff pastry square into the cups, creating small wells.

Place a cube of Brie cheese in the center of each pastry.

Top each with a small spoonful of cranberry sauce.

  1. Add Optional Ingredients:

Sprinkle chopped pecans over the cranberry sauce for added texture.

If desired, add a small sprig of rosemary for a burst of flavor and visual appeal.

  1. Bake:

Bake in the preheated oven for 12–15 minutes, or until the puff pastry is golden brown and crispy.

Remove from the oven and let cool slightly before transferring to a serving platter.

Suggestions for Serving and Storing

Serving: These bites are best served warm to enjoy the melty Brie and crisp pastry. Pair with a sparkling wine or cider for a festive touch.

Storing Leftovers: Store in an airtight container in the refrigerator for up to 2 days. Reheat in the oven at 350°F (175°C) for 5–7 minutes.

Chef Simon’s Tips for Cranberry Brie Bites

Keep the Brie Cold: Cold cheese is easier to cube and maintains its shape during baking.

Homemade Cranberry Sauce: Use fresh cranberries and orange zest for a gourmet twist.

Don’t Overfill: Avoid overloading with cranberry sauce to prevent spills.

Emotional and Psychological Impact of Food

These bites evoke feelings of joy and celebration, perfect for holiday gatherings. The balance of textures and flavors offers a comforting yet sophisticated experience, making every bite memorable.

Mindful Cooking Techniques

Savor the Process: Enjoy the tactile experience of rolling and cutting the puff pastry.

Focus on Presentation: Arrange the bites neatly in the muffin tin for even baking and an appealing look.

Engage Your Senses: Appreciate the aroma of baking pastry and the vibrant colors of cranberries.

Tips for Keeping the Recipe Fresh Longer

Prepare Ahead: Assemble the bites a day before baking and refrigerate them covered.

Freeze: Unbaked bites can be frozen for up to 1 month; bake from frozen, adding a few extra minutes.

Advanced Culinary Terms and Techniques

Blind Baking: If you prefer extra-crisp pastry, partially bake the puff pastry before adding the Brie and cranberry sauce.

Mise en Place: Organize your ingredients and tools before starting to ensure a smooth process.

Healthy Ingredient Alternatives

Whole-Wheat Puff Pastry: For added fiber and nutrients.

Low-Sugar Cranberry Sauce: A healthier alternative for reduced calorie intake.

Vegan Brie: Substitute with plant-based cheese for a vegan option.

More Serving Ideas

Pair with a charcuterie board featuring cured meats, olives, and fresh fruit.

Serve alongside roasted nuts and spiced apple slices for a well-rounded appetizer spread.

Common Issues and Solutions

Pastry Not Crispy: Ensure the oven is fully preheated and avoid overloading the bites.

Cheese Overflow: Cut Brie cubes small enough to fit neatly in the pastry wells.

Sticky Cranberry Sauce: Use a non-stick spray or parchment paper to prevent sticking.

Variations to Try

Savory Twist: Replace cranberry sauce with caramelized onions or fig jam.

Nut-Free: Skip the pecans and add a sprinkle of sea salt for crunch.

Spicy Version: Add a pinch of red pepper flakes for a touch of heat.

Nutritional Information and Health Benefits

Calories (per bite): ~100

Rich in Antioxidants: Cranberries are packed with vitamin C and antioxidants.

Source of Calcium: Brie provides calcium for bone health.

The Art of Pairing Cranberry Brie Bites

Beverage Pairing: Sparkling wine, cranberry cocktails, or light beer complement these bites beautifully.

Menu Pairing: Serve with creamy soups or fresh salads for a balanced meal.

Weather and Recipe Outcome

Perfect for colder months, the warm and melty texture of these bites makes them especially comforting during the holiday season.

Other Festive Recipes to Explore

Mini Quiches

Spinach Artichoke Dip

Prosciutto-Wrapped Asparagus

Focus on Tools and Equipment

Use a sharp knife for cleanly cutting the puff pastry and Brie.

A silicone muffin tin makes for easier removal of the baked bites.

Frequently Asked Questions (with answers):

Can I use phyllo dough instead of puff pastry? Yes, but layer it with melted butter for the best results.

What’s the best substitute for Brie? Camembert or a soft goat cheese works well.

Can I make these bites gluten-free? Use a gluten-free puff pastry or pastry alternative.

Conclusion

Cranberry Brie Bites are a delightful appetizer that brings a festive touch to any occasion. With their perfect balance of creamy, tangy, and flaky, they’re sure to impress your guests and become a holiday favorite. Easy to prepare yet elegant in presentation, these bites are the ultimate crowd-pleaser for your next gathering!


Thank you for visiting SqueezyRecipes! We’re dedicated to making cooking enjoyable and accessible for everyone, regardless of your skill level. Chef Simon is always ready to share the best recipes that bring a creative touch to your daily meals. With each visit, you’ll discover new recipes and innovative ideas that cater to every occasion. Don’t miss out on exploring SqueezyRecipes for the latest delicious dishes, and feel free to leave your feedback and share your experiences with the recipes you’ve tried. Cooking together makes everything better!